Access

CTX-Blog

powered by Ecki's Place

July 12th, 2008

AAC Tuning, Teil 4AAC tuning, part 4

Die Optik eines AAC Logon Points ist leider nicht so leicht an die CI einer Firma anpassbar, wie die des Citrix Web Interfaces. Wie es trotz fehlender Assistenten geht, möchte ich in dem folgenden PDF zeigen.

Das HowTo steht, der besseren Lesbarkeit wegen, als PDF zum Download zur Verfügung. Es kann hier heruntergeladen werden: AAC4_5_CustomizeLogonPoint_Rev1.1_DE.pdf

Das PDF beschreibt in detaillierten und bebilderten Einzelschritten den Weg zu einem individuellen AAC LogonPoint. Dieser könnte dann z. B. so aussehen:
Angepasster LogonPoint - LoginAngepasster LogonPoint - Portal

Weitere lesenswerte Dokumentationen zur Anpassung eines AAC LogonPoints finden sich hier:

Und hier noch ein aktuell interessanter Artikel zu FireFox 3.0:

Gruss
Ecki

To adjust the look of an AAC LogonPoint at the CI of a company is not as easy as it is with a Citrix Web Interface deployment. In the following PDF i will show you a way to get there anyway.

The howto is written in german. A translation into english is not available at the moment. Since the pdf utilizes a lot of pictures, you might be able to understand it anyway. As soon as i find the time, i will provide a translated version. Until then, you can download the german version here: AAC4_5_CustomizeLogonPoint_Rev1.1_DE.pdf

This is, what your LogonPoint could look like after reading this document:
Angepasster LogonPoint - LoginAngepasster LogonPoint - Portal

Additional documentation about customizing an AAC LogonPoint can be found here:

And here you can find a currently very interesting article about AAC and FireFox 3.0:

Regards
Ecki

June 18th, 2008

IE Kiosk Mode IE kiosk mode

Ich musste gerade bei einem Kunden dafür sorgen, dass der Internet Explorer ohne Navigationsleisten und sonstige Benutzerschnittstellen startet, um eine browserbasierte Applikation zum SmartCard Rollout zu veröffentlichen. Die Suche nach einer Lösung gestaltete sich hierbei schwieriger als erwartet.

Der häufigste Ansatz, den Google bei einer entsprechenden Anfrage ausspuckte, war der eingebaute “Kiosk Mode” des Internet Explorers. Der Modus wird durch den Aufruf des IE mit dem Parameter -k aktiviert, s. http://support.microsoft.com/kb/154780. Dieser Modus versetzt den IE in den Vollbild Modus, blendet aber, im Gegensatz zum Tastendruck F11, die Symbolleisten komplett aus. Ein Beenden des IE ist dann nur noch über Alt. + F4 möglich und auch die sonstige Bedienung beschränkt sich ausschliesslich auf Tastenkürzel. Eine eher endkundenuntaugliche Variante 🙁

Der nächste Ansatz waren Microsoft Group Policies, aber auch hier gab es zu viele Einschränkungen und Probleme. So lassen sich die Symbolleisten des IE nicht komplett per Policy ausblenden, sondern nur einzelne Icons, was wiederum Anpassungen in der Registry unter HKCU notwendig gemacht hätte, um die Symbolleisten komplett zu entfernen. Hier gehen die ansonsten ausufernden IE Policies eindeutig nicht weit genug 🙁

Die Lösung kam in Form einen VBS Objekts. Der Internet Explorer lässt sich über VBS ansprechen und steuern. Dies gab mir die Möglichkeit, auch das Erscheinungsbild des Browsers soweit anzupassen, dass sämtliche Steuerelemente ausgeblendet werden können, ohne wichtige Funktionen zu beeinträchtigen. Mit dem folgenden Code lässt sich nun ein IE mit einer vordefinierten URL starten und ein Ausbruch aus dieser Umgebung ist deutlich erschwert 🙂

DIM IE
Set IE = CreateObject("InternetExplorer.Application")
IE.Navigate "http://das.ist.die.anzuzeigende.url"
IE.Visible=True
IE.Toolbar=no
IE.Menubar=no
IE.Statusbar=no
IE.Width=750
IE.Height=600
IE.Resizable=yes
'IE.Top=5
'IE.Left=5

Auf den Eintrag IE.Navigate folgt hierbei die aufzurufende URL, wobei die gesamte URL in Anführungszeichen gesetzt sein muss. Optionale Parameter sind die Fenstergrösse (IE.Width/IE.Height) und die Position des Fensters auf dem Desktop (IE.Top/IE.Left).

IE Kiosk Mode

Das Script funktioniert sowohl unter Windows XP als auch 2003 Server problemlos. Unter Vista und 2008 Server sind Administrator Rechte notwendig, um den gewünschten Effekt zu erzielen!

Gruss
Ecki

I recently had a customer that wanted Internet Explorer to be published as a locked down version without toolbars and userinterface. The goal was to publish a browser based application to allow for a smart card rollout and not allowing users to browse away from this site. The search for a solution was harder than expected.

The solution most frequently found with Google was the built in “kiosk mode” of Internet Explorer. This mode can be activated by appending the parameter -k to the IE shortcut. For more details see http://support.microsoft.com/kb/154780. In this mode the IE starts in full screen mode, but without the ability to access the navigation panes, toolbars and menus as it would be possible when switching to full screen view by pressing F11. To end such a session, the user is forced to use the Alt. + F4 hotkey and all navigation in IE has to be done through hotkeys too. Not the solution we wanted for standard users 🙁

The next approach were Microsoft Group policies, but they too had too many constraints and issues. One issue here was, that there is no way, to hide the standard toolbars through group policies. It would have been therefore inevitable to manipulate the HKCU branch of the users registry at logon. This is a subject, where the otherwise “overloaded” IE policies are not detailed enough 🙁

The solution came through a VBS object. Internet Explorer can be addresses and controlled through VBS. This gave me the possibility to adjust the user interface of the IE and to hide all toolbars, navigation panes and menues, without disabling basic functionality. The following code starts IE with a predefined URL and makes it much more difficult for users to break out of the predefined environment 🙂

DIM IE
Set IE = CreateObject("InternetExplorer.Application")
IE.Navigate "http://this.is.the.url.to.be.shown"
IE.Visible=True
IE.Toolbar=no
IE.Menubar=no
IE.Statusbar=no
IE.Width=750
IE.Height=600
IE.Resizable=yes
'IE.Top=5
'IE.Left=5

The entry IE.Navigate stands for the target URL. Take care that the whole URL is surrounded by double quotes. Optional parameters are for the windows size (IE.Width/IE.Height) and the windows position on the users desktop (IE.Top/IE.Left).

IE kiosk mode

This script works perfect under Windows XP and 2003 Server. With Vista and 2008 Server administrative privileges are required!

Regards
Ecki

December 15th, 2007

AAC Tuning, Teil 3 AAC tuning, part 3

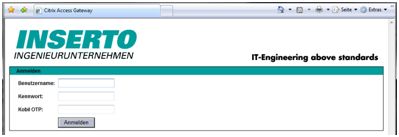
Two Factor Authentication mit RSA, SafeWord oder einer beliebigen RADIUS Lösung ist eine gängige Methode zur sicheren Authentifizierung an einem AAC Deployment. AAC beschriftet das Eingabefeld für das RSA/SafeWord/RADIUS One Time Passwort bei einem deutschen Client jedoch starr mit dem Text “SecurID-PASSCODE”, “SafeWord CODE:” oder generisch mit “RADIUS-Passwort”.

Endbenutzer kennen ihre One Time Passwort Lösung jedoch meist unter einem anderem Namen, meist dem Namen des Herstellers. Dies kann dann zu Verwirrung und Problemen bei der Eingabe führen.

Dieses Problem lässt sich für RSA und SafeWord recht einfach lösen. Eine Lösung für RADIUS ist weiter unten beschrieben. Wie schon im ersten und zweiten Beitrag zu dieser Reihe, befindet sich der Schlüssel in der Datei “web.config” im Root des jeweiligen LogonPoint Verzeichnisses.

Auf einem Standard AAC Server vermutlich unter:

C:\Inetpub\wwwroot\CitrixLogonPoint\#LogonPointName#

Es existiert noch eine weitere Version dieser Datei unter “C:\Inetpub\wwwroot\CitrixLogonPoint\”, welche unberührt bleiben sollte !

Diese Datei lässt sich mit einem Editor wie z. B. NotePad öffnen und bearbeiten. Im letzten Drittel findet sich der Abschnitt <appSettings>, in dem diverse Einstellungen vorgenommen werden können. Unter Anderem lässt sich hier auch die Anzeige für das Eingabefeld des One Time Passwords manipulieren, so dass ein beliebiger Text angezeigt werden kann. Dazu genügt es, folgende Zeilen im <appSettings> Block einzufügen:

<add key=”SecondaryAuthenticationPromptOverride” value=”Password:” />
und
<add key=”SecondaryAuthenticationToolTipOverride” value=”Enter Password” />

Wobei “Password:” für den anzuzeigenden Text steht und “Enter Password” den Text für den Tool Tip festlegt.

Der Abschnitt sollte dann z. B. so aussehen:

<appSettings>
<add key="DebugConsoleTrace" value="False" />
<add key="AdvancedGatewayClientDownloadUrl" value="http://www.citrix.com" />
<add key="AdvancedGatewayClientActivationDelay" value="10" />
<add key="MaxConnectionsToAuthenticationService" value="20" />
<add key="LogonPointId" value="00000000-0000-0000-0000-000000000000" />
<add key="DeployedBy" value="LACONFIG" />
<add key="ExtendedSecurIdFunctionalityEnabled" value="true" />
<add key="SecondaryAuthenticationPromptOverride" value="SafeWord PIN + Zahlencode:" />
<add key="SecondaryAuthenticationToolTipOverride" value="PIN und Zahlencode eingeben" />
<!- -

Nach dem Speichern der Datei und einem Refresh des LogonPoints sollte der neue Text erscheinen 🙂

Dieses Vorgehen funktioniert leider nur bei RSA SecureID und SafeWord. Der Text, welcher bei einer RADIUS Lösung angezeigt wird, ist leider hart codiert und kann nicht so einfach geändert werden. Es gibt zwar bereits einen Feature Request bei Citrix, aber wann eine Lösung effektiv verfügbar sein wird, ist momentan noch nicht abzusehen.

Joel Donaldson hat im Citrix AAC Forum jedoch auch für diesen Fall eine tolle Umgehungs- / Übergangslösung veröffentlicht. Eine einfache Manipulation der Datei BasePage.aspx aus dem jeweiligen LogonPoint Verzeichnis läst das Problem auf elegante Art und Weise.

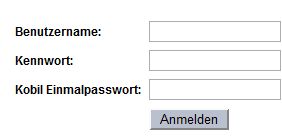
Es genügt, bei einem deutschen LogonPoint, folgenden Abschnitt vor dem </body> Tag einzufügen:

<script type="text/javascript" language="JavaScript">
document.body.innerHTML=document.body.innerHTML.replace("RADIUS-Kennwort:","Kobil Einmalpasswort:");
</script>

Das Ergbnis sieht dann so aus:
Loginprompt nach der Manipulation

Sollen auch englische LogonPoints unterstützt werden, hilft ein weiterer Code Block, der die englische Schreibweise berücksichtigt:

<script type="text/javascript" language="JavaScript">
document.body.innerHTML=document.body.innerHTML.replace("RADIUS Password:","Kobil OTP:");
</script>

Weitere Sprachen können so leicht hinzugefügt werden.

Wer sich nun fragt, warum das funktioniert, dem kann evtl. diese Erklärung weiterhelfen. Der Script Code sucht im Text der ausgelieferten Webseite nach dem String “RADIUS-Kennwort:” und ersetzt ihn dann durch den zweiten Parameter der Funktion “document.body.innerHTML.replace”, also in unserem Beispiel durch “Kobil Einmalpasswort:”.

Achtung, dies funktioniert nur, solange JavaScript im Browser aktiviert und erlaubt ist. Ist JavaScript abgeschaltet, erscheint wieder der ursprüngliche Text “RADIUS-Kennwort:”! Weitere Nebenwirkungen sind bei dieser Anpassung nicht zu befürchten.

< < AAC Tuning, Teil 2

!!! Bitte beachtet den ersten Kommentar zu diesem Beitrag !!!

Gruss
Ecki

Two Factor Authentication with RSA, SafeWord or any other third party RADIUS solution is a common way to authenticate in a secure manner to an AAC deployment. AAC however labels the input box for the OTP (One Time Password) fix with the text “SecurID-PASSCODE”, “SafeWord CODE:” oder generic with “RADIUS Password”.

Endusers however know their OTP solution most of the time with other names, the name of the RADIUS solution provider for example. This can lead to confusion during the login process.

This problem is easily solved for RSA SecureID and SafeWord. A solution for RADIUS is described further down. As in part 1 and 2, the solution can be found in the “web.config” file in the root of the respective LogonPoint directory.

On a standard AAC server this is presumably:

C:\Inetpub\wwwroot\CitrixLogonPoint\#LogonPointName#

There is an other version of this file in the “C:\Inetpub\wwwroot\CitrixLogonPoint\” directory which should stay untouched !

This file can be opened and edited with any editor like the Windows NotePad. In the last third of the file you can find a section <appSettings>, which gives you some interesting possibilities. Among other things you can configure the lables for the OTP field, so that it displays a text your users expect. All it needs, is to change the following line below the <appSettings> section:

<add key=”SecondaryAuthenticationPromptOverride” value=”Password:” />
and
<add key=”SecondaryAuthenticationToolTipOverride” value=”Enter Password” />

Where “Password:” stands for the text to be displayed as lable and “Enter Password” stands for the text, displayed as tool tip.

The section should look like this afterwards:

<appSettings>
<add key="DebugConsoleTrace" value="False" />
<add key="AdvancedGatewayClientDownloadUrl" value="http://www.citrix.com" />
<add key="AdvancedGatewayClientActivationDelay" value="10" />
<add key="MaxConnectionsToAuthenticationService" value="20" />
<add key="LogonPointId" value="00000000-0000-0000-0000-000000000000" />
<add key="DeployedBy" value="LACONFIG" />
<add key="ExtendedSecurIdFunctionalityEnabled" value="true" />
<add key="SecondaryAuthenticationPromptOverride" value="SafeWord PIN + Zahlencode:" />
<add key="SecondaryAuthenticationToolTipOverride" value="PIN und Zahlencode eingeben" />
<!- -

After saving the changes, a user calling this manipulated LogonPoint should now see the new lable.

This method unfortunately works only for RSA SecureID and SafeWord. The text displayed, when using a third party RADIUS solution is hard coded and not that easy to manipulate. There is a pending feature request at Citrix, but it isn’t clear, when a solution will be publicly available.

At last I found a very good work-around in the Citrix AAC Forum, published by Joel Donaldson. A simple manipulation of the BasePage.aspx file of the respective LogonPoint solves the problem in an elegant way.

With an english LogonPoint it is sufficient, to add the following paragraph before the </body> tag:

<script type="text/javascript" language="JavaScript">
document.body.innerHTML=document.body.innerHTML.replace("RADIUS Password:","Kobil Einmalpasswort:");
</script>

The result will look like this:
Loginprompt nach der Manipulation

If you want to support german LogonPoints also, you need another code block that respects the german notation:

<script type="text/javascript" language="JavaScript">
document.body.innerHTML=document.body.innerHTML.replace("RADIUS-Kennwort:","Kobil Einmalpasswort:");
</script>

Other languages can be added easily this way.

If someone is asking itself why this works, this short explanation may help. The script code is looking for the string “RADIUS Password:” in the delivered web page and replaces it with the second parameter of the function “document.body.innerHTML.replace”, in our example “Kobil OTP:”.

Attention, this works only, if JavaScript is enabled in the browser. If JavaScript is disabled, the original text “RADIUS Password:” is displayed. This modification shouldn’t have any other side effects.

< < AAC tuning, part 2

!!! Please read the first comment to this post !!!

Regards
Ecki

May 2nd, 2007

Secure Access Client Kommandozeilen Parameter Secure Access Client Command Line Parameters

Wenig bekannt ist die Tatsache, dass der Secure Access Client (4.2 und später, einschliesslich net6vpn.exe) über einige interessante Kommandozeilen Parameter verfügt. Daher will ich diese hier kurz vorstellen. Der interessanteste Einsatzzweck sind sicher automatisierte Installationen via Softwareverteilung, oder einfachem Batch Script.

Achtung: Bei diesen Parameter ist die GROSS/klein-schreibung wichtig!

Folgende Parameter stehen zur Verfügung:

  • -C zeigt das Konfigurations Interface (GUI) an
    Beispiel: “CitrixSAClient.exe –C”
  • -H verbindet auf die angegebene Serveradresse und Port (Syntax: -H SERVER_IP:PORT)
    Beispiel: “CitrixSAClient.exe –H 192.168.1.1:443”
  • -p zwingt den Client, den angegebenen Proxy zu verwenden (Syntax: -p PROXY_IP:PORT)
    Beispiel: “CitrixSAClient.exe –p 192.168.1.1:8080”
  • -i Installiert den Client, wird meist mit anderen Parametern verwendet
    Beispiel: “CitrixSAClient.exe –i”
  • -D konfiguriert die URL für das Desktop Icon für Advanced Access Control (Syntax: -D AG_AAC_URL)
    Beispiel: “CitrixSAClient.exe -D https://cag.company.com”
  • -Q Quiet Mode, unterdrückt alle Meldungen. Dieser Parameter kann nur in Verbindung mit -i (Install), oder -U (Uninstall) verwendet werden. Er muss vor allen anderen Parametern stehen
    Beispiel: “CitrixSAClient.exe –Q”
  • -U Deinstalliert den Client und Treiber
    Beispiel: “CitrixSAClient.exe –U”
  • -v zeigt Versionsinformationen zum Client
    Beispiel: “CitrixSAClient.exe –v”

Ein Beispiel für eine Silent Installation in Verbindung mit AAC sähe so aus:
CitrixSAClient.exe –Q –D https://AG_AAC_URL –i

Eine Installation für ein Access Gateway Standard sähe so aus:
CitrixSAClient.exe –Q –H [AG_SYSTEM_FQDN]:[AG_SYSTEM_PORT] –i

Gefunden unter CTX108757.

Gruss
Ecki

It is a little known fact, that the Secure Access Client (4.2 and later, including net6vpn.exe) offers some interesting command line parameters. I will therefore present them here. The most intersting part is the ability to automate installation of the client via software deployment or simple batch script.

Note: These parameters are case-sensitive.

The following parameters are available:

  • -C Configure the Virtual Private Networking (VPN) client–bring up the GUI configuration screen
    Example: “CitrixSAClient.exe –C”
  • -H Connect to a specific server address and port (Syntax: -H SERVER_IP:PORT)
    Example: “CitrixSAClient.exe –H 192.168.1.1:443”
  • -p Connect with a proxy IP address and port (Syntax: -p PROXY_IP:PORT)
    Example: “CitrixSAClient.exe –p 192.168.1.1:8080”
  • -i Install the client. This is used in combination with other parameters for silent installations
    Example: “CitrixSAClient.exe –i”
  • -D Sets the URL for the desktop icon for Advanced Access Control mode (Syntax: -D AG_AAC_URL)
    Example: “CitrixSAClient.exe -D https://cag.company.com”
  • -Q Quiet mode parameter–this can only be used during an install (-i) or uninstall (-U). It must appear before all other parameters
    Example: “CitrixSAClient.exe –Q”
  • -U Uninstall the VPN client and drivers
    Example: “CitrixSAClient.exe –U”
  • -v Shows the version of the client you are launching
    Example: “CitrixSAClient.exe –v”

Below is a syntax example for a silent installation with Advanced Access Control integration:
CitrixSAClient.exe –Q –D https://AG_AAC_URL –i

A silent installation for Access Gateway Standard would look like that:
CitrixSAClient.exe –Q –H [AG_SYSTEM_FQDN]:[AG_SYSTEM_PORT] –i

From CTX108757.

Regards
Ecki

|