Access

CTX-Blog

powered by Ecki's Place

May 28th, 2007

AAC Tuning, Teil 2 AAC tuning, part 2

AAC Admins, die RSA SecureID, SafeWord oder eine andere Two Factor Authentifizierungsmethode einsetzen, kennen das Dilemma. Durch den Token wird zwar die Sicherheit deutlich erhöht, wenn der Token aber mal nicht zur Hand ist, gibt es keinen Zugriff auf interne Ressourcen. Das muss nicht sein. Ein LogonPoint der für Two Factor Authentication konfiguriert wurde, erfordert nicht immer zwingend ein One Time Passwort.

Wie schon im ersten Beitrag zu dieser Reihe, befindet sich der Schlüssel in der Datei “web.config” im Root des jeweiligen LogonPoint Verzeichnisses.

Auf einem Standard AAC Server vermutlich unter:

C:\Inetpub\wwwroot\CitrixLogonPoint\#LogonPointName#

Es existiert noch eine weitere Version dieser Datei unter “C:\Inetpub\wwwroot\CitrixLogonPoint\”, welche unberührt bleiben sollte !

Diese Datei lässt sich mit einem Editor wie z. B. NotePad öffnen und bearbeiten. Im letzten Drittel findet sich der Abschnitt <appSettings>, in dem diverse Einstellungen vorgenommen werden können. Unter Anderem lässt sich hier auch die Two Factor Authentication so konfigurieren, dass ein One Time Passwort nicht mehr zwingend erforderlich ist. Dazu genügt es, folgende Zeile im <appSettings> Block zu ändern:

Von
<add key=”SecondaryAuthenticationIsOptional” value=“false” />
auf
<add key=”SecondaryAuthenticationIsOptional” value=“true” />

Der Abschnitt sollte dann so aussehen:

<appSettings>
<add key="DebugConsoleTrace" value="False" />
<add key="AdvancedGatewayClientDownloadUrl" value="http://www.citrix.com" />
<add key="AdvancedGatewayClientActivationDelay" value="10" />
<add key="MaxConnectionsToAuthenticationService" value="20" />
<add key="LogonPointId" value="00000000-0000-0000-0000-000000000000" />
<add key="DeployedBy" value="LACONFIG" />
<add key="ExtendedSecurIdFunctionalityEnabled" value="true" />
<add key="SecondaryAuthenticationIsOptional" value="true" />
<!- -

Nach dem Speichern der Datei sieht der User bei diesem einen LogonPoint nun zwar immer noch die Eingabemaske für RSA, SafeWord, etc., kann dieses Eingabefeld nun aber auch leer lassen und nur mit Username und Passwort einloggen.

Diese Manipulation reisst natürlich erst ein Mal ein grosses Loch in die Sicherheitseinstellungen der Installation. Um nun die Two Factor Authentication nicht völlig zu entwerten, muss an anderer Stelle nachgebessert werden. Mit Hilfe eines angepassten Filters und einer angepassten Policy kann die Sicherheit jedoch weiterhin hoch gehalten werden.

Der Filter für den vollwertigen Zugriff muss zwingend RSA, SafeWord, oder RADIUS als Authentifizierung voraussetzen. Dazu bietet der Filtergenerator den Punkt “Authentication Strength”. Nur wer eine starke Authentifizierung durchführt, bekommt Vollzugriff auf alle Ressourcen.
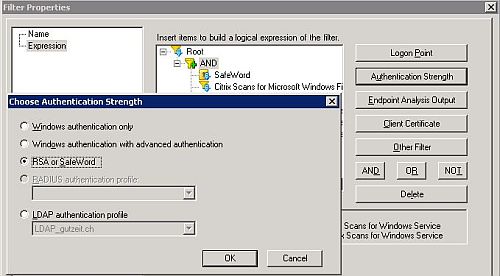
Authentication Strength

Hat der User sein Token ein Mal nicht im Zugriff, kann er sich trotzdem ohne One Time Passwort authentifiziert. Dann greift allerdings ein anderer Filter (identisch mit dem Filer für vollwertigen Zugriff, allerdings ohne Strong Authentication) und eine andere Policy, die den Zugriff restriktiver handhabt. So kann der User zumindest auf eine eingeschränkte Umgebung zugreifen und ist nicht zum Däumchen drehen verdammt 🙂

< < AAC Tuning, Teil 1 AAC Tuning, Teil 3 >>

!!! Bitte beachtet den ersten Kommentar zu diesem Beitrag !!!

Gruss
Ecki

AAC admins that deploy LogonPoints with RSA SecureID, SafeWord or any other Two Factor Authentication solution know the dilemma. The token realy boosts security, but if the token isn’t at hand, there is no way to access internal resources. Fortunately this is not imperativ. A LogonPoint configured with Two Factor Authentication must not always require a One Time Password.

As in part 1, the solution can be found in the “web.config” file in the root of the respective LogonPoint directory.

On a standard AAC server this is presumably:

C:\Inetpub\wwwroot\CitrixLogonPoint\#LogonPointName#

There is an other version of this file in the “C:\Inetpub\wwwroot\CitrixLogonPoint\” directory which should stay untouched !

This file can be opened and edited with any editor like the Windows NotePad. In the last third of the file you can find a section <appSettings>, which gives you some interesting possibilities. Among other things you can configure Two Factor Authentication such, that a One Time Password is not mandatory. All it needs is to change the following line below the <appSettings> section:

From
<add key=”SecondaryAuthenticationIsOptional” value=“false” />
to
<add key=”SecondaryAuthenticationIsOptional” value=“true” />

The section should look like this afterwards:

<appSettings>
<add key="DebugConsoleTrace" value="False" />
<add key="AdvancedGatewayClientDownloadUrl" value="http://www.citrix.com" />
<add key="AdvancedGatewayClientActivationDelay" value="10" />
<add key="MaxConnectionsToAuthenticationService" value="20" />
<add key="LogonPointId" value="00000000-0000-0000-0000-000000000000" />
<add key="DeployedBy" value="LACONFIG" />
<add key="ExtendedSecurIdFunctionalityEnabled" value="true" />
<add key="SecondaryAuthenticationIsOptional" value="true" />
<!- -

After saving the changes, a user calling this manipulated LogonPoint will still see the prompt for RSA, SafeWord, or RADIUS passcode, but he is now able to leave this field empty and log in with just his username and password.

This manipulation creates a big hole in your security configuration, but this hole can be easily closed again. All that is needed is to reconfigure your filters and policies.

The filter for full access must require RSA, SafeWord, or RADIUS authentication. Therefore the filter generator allows to use the authentication strength as a criteria. Only users using strong authentication get access to all resources.

Authentication Strength

A user that has no access to his token is nevertheless able to authenticate without a One Time Password. But now an other filter is matched (you can create the same filter as for full acces, but without strong authentication) and an other, more restrictive policy becomes active. This way, the user is at least able to work in a restricted environment, then to stop working 🙂

< < AAC tuning, part 1 AAC tuning, part 3 >>

!!! Please read the first comment to this post !!!

Regards
Ecki

May 25th, 2007

Citrix Session Reliability Service angreifbar, CTX112964 Vulnerability in Citrix Session Reliability service, CTX112964

Eine Sicherheitslücke im Citrix Presentation Server Session Reliability Service ist kürzlich entdeckt worden. Durch eine präparierte Anfrage an den XTE Service kann ein Angreifer TCP Sitzungen zu jedem lokalen Port der betroffenen Maschine aufbauen. Dadurch können Sicherheits Policies umgangen werden und lokale Ports trotz Firewall von Remote angesprochen werden.

Für folgende Produkte ist der Fehler bestätigt und sind HotFixes verfügbar:

  • Citrix MetaFrame Presentation Server 3.0
  • Citrix MetaFrame Presentation Server 4.0
  • Citrix Access Essentials 1.0
  • Citrix Access Essentials 1.5

Andere Versionen von Citrix Presentation Server, Citrix Access Essentials oder Citrix Desktop Server sind von dieser Sicherheitslücke nicht betroffen.

Wird Session Reliability nicht verwendet, besteht keine Gefahr für die Sicherheit des Presentation Servers.

Citrix stellt hier (CTX112964) HotFixes in allen Sprachen bereit.

Gruss
Ecki

A security flaw in the Citrix Presentation Server Session Reliability service has been found recently. The Session Reliability service is used by some Citrix products to improve user experience when connecting over unreliable networks. By sending a specifically crafted request to this service, an attacker could establish a TCP connection to any port on the local machine. This could be used by the attacker to bypass network security policies and remotely access local ports on the target machine.

This vulnerability is present in the following versions of Citrix products:

  • Citrix MetaFrame Presentation Server 3.0
  • Citrix MetaFrame Presentation Server 4.0
  • Citrix Access Essentials 1.0
  • Citrix Access Essentials 1.5

No other versions of Citrix Presentation Server, Citrix Access Essentials or Citrix Desktop Server are affected by this issue.

Customers running an affected product with the Session Reliability feature disabled are not affected by this issue.

Downloads for all languages are available here (CTX112964).

Regards
Ecki

May 23rd, 2007

AAC Tuning, Teil 1 AAC tuning, part 1

Welcher AAC Admin hat nicht schon einmal über das Verhalten des EPA-Scans geflucht. Sobald auch nur ein EPA-Scan in der AMC (Access Management Console) definiert ist, wird der EPA-Scan bei jedem LogonPoint automatisch gestartet, egal, ob er gebraucht wird, oder nicht.

Sehr lästig ist dieses Verhalten z. B. bei einem reinen OWA (Outlook Web Access) LogonPoint, der nichts anderes, als einen eingeschränkten Zugriff auf das persönliche Mailkonto bereitstellen soll. Damit er von Ãœberall her funktioniert und auch “Clientless” arbeitet, darf er natürlich keinen EPA-Scan voraussetzen. Trotzdem erscheint bei jedem Aufruf dieses LogonPoints der Download- und Installationshinweis für den EPA-Scan-Client. Ein beherzter Klick auf “Skip Scan” bringt einen zwar weiter, ohne den Client installieren zu müssen, der Download findet aber trotzdem jedes Mal im Hintergrund statt, sehr hinderlich, bei langsamen Internetverbindungen. Dazu kommt die Verunsicherung weniger computeraffiner Zeitgenossen, die u. U. endlos versuchen, auf eingeschränkten InternetCafe PC’s den EPA-Scan-Client zu installieren, was ihnen mangels Rechten nie gelingen wird…

Per Zufall bin ich kürzlich über eine Option gestolpert, die dieses Verhalten ändern kann. Gut versteckt und kaum dokumentiert, werden sie wohl bisher nur Wenige entdeckt haben. Der Schlüssel befindet sich in der Datei “web.config” im Root des jeweiligen LogonPoint Verzeichnisses.

Auf einem Standard AAC Server vermutlich unter:

C:\Inetpub\wwwroot\CitrixLogonPoint\#LogonPointName#

Es existiert noch eine weitere Version dieser Datei unter “C:\Inetpub\wwwroot\CitrixLogonPoint\”, welche unberührt bleiben sollte !

Diese Datei lässt sich mit einem Editor wie z. B. NotePad öffnen und bearbeiten. Im letzten Drittel findet sich der Abschnitt <appSettings>, in dem diverse Einstellungen vorgenommen werden können. Unter Anderem lässt sich hier auch der EPA-Scan deaktivieren. Dazu genügt es, folgende Zeile unter dem <appSettings> Block einzufügen:

<add key=”EndpointAnalysisDisabled” value=“true” />

Der Abschnitt sollte dann so aussehen:

<appSettings>
<add key="DebugConsoleTrace" value="False" />
<add key="AdvancedGatewayClientDownloadUrl" value="http://www.citrix.com" />
<add key="AdvancedGatewayClientActivationDelay" value="10" />
<add key="MaxConnectionsToAuthenticationService" value="20" />
<add key="LogonPointId" value="00000000-0000-0000-0000-000000000000" />
<add key="DeployedBy" value="LACONFIG" />
<add key="ExtendedSecurIdFunctionalityEnabled" value="true" />
<add key="SecondaryAuthenticationIsOptional" value="false" />
<add key="EndpointAnalysisDisabled" value="True" />
<!- -

Nach dem Speichern der Datei gelangt der User bei diesem einen LogonPoint nun direkt zur Eingabemaske für seinen Usernamen und sein Passwort, ohne Umweg über die EPA-Scan Zwischenseite 🙂

AAC Tuning, Teil 2 >>

!!! Bitte beachtet den ersten Kommentar zu diesem Beitrag !!!

Gruss
Ecki

Is there any AAC admin happy with the way, EPA scans behave? Once you create just one EPA scan in the AMC (Access Management Console), the EPA scan gets started automatically on every LogonPoint, regardless whether this is wanted/needed or not.

This behavior is for example very annoying at OWA (Outlook Web Access) LogonPoints, that are created only to allow restricted access to the personal mail from anywhere. To operate “client less” from anyplace, anywhere, no EPA scans may be required. On a standard LogonPoint the EPA scan appears anyway with his download and installation directions. If you click on the “Skip Scan” button, you can proceed without scanning your PC, but the download of the EPA scan client still takes place in the background, steeling you valuable bandwidth. In addition, less computer versed users in an internet cafe with restricted PCs might end up trying to install the EPA scan client over and over without a chance to succeed…

Recently I stumbled upon an option that is able to stop this “misbehavior”. Well hidden and badly documented, the chances are good, that only few people discovered this option so far. The solution can be found in the “web.config” file in the root of the respective LogonPoint directory.

On a standard AAC server this is presumably:

C:\Inetpub\wwwroot\CitrixLogonPoint\#LogonPointName#

There is an other version of this file in the “C:\Inetpub\wwwroot\CitrixLogonPoint\” directory which should stay untouched !

This file can be opened and edited with any editor like the Windows NotePad. In the last third of the file you can find a section <appSettings>, which gives you some interesting possibilities. Among other things you can disable EPA scans here. All it needs is to add the following line below the <appSettings> section:

<add key=”EndpointAnalysisDisabled” value=“true” />

The section should look like this afterwards:

<appSettings>
<add key="DebugConsoleTrace" value="False" />
<add key="AdvancedGatewayClientDownloadUrl" value="http://www.citrix.com" />
<add key="AdvancedGatewayClientActivationDelay" value="10" />
<add key="MaxConnectionsToAuthenticationService" value="20" />
<add key="LogonPointId" value="00000000-0000-0000-0000-000000000000" />
<add key="DeployedBy" value="LACONFIG" />
<add key="ExtendedSecurIdFunctionalityEnabled" value="true" />
<add key="SecondaryAuthenticationIsOptional" value="false" />
<add key="EndpointAnalysisDisabled" value="True" />
<!- -

After saving the changes, a user calling this manipulated LogonPoint will now be forwarded immediately to the login prompt without seeing any EPA “nag screen” 🙂

AAC tuning, part 2 >>

!!! Please read the first comment to this post !!!

Regards
Ecki

May 2nd, 2007

Secure Access Client Kommandozeilen Parameter Secure Access Client Command Line Parameters

Wenig bekannt ist die Tatsache, dass der Secure Access Client (4.2 und später, einschliesslich net6vpn.exe) über einige interessante Kommandozeilen Parameter verfügt. Daher will ich diese hier kurz vorstellen. Der interessanteste Einsatzzweck sind sicher automatisierte Installationen via Softwareverteilung, oder einfachem Batch Script.

Achtung: Bei diesen Parameter ist die GROSS/klein-schreibung wichtig!

Folgende Parameter stehen zur Verfügung:

  • -C zeigt das Konfigurations Interface (GUI) an
    Beispiel: “CitrixSAClient.exe –C”
  • -H verbindet auf die angegebene Serveradresse und Port (Syntax: -H SERVER_IP:PORT)
    Beispiel: “CitrixSAClient.exe –H 192.168.1.1:443”
  • -p zwingt den Client, den angegebenen Proxy zu verwenden (Syntax: -p PROXY_IP:PORT)
    Beispiel: “CitrixSAClient.exe –p 192.168.1.1:8080”
  • -i Installiert den Client, wird meist mit anderen Parametern verwendet
    Beispiel: “CitrixSAClient.exe –i”
  • -D konfiguriert die URL für das Desktop Icon für Advanced Access Control (Syntax: -D AG_AAC_URL)
    Beispiel: “CitrixSAClient.exe -D https://cag.company.com”
  • -Q Quiet Mode, unterdrückt alle Meldungen. Dieser Parameter kann nur in Verbindung mit -i (Install), oder -U (Uninstall) verwendet werden. Er muss vor allen anderen Parametern stehen
    Beispiel: “CitrixSAClient.exe –Q”
  • -U Deinstalliert den Client und Treiber
    Beispiel: “CitrixSAClient.exe –U”
  • -v zeigt Versionsinformationen zum Client
    Beispiel: “CitrixSAClient.exe –v”

Ein Beispiel für eine Silent Installation in Verbindung mit AAC sähe so aus:
CitrixSAClient.exe –Q –D https://AG_AAC_URL –i

Eine Installation für ein Access Gateway Standard sähe so aus:
CitrixSAClient.exe –Q –H [AG_SYSTEM_FQDN]:[AG_SYSTEM_PORT] –i

Gefunden unter CTX108757.

Gruss
Ecki

It is a little known fact, that the Secure Access Client (4.2 and later, including net6vpn.exe) offers some interesting command line parameters. I will therefore present them here. The most intersting part is the ability to automate installation of the client via software deployment or simple batch script.

Note: These parameters are case-sensitive.

The following parameters are available:

  • -C Configure the Virtual Private Networking (VPN) client–bring up the GUI configuration screen
    Example: “CitrixSAClient.exe –C”
  • -H Connect to a specific server address and port (Syntax: -H SERVER_IP:PORT)
    Example: “CitrixSAClient.exe –H 192.168.1.1:443”
  • -p Connect with a proxy IP address and port (Syntax: -p PROXY_IP:PORT)
    Example: “CitrixSAClient.exe –p 192.168.1.1:8080”
  • -i Install the client. This is used in combination with other parameters for silent installations
    Example: “CitrixSAClient.exe –i”
  • -D Sets the URL for the desktop icon for Advanced Access Control mode (Syntax: -D AG_AAC_URL)
    Example: “CitrixSAClient.exe -D https://cag.company.com”
  • -Q Quiet mode parameter–this can only be used during an install (-i) or uninstall (-U). It must appear before all other parameters
    Example: “CitrixSAClient.exe –Q”
  • -U Uninstall the VPN client and drivers
    Example: “CitrixSAClient.exe –U”
  • -v Shows the version of the client you are launching
    Example: “CitrixSAClient.exe –v”

Below is a syntax example for a silent installation with Advanced Access Control integration:
CitrixSAClient.exe –Q –D https://AG_AAC_URL –i

A silent installation for Access Gateway Standard would look like that:
CitrixSAClient.exe –Q –H [AG_SYSTEM_FQDN]:[AG_SYSTEM_PORT] –i

From CTX108757.

Regards
Ecki

|