Access

CTX-Blog

powered by Ecki's Place

October 17th, 2010

Fehlendes XML File für Offline-Plugin 6.0.1 für den Merchandising Server Missing XML file for Offline-Plugin 6.0.1 for Merchandising Server

Wer bereits den Merchandising Server einsetzt, wird vermutlich ebenfalls über folgendes Problem gestolpert sein.

Citrix bietet ein Update für das Offline-Plugin an, welches 45 Fehler behebt. Als normaler Download steht das Update 6.0.1 seit einiger Zeit zur Verfügung. Wer aber im Merchandising Server das aktuelle Plugin sucht, wird es nicht finden. Auch eine manuelle Aktualisierung findet das Update nicht 🙁

Der Grund liegt in einem fehlenden XML-File, welches der Merchandising Server verwendet, um die Installation und Konfiguration zu steuern. Es sieht leider nicht so aus, als ob Citrix das fehlende File irgendwann selbst bereitstellen würde, s. Citrix Blog: App Streaming-6.0.1 LCM Update

Ich habe mir daher die folgenden Ressourcen genauer angesehen:

Citrix-TV
Citrix eDocs
Metadata Reference

und anschliessend mein eigenes XML File erstellt.

Um euch die Arbeit zu ersparen, stelle ich es hier zum download bereit: XenAppStreamingMetaData.xml

Im Merchandising Server lässt sich das aktuelle Offline-Plugin und das aktualisierte XML-File manuell hochladen und dann via Deliveries wie gewohnt verteilen 🙂

Warum Citrix dieses File nicht selbst zur Verfügung stellt, wird wohl ihr Geheimnis bleiben. Grundsätzlich stellt dieses Verhalten jedoch die Nützlichkeit des an sich guten Gedankens des Merchandising Server stark in Frage. Ich hoffe, Citrix wird seine Update Politik für Merchandising Server nochmal überdenken und ALLE Updates auch auf dieser Plattform verfügbar machen…

Gruss
Ecki

If you are already working with Merchandising Server, you will probably know this problem.

Citrix provides an update for his Offline –Plugin that eliminates 45 bugs. The update 6.0.1 is available as regular download since many weeks now but if you try to find the update on your Merchandising Server you won’t find it. Even a manual rescan of the available plugins doesn’t help 🙁

The reason is a missing XML file, which Merchandising Server needs to control the installation and configuration of the plugins. Apparently Citrix won’t make this XML file available to the public, see Citrix Blog: App Streaming-6.0.1 LCM Update

I have therefore taken the time to have a look at the following resources:

Citrix-TV
Citrix eDocs
Metadata Reference

and finally created my own XML file.

To save your time, I will provide you with the XML file needed here: XenAppStreamingMetaData.xml

On the Merchandising Server it is now possible to upload the actual Offline-Plugin together with the new XML file. After that step you can deploy the update through standard deliveries as usual.

Why Citrix doesn’t provide this file itself is a miracle to me. In fact this behavior doesn’t help to convince people to use Merchandising Server. I hope Citrix is rethinking the way they provide updates to Merchandising Server in the future…

Regards
Ecki
October 21st, 2008

SmartCard Single Sign On mit PNAgent Smart Card Single Sign On with PNAgent

Alle verfügbaren Dokumentationen zum Thema “Single Sign On” oder “Credential passthrough” mit SmartCard und Citrix Clients beschränkt sich leider auf den Gebrauch der Program Neighborhood, wie folgende Anleitung von Brianmadden beispielhaft zeigt. Diesen Client setze ich bei Kundenprojekten aber seit Jahren nur noch in Ausnamefällen ein. Statt dessen verwende ich meistens den PNAgent, oder den Web Client.

Diese Clients entzogen sich aber bisher dem Passthrough der SmartCard PIN, da sie die APPSRV.INI ignorierten und daher die notwendigen Einstellungen nicht übernahmen.

Seit dem 10.0er Client findet sich im Installationsverzeichnis jedes Citrix Clients eine Datei “icaclient.adm”, ein Active Directory Group Policies Template, das die benötigten Optionen enthält. Seit dem Release 10.0 überprüft jeder ICA Client zuerst, ob eine entsprechende Policy konfiguriert wurde und übernimmt dann diese Einstellungen aus der Registry. Die Datei APPSRV.INI fungiert nur noch als Fallback, wenn keine Policy existiert. Dieses neue Client Feature ermöglicht nun endlich ein “Single Sign On” mit SmartCard und PNAgent.

Hier in Kürze die Schritte, die es dafür benötigt:

1. Auf dem Presentation Server /XenApp Server

  • Überprüfen, ob ein Login auf einen Desktop mittels SmartCard generell funktioniert. Für SmartCard-Passthrough muss in den Server-Eigenschaften die Option “Trust requests sent to the XML Service” aktiviert sein.

2. Auf dem Web Interface Server

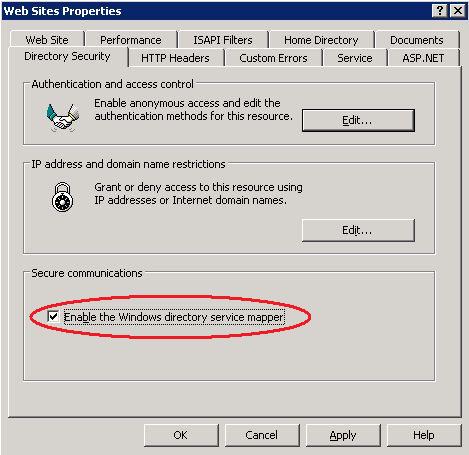
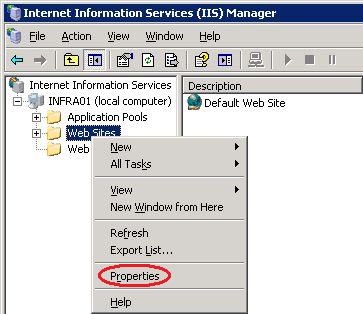
    • Hier muss SSL aktiviert (ein Web Server Zertifikat installiert) und das “Directory Service Mapping” aktiviert sein. Diese Option findet sich im IIS Manager unter den Eigenschaften des “Web Sites” Ordners:

Web Sites EigenschaftenDirectory Service Mapper

  • In der Access Suite Management Console muss die PNAgent Web Site unter “Configure Authentication” auf “Smart Card with Passthrough” konfiguriert werden.

3. Registry

  • Überprüfen, ob unter HKLM\System\CurrentControlSet\Control\TerminalServer\WinStations\ICA-tcp der Wert UseDefaultGina auf 0 gesetzt ist (1 schaltet die CtxGina ab).

4. Active Directory Policy

    • Import des ADM Templates in eine beliebige Policy
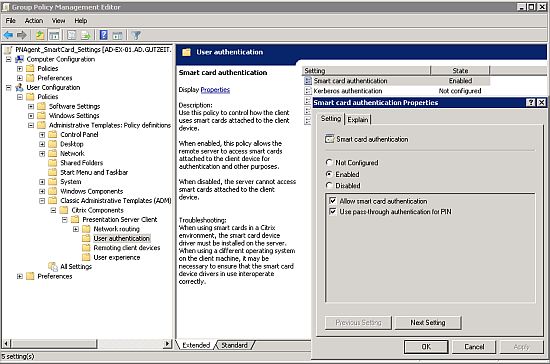
    • Im User Teil der Policy müssen folgende Einstellungen gesetzt sein:

Citrix Policy

  • <PolicyName>\User Configuration\Administrative Templates\Citrix Components\Presentation Server Client\User Authentication\Smart Card Authentication muss “Enabled” werden und “Allow Smart Card Authentication” und “Use pass-through authentication for PIN” müssen aktiviert werden.
  • Alle weiteren Optionen bleiben unkonfiguriert, vorausgesetzt es sollen nur SmartCard Logins konfiguriert werden.

Jetzt sollte einem “Single Sign On” mit SmartCard und PNAgent nichts mehr im Wege stehen 😀

Diese Anleitung gilt leider nur für Windows XP und Server 2003. Vista und 2008 Server sind hier momentan explizit ausgenommen, da aktuell kein Citrix Client, einschliesslich 11.0, in der Lage ist, die SmartCard PIN unter diesen OS weiterzureichen 🙁

Hier noch ein paar interessante weiterführende Links:

Gruss
Ecki

All available documentation regarding “Single Sign On” or “Credential pass-through” with Smart Card and Citrix clients is limited to the Program Neighborhood client only, as can be seen exemplarily at Brianmadden . I don’t use this client in customer projects for a couple of years now but use the PNAgent or the Web client instead.

With these clients, a pass-through of the Smart Card PIN didn’t work, because they do not read their settings from the APPSRV.INI, which would allow for the neccessary settings.

Since client version 10.0, an Active Directory Group Policy Template can be found in every client installation directory, named “icaclient.adm”. All clients, starting with 10.0 now read the policy settings first and make use of the APPSRV.INI only in case, no policy is defined. This new feature allows now for a “Single Sign On” with SmartCard and PNAgent.

Here is, what you need to do, to get it up and running:

1. On the Presentation Server /XenApp Server

  • Confirm proper operation by logging in to a full desktop on the Citrix server. Insert a Smart Card and it should begin reading it. Enable “Trust requests sent to the XML Service”. This is necessary if using smart card pass through logon.

2. On the Web Interface Server

    • SSL must be configured and active (a web server certificate has to be installed) and the “Directory Service Mapping” has to be activated. This option can be found in the IIS Manager below the properties of the “Web Sites” folder:

Web Sites propertiesDirectory Service Mapper

  • The Web Interface site itself must now be configured. Open the Citrix Access Suite Management Console on the Web Interface server and run discovery if necessary to find the Web Interface site you wish to work with.
    Under “Configure Authentication” select “Smart Card with Passthrough”.

3. Registry

  • Check HKLM\System\CurrentControlSet\Control\TerminalServer\WinStations\ICA-tcp the value for “UseDefaultGina” should be 0 (1 disables the CtxGina).

4. Active Directory Policy

    • Import the ADM template into a Policy
    • Go to the “User Configuration” of the policy, leave the Computer part set to “not configured”. The following settings have to be enabled:

Citrix Policy

  • <PolicyName>\User Configuration\Administrative Templates\Citrix Components\Presentation Server Client\User Authentication\Smart Card Authentication has to be “Enabled” and “Allow Smart Card Authentication” and “Use pass-through authentication for PIN” have to be activated.
  • Leave everything else to “Not Configured”, provided that you are testing just Smart Card and PIN pass-through.

Now “Single Sign On” with Smart Card and PNAgent should work 😀

Unfortunately these instructions only work for Windows XP and Server 2003. At the moment, no Citrix client, including 11.0, allows for PIN pass-through with Vista and 2008 Server 🙁

Here are some more interesting links:

Regards
Ecki

May 7th, 2008

AAC HotFix AAC450W003 und CAG HotFix 4.5.7 verfügbarAAC hotfix AAC450W003 and CAG hotfix 4.5.7 available

Seit wenigen Tagen stehen die Hotfixes AAC450W003 und Hotfix AG2000_v457 bei Citrix zum Download bereit. Neben einigen kleineren Bugfixes gibt es in diesen Releases weitere wirklich interessante Neuerungen:

Durch den AAC HotFix wird mein letzter Beitragt “AAC Tuning, Teil 3” teilweise entwertet. Genauer gesagt ist durch die Intervention, welche ich für einen Kunden durchgeführt habe, nun eine einfache Möglichkeit entstanden, den Beschreibungstext für das RADIUS-Eingabefeld nicht nur bei einem RSA, bzw. SafeWord Deployment einfach zu wechseln, sondern neu auch bei einer beliebigen RADIUS Implementation. Das Vorgehen aus dem ersten Abschnitt des Beitrags “AAC Tuning, Teil 3” behält daher seinen Gültigkeit, gilt aber nach der Installation des HotFixes AAC450W003 auch für alle RADIUS Lösungen.

Vista wird nun endlich, wenn auch nur im Beta Stadium, von AAC 4.5 unterstützt. Das heisst, es lassen sich nun auch Vista Clients via EPA-Scan überprüfen und klassifizieren. Erste Tests verliefen bereits positiv. ACHTUNG: Wenn EPA-Scans von EPAFactory/Accario eingesetzt werden, darf dieser Hotfix noch nicht eingespielt werden. Accario plant die Unterstützung von AAC 4.5 HF03 für voraussichtlich den 20. Mai.

Die Liste der unterstützten Virenscanner und Personal Firewalls wurde ergänzt. So sind nun endlich u. a. auch McAfee 8.5i, Symantec AVE 10.0, Symantec Endpoint Protection 11.0 und Trend Micro 8.0 offiziell von Citrix unterstützt.

Der Download und das ReadMe für AAC 4.5 sind hier zu finden: CTX117123, AAC45W003

Der Download und das ReadMe für das CAG 4.5.7 sind hier zu finden: CTX117123, Hotfix AG2000_v457

Gruss
Ecki

A few days ago, Citrix released the hotfixes AAC450W003 and hotfix AG2000_v457. Beside a couple of bug fixes, there are some really interesting things in these releases:

Hotfix AAC450W003 invalidates some parts of my last posting in “AAC tuning, part 3”. A couple of months ago, i asked Citrix to allow customers to change the caption of the RADIUS input box on the logon page. In my last article i showed a way to change the caption easily for RSA and SafeWord deployments and pointed out a way to change the text with a little script in case of another RADIUS solution. However this solution had some unwanted side effects and so i’m glad that Citrix came up with a solution for all deployments. The procedure described in the first section of “AAC tuning, part 3” stays valid but is now applicable for all RADIUS deployments too, given you installed hotfix AAC450W003 correctly.

Vista is now supported with AAC 4.5, but it is still beta. This means, that you are now able to check Vista clients through EPA-scans, provided by Citrix. My first tests have been successfull. CAUTION: If you use EPA-scans from EPAFactory/Accario you have to wait for an update from Accario to support AAC 4.5 HF03. This should be available around the 20th of Mai.

The list of supported AV scanner and personal firewalls has become a little longer. McAfee 8.5i, Symantec AVE 10.0, Symantec Endpoint Protection 11.0 and Trend Micro 8.0 are now officially supported at last.

The download and readme for AAC can be found here: CTX117123, AAC45W003

The download and readme for CAG 4.5.7 can be found here: CTX117123, Hotfix AG2000_v457

Regards
Ecki

November 22nd, 2007

Wie kann die Sprache des ICA Clients geändert werden How to change the ICA client language

Während der Installation kann der User seine bevorzugte Sprache für den ICA Client Version 10.x und höher, über einen Dialog auswählen.

Wenn die Sprache jedoch später geändert werden muss, kann dies einfach über die Kommandozeile gemacht werden.Dazu muss eine Eingabeaufforderung geöffnet werden und zum ICA Clientverzeichnis gewechselt werden. Der Befehl

Wfica32.exe /UserUILocale

cmd.exe

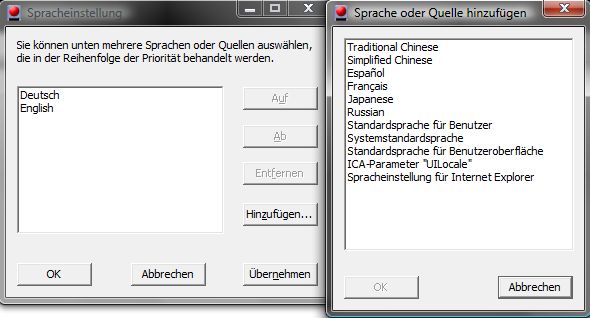
führt zur Anzeige einer Dialogbox, über die die benötigte Sprache ausgewählt und hinzugefügt werden kann.

MUI Einstellungen

Die Sprache die hier an erster Stelle steht, wird nun zur Anzeige der Client GUI verwendet.

Gruss
Ecki

Users can choose the user interface language of the ICA Client for Win32 10.x and above through a dialog box the ICA Client provides during installation.

If users want to change the Language after the installation this can be done from the command line. Simply open a command prompt, browse to the ICA Client directory and run

Wfica32.exe /UserUILocale

cmd.exe

Then add the required language and move it to the top of the list.

MUI settings

After a restart the ICA Client should appear with the new language selected.

Regards
Ecki

July 21st, 2007

Erstes Hotfix Rollup Pack für Presentation Server 4.5 verfügbar First Hotfix Rollup Pack for Presentation Server 4.5 available

Seit dem 19.07. steht bei Citrix das erste Hotfix Rollup Pack für Presentation Server 4.5 zur Verfügung. Neben einer ganzen Reihe von Fehlerbehebungen wurde vor allem die Office 2007 Integration verbessert. Weitere Neuigkeiten sind:

  • Microsoft Windows Vista/Office 2007 Compatibility Updates
  • Verbesserte Unterstützung für High Color (16-, 32-, and 48-bit) Icons
  • Microsoft Office Live Preview Support

Einige der Verbesserungen setzen mindestens den aktuellen Client 10.100 voraus. Ein Update der Client Installation ist daher ebenfalls anzuraten.

Der Download und weitere Informationen sind hier zu finden.

Gruss
Ecki

On July 19th Citrix released the first Hotfix Rollup Pack for Citrix Presentation Server 4.5. This update comprises a couple of new features and options. Beside others, the main improvements are IMHO the following issues:

  • Microsoft Windows Vista/Office 2007 Compatibility Updates
  • Enhanced (16-, 32-, and 48-bit) Icon Support
  • Microsoft Office Live Preview Support

To get the fulll benefit of these compatibilityupdates, you must also deploy Version 10.100 or later of the Presentation ServerClient.

The download and aditional informations can be found here.

Regards
Ecki

July 18th, 2007

CAG 4.5.5 Update verfügbar CAG 4.5.5 Update available

18. Juli: Seit Heute steht bei Citrix das Update 4.5.5 für alle Access Gateway 2000/2010 Modelle zur Verfügung. Neben einer ganzen Reihe von Fehlerbehebungen sind auch einige neue Features und Konfigurationsoptionen dazu gekommen:

  • Caching von One Time Passwörtern kann nun explizit verboten werden
  • WANScaler Integration (Protokoll und TCP Optimierung über den SSL VPN Client)
  • Vista Client Support

Um nur die Wichtigsten zu nennen.

Da mit diesem Update auch einige Sicherheitprobleme entschärft worden sind, sollte mit dem Update nicht allzulange gewartet werden.

Der Download und weitere Informationen sind hier zu finden.

Gruss
Ecki

July 18.: Citrix released a Hotfix for Citrix Access Gateway. This hotfix is applicable to the Model 2000 and the Model 2010 appliance that supports the Access Gateway Standard Edition, Version 4.5 and Access Gateway Advanced Edition, Version 4.5. This update comprises a couple of new features and options. Beside others, the main improvements are IMHO the following issues:

  • Caching of one time passwords can now be disabled
  • WANScaler integration (protocol and TCP optimizations through the SSL VPN client)
  • Vista client support

Since a couple of security updates are comprised in this Package, administrators shouldn’t wait with installing this update.

The download and aditional informations can be found here.

Regards
Ecki

May 23rd, 2007

AAC Tuning, Teil 1 AAC tuning, part 1

Welcher AAC Admin hat nicht schon einmal über das Verhalten des EPA-Scans geflucht. Sobald auch nur ein EPA-Scan in der AMC (Access Management Console) definiert ist, wird der EPA-Scan bei jedem LogonPoint automatisch gestartet, egal, ob er gebraucht wird, oder nicht.

Sehr lästig ist dieses Verhalten z. B. bei einem reinen OWA (Outlook Web Access) LogonPoint, der nichts anderes, als einen eingeschränkten Zugriff auf das persönliche Mailkonto bereitstellen soll. Damit er von Ãœberall her funktioniert und auch “Clientless” arbeitet, darf er natürlich keinen EPA-Scan voraussetzen. Trotzdem erscheint bei jedem Aufruf dieses LogonPoints der Download- und Installationshinweis für den EPA-Scan-Client. Ein beherzter Klick auf “Skip Scan” bringt einen zwar weiter, ohne den Client installieren zu müssen, der Download findet aber trotzdem jedes Mal im Hintergrund statt, sehr hinderlich, bei langsamen Internetverbindungen. Dazu kommt die Verunsicherung weniger computeraffiner Zeitgenossen, die u. U. endlos versuchen, auf eingeschränkten InternetCafe PC’s den EPA-Scan-Client zu installieren, was ihnen mangels Rechten nie gelingen wird…

Per Zufall bin ich kürzlich über eine Option gestolpert, die dieses Verhalten ändern kann. Gut versteckt und kaum dokumentiert, werden sie wohl bisher nur Wenige entdeckt haben. Der Schlüssel befindet sich in der Datei “web.config” im Root des jeweiligen LogonPoint Verzeichnisses.

Auf einem Standard AAC Server vermutlich unter:

C:\Inetpub\wwwroot\CitrixLogonPoint\#LogonPointName#

Es existiert noch eine weitere Version dieser Datei unter “C:\Inetpub\wwwroot\CitrixLogonPoint\”, welche unberührt bleiben sollte !

Diese Datei lässt sich mit einem Editor wie z. B. NotePad öffnen und bearbeiten. Im letzten Drittel findet sich der Abschnitt <appSettings>, in dem diverse Einstellungen vorgenommen werden können. Unter Anderem lässt sich hier auch der EPA-Scan deaktivieren. Dazu genügt es, folgende Zeile unter dem <appSettings> Block einzufügen:

<add key=”EndpointAnalysisDisabled” value=“true” />

Der Abschnitt sollte dann so aussehen:

<appSettings>
<add key="DebugConsoleTrace" value="False" />
<add key="AdvancedGatewayClientDownloadUrl" value="http://www.citrix.com" />
<add key="AdvancedGatewayClientActivationDelay" value="10" />
<add key="MaxConnectionsToAuthenticationService" value="20" />
<add key="LogonPointId" value="00000000-0000-0000-0000-000000000000" />
<add key="DeployedBy" value="LACONFIG" />
<add key="ExtendedSecurIdFunctionalityEnabled" value="true" />
<add key="SecondaryAuthenticationIsOptional" value="false" />
<add key="EndpointAnalysisDisabled" value="True" />
<!- -

Nach dem Speichern der Datei gelangt der User bei diesem einen LogonPoint nun direkt zur Eingabemaske für seinen Usernamen und sein Passwort, ohne Umweg über die EPA-Scan Zwischenseite 🙂

AAC Tuning, Teil 2 >>

!!! Bitte beachtet den ersten Kommentar zu diesem Beitrag !!!

Gruss
Ecki

Is there any AAC admin happy with the way, EPA scans behave? Once you create just one EPA scan in the AMC (Access Management Console), the EPA scan gets started automatically on every LogonPoint, regardless whether this is wanted/needed or not.

This behavior is for example very annoying at OWA (Outlook Web Access) LogonPoints, that are created only to allow restricted access to the personal mail from anywhere. To operate “client less” from anyplace, anywhere, no EPA scans may be required. On a standard LogonPoint the EPA scan appears anyway with his download and installation directions. If you click on the “Skip Scan” button, you can proceed without scanning your PC, but the download of the EPA scan client still takes place in the background, steeling you valuable bandwidth. In addition, less computer versed users in an internet cafe with restricted PCs might end up trying to install the EPA scan client over and over without a chance to succeed…

Recently I stumbled upon an option that is able to stop this “misbehavior”. Well hidden and badly documented, the chances are good, that only few people discovered this option so far. The solution can be found in the “web.config” file in the root of the respective LogonPoint directory.

On a standard AAC server this is presumably:

C:\Inetpub\wwwroot\CitrixLogonPoint\#LogonPointName#

There is an other version of this file in the “C:\Inetpub\wwwroot\CitrixLogonPoint\” directory which should stay untouched !

This file can be opened and edited with any editor like the Windows NotePad. In the last third of the file you can find a section <appSettings>, which gives you some interesting possibilities. Among other things you can disable EPA scans here. All it needs is to add the following line below the <appSettings> section:

<add key=”EndpointAnalysisDisabled” value=“true” />

The section should look like this afterwards:

<appSettings>
<add key="DebugConsoleTrace" value="False" />
<add key="AdvancedGatewayClientDownloadUrl" value="http://www.citrix.com" />
<add key="AdvancedGatewayClientActivationDelay" value="10" />
<add key="MaxConnectionsToAuthenticationService" value="20" />
<add key="LogonPointId" value="00000000-0000-0000-0000-000000000000" />
<add key="DeployedBy" value="LACONFIG" />
<add key="ExtendedSecurIdFunctionalityEnabled" value="true" />
<add key="SecondaryAuthenticationIsOptional" value="false" />
<add key="EndpointAnalysisDisabled" value="True" />
<!- -

After saving the changes, a user calling this manipulated LogonPoint will now be forwarded immediately to the login prompt without seeing any EPA “nag screen” 🙂

AAC tuning, part 2 >>

!!! Please read the first comment to this post !!!

Regards
Ecki

May 2nd, 2007

Secure Access Client Kommandozeilen Parameter Secure Access Client Command Line Parameters

Wenig bekannt ist die Tatsache, dass der Secure Access Client (4.2 und später, einschliesslich net6vpn.exe) über einige interessante Kommandozeilen Parameter verfügt. Daher will ich diese hier kurz vorstellen. Der interessanteste Einsatzzweck sind sicher automatisierte Installationen via Softwareverteilung, oder einfachem Batch Script.

Achtung: Bei diesen Parameter ist die GROSS/klein-schreibung wichtig!

Folgende Parameter stehen zur Verfügung:

  • -C zeigt das Konfigurations Interface (GUI) an
    Beispiel: “CitrixSAClient.exe –C”
  • -H verbindet auf die angegebene Serveradresse und Port (Syntax: -H SERVER_IP:PORT)
    Beispiel: “CitrixSAClient.exe –H 192.168.1.1:443”
  • -p zwingt den Client, den angegebenen Proxy zu verwenden (Syntax: -p PROXY_IP:PORT)
    Beispiel: “CitrixSAClient.exe –p 192.168.1.1:8080”
  • -i Installiert den Client, wird meist mit anderen Parametern verwendet
    Beispiel: “CitrixSAClient.exe –i”
  • -D konfiguriert die URL für das Desktop Icon für Advanced Access Control (Syntax: -D AG_AAC_URL)
    Beispiel: “CitrixSAClient.exe -D https://cag.company.com”
  • -Q Quiet Mode, unterdrückt alle Meldungen. Dieser Parameter kann nur in Verbindung mit -i (Install), oder -U (Uninstall) verwendet werden. Er muss vor allen anderen Parametern stehen
    Beispiel: “CitrixSAClient.exe –Q”
  • -U Deinstalliert den Client und Treiber
    Beispiel: “CitrixSAClient.exe –U”
  • -v zeigt Versionsinformationen zum Client
    Beispiel: “CitrixSAClient.exe –v”

Ein Beispiel für eine Silent Installation in Verbindung mit AAC sähe so aus:
CitrixSAClient.exe –Q –D https://AG_AAC_URL –i

Eine Installation für ein Access Gateway Standard sähe so aus:
CitrixSAClient.exe –Q –H [AG_SYSTEM_FQDN]:[AG_SYSTEM_PORT] –i

Gefunden unter CTX108757.

Gruss
Ecki

It is a little known fact, that the Secure Access Client (4.2 and later, including net6vpn.exe) offers some interesting command line parameters. I will therefore present them here. The most intersting part is the ability to automate installation of the client via software deployment or simple batch script.

Note: These parameters are case-sensitive.

The following parameters are available:

  • -C Configure the Virtual Private Networking (VPN) client–bring up the GUI configuration screen
    Example: “CitrixSAClient.exe –C”
  • -H Connect to a specific server address and port (Syntax: -H SERVER_IP:PORT)
    Example: “CitrixSAClient.exe –H 192.168.1.1:443”
  • -p Connect with a proxy IP address and port (Syntax: -p PROXY_IP:PORT)
    Example: “CitrixSAClient.exe –p 192.168.1.1:8080”
  • -i Install the client. This is used in combination with other parameters for silent installations
    Example: “CitrixSAClient.exe –i”
  • -D Sets the URL for the desktop icon for Advanced Access Control mode (Syntax: -D AG_AAC_URL)
    Example: “CitrixSAClient.exe -D https://cag.company.com”
  • -Q Quiet mode parameter–this can only be used during an install (-i) or uninstall (-U). It must appear before all other parameters
    Example: “CitrixSAClient.exe –Q”
  • -U Uninstall the VPN client and drivers
    Example: “CitrixSAClient.exe –U”
  • -v Shows the version of the client you are launching
    Example: “CitrixSAClient.exe –v”

Below is a syntax example for a silent installation with Advanced Access Control integration:
CitrixSAClient.exe –Q –D https://AG_AAC_URL –i

A silent installation for Access Gateway Standard would look like that:
CitrixSAClient.exe –Q –H [AG_SYSTEM_FQDN]:[AG_SYSTEM_PORT] –i

From CTX108757.

Regards
Ecki

April 27th, 2007

Dynamic USB Utility für den 32-bit Windows Presentation Server ClientDynamic USB Utility for the 32-bit Windows Presentation Server Client

Citrix Advanced Products Group hat kürzlich eine interessante Preview veröffentlicht, das Dynamic USB Utility for the 32-bit Windows Presentation Server Client.

Dynamic USB ermöglicht den Zugriff auf USB Laufwerke, die erst nach dem Aufbau einer Presentation Server Session verbunden wurden. Das Tool erstellt für jeden angesteckten USB Speicher ein Verzeichnis unter C:\CitrixUSBStore im Dateisystem des Clients. In diesem Verzeichnis erscheinen alle Dateien des verlinkten USB Laufwerks. Wenn das Laufwerk später entfernt wird, wird das entsprechende Verzeichnis wieder gelöscht.

Voraussetzungen
Das Tool setzt zwingend ein NTFS Filesystem auf dem Client voraus. Windows XP wird als Minimalvoraussetzung genannt.

Installation
Das Tool muss nicht installiert werden, es ist, nach dem Entzippen, direkt lauffähig.

Bedienung

1. Der Start von DynamicUSB.exe auf dem Client erzeugt ein System Tray Icon.

2. Wenn jetzt ein USB Speicher angesteckt wird, erstellt DynamicUSB ein Verzeichnis C:\CitrixUSBStore\Drive_X, wobei:

  • X: der Laufwerksbuchstabe des angesteckten USB Speichers ist
  • Drive_X ein Link zu X:\ darstellt

3. Wenn der USB Speicher abgesteckt wird, wird das Verzeichnis Drive_X gelöscht.

Das Erstellen, bzw. das Löschen dieses Verzeichnisses kann beim An- und Abstecken eines USB Speichers in einer Presentation Server Session beobachtet werden.

Default Verzeichnis anpassen
Um das Default Verzeichnis (C:\CitrixUSBStore), für die verlinkten USB Speicher zu modifizieren, kann das Tool mit Parameter gestartet werden:

DynamicUSB “FullPathoftheDesiredRootDirectory”

Falls Leerzeichen im gewünschten Zielverzeichnisnamen vorhanden sind, muss der Parameter zwingend in Anführungsstriche gesetzt werden.

Das Tool kann hier heruntergeladen werden.

Gruss
Ecki

Citrix Advanced Products Group investigates emerging technologies relevant to the Citrix business mission, and creates research, prototypes and first release versions of products addressing these technologies. As part of this effort, the Advanced Products Group periodically releases technical preview versions of products to the Citrix community to encourage feedback.

Overview
DynamicUSB allows you to access a USB drive in a Presentation Server session in situations where the device is connected to a client system after the Presentation Server session is established.

The utility creates a directory under C:\CitrixUSBStore in the client file system for each USB drive that is inserted into the client device. This linked directory reflects the contents of the USB drive; thus, all directories and files in the USB drive appear as directories and files under the linked directory. If the USB key is subsequently removed, the utility deletes the corresponding link directory.

The user can access the linked directory from a Presentation Server session using client drive mapping functionality.

Prerequisites
This utility is designed to work only on client systems that support the New Technology File System (NTFS). A Windows XP or later variant of the client operating system is a prerequisite.

Installing DynamicUSB
There is no specific installer for this utility. Extract the executable DynamicUSB.EXE and proceed to use it as described below.

How to Use DynamicUSB

1. Run DynamicUSB.EXE on the client workstation. It creates a system tray icon.

2. Plug in a USB key. DynamicUSB creates a directory called C:\CitrixUSBStore\Drive_X where:

  • X: is the USB drive letter assigned to the USB key by the client operating system
  • Drive_X is a link to X:\

3. When you unplug the USB key, the utility deletes the directory Drive_X.

You can observe directory Drive_X being dynamically created or destroyed in the Presentation Server session as you plug or unplug your USB key.

Modify the Default Root Directory for Linked Directories
To modify the default directory in which linked directories are created (C:\CitrixUSBStore), launch DynamicUSB with the following command line:

DynamicUSB FullPathoftheDesiredRootDirectory

If FullPathoftheDesiredRootDirectory has spaces, enclose it with double quotation marks as shown below:

DynamicUSB “FullPathoftheDesiredRootDirectory”

You can download the tool here.

Regards
Ecki

|