Access

CTX-Blog

powered by Ecki's Place

May 4th, 2010

Homedrive wird beim Login nicht verbunden (Vista/Windows 7) Homedrive fails silently to mount at logon (Vista/Windows 7)

Nach dem Update auf Vista/Windows 7 wird das UserHome Verzeichnis beim Login nicht mehr verbunden. Alle anderen Drivemappings, welche über das Logonscript eingerichtet werden, funktionieren normal. Das passiert immer dann, wenn das UserHome über das AD Userobjekt und nicht über GPO gemappt wird. Es werden keine Fehler geloggt und auch sonst finden sich keinerlei Hinweise auf die Ursache des Problems 🙁

Das Abschalten der UAC hilft zwar, sollte aber nicht die Lösung sein, da damit wieder weitere Sicherheitslücken aufgerissen werden.

Nicht direkt ein Citrix Problem, aber sehr nervig, wenn man darüber stolpert. Da ich einige Zeit für die Problemlösung benötigt habe, dachte ich mir, dass hier ein kleiner Hinweis angebracht ist.

Folgender Registry Key erlaubt das Mappen des UserHome Shares wieder:

Windows Registry Editor Version 5.00

[HKEY_LOCAL_MACHINE\SOFTWARE\Microsoft\Windows\CurrentVersion\Policies\System]
“EnableLinkedConnections”=dword:00000001

Die Lösung habe ich übrigens hier gefunden.

Gruss
Ecki

After the update to Vista/Windows 7, mapping of the UserHome drive fails silently at logon. All other drive mappings made by a logon script are successful. This happens always if the UserHome is mapped through the AD user-object. UserHome mapping configured by GPO is not affected. There are no error messages logged and it is hard to find a reason for this behavior 🙁

Disabling UAC helps, but should not be the final solution, since it opens up many security holes.

Not really a Citrix problem but annoying if you happen to stumble upon it. Since it took me some time to find a solution, i thought it might be a good idea to post it here.

The following registry key allows again for a successful UserHome mapping:

Windows Registry Editor Version 5.00

[HKEY_LOCAL_MACHINE\SOFTWARE\Microsoft\Windows\CurrentVersion\Policies\System]
“EnableLinkedConnections”=dword:00000001

The original solution has been posted here.

Regards
Ecki

October 21st, 2008

SmartCard Single Sign On mit PNAgent Smart Card Single Sign On with PNAgent

Alle verfügbaren Dokumentationen zum Thema “Single Sign On” oder “Credential passthrough” mit SmartCard und Citrix Clients beschränkt sich leider auf den Gebrauch der Program Neighborhood, wie folgende Anleitung von Brianmadden beispielhaft zeigt. Diesen Client setze ich bei Kundenprojekten aber seit Jahren nur noch in Ausnamefällen ein. Statt dessen verwende ich meistens den PNAgent, oder den Web Client.

Diese Clients entzogen sich aber bisher dem Passthrough der SmartCard PIN, da sie die APPSRV.INI ignorierten und daher die notwendigen Einstellungen nicht übernahmen.

Seit dem 10.0er Client findet sich im Installationsverzeichnis jedes Citrix Clients eine Datei “icaclient.adm”, ein Active Directory Group Policies Template, das die benötigten Optionen enthält. Seit dem Release 10.0 überprüft jeder ICA Client zuerst, ob eine entsprechende Policy konfiguriert wurde und übernimmt dann diese Einstellungen aus der Registry. Die Datei APPSRV.INI fungiert nur noch als Fallback, wenn keine Policy existiert. Dieses neue Client Feature ermöglicht nun endlich ein “Single Sign On” mit SmartCard und PNAgent.

Hier in Kürze die Schritte, die es dafür benötigt:

1. Auf dem Presentation Server /XenApp Server

  • Überprüfen, ob ein Login auf einen Desktop mittels SmartCard generell funktioniert. Für SmartCard-Passthrough muss in den Server-Eigenschaften die Option “Trust requests sent to the XML Service” aktiviert sein.

2. Auf dem Web Interface Server

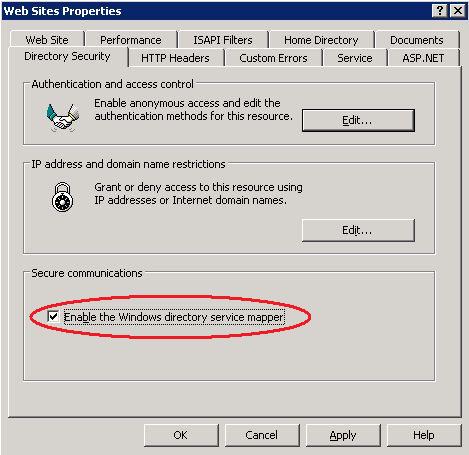
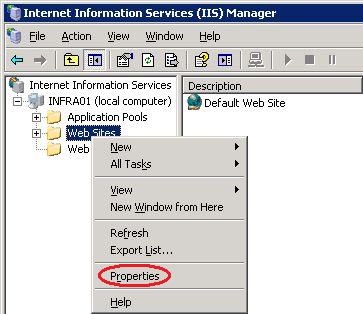
    • Hier muss SSL aktiviert (ein Web Server Zertifikat installiert) und das “Directory Service Mapping” aktiviert sein. Diese Option findet sich im IIS Manager unter den Eigenschaften des “Web Sites” Ordners:

Web Sites EigenschaftenDirectory Service Mapper

  • In der Access Suite Management Console muss die PNAgent Web Site unter “Configure Authentication” auf “Smart Card with Passthrough” konfiguriert werden.

3. Registry

  • Überprüfen, ob unter HKLM\System\CurrentControlSet\Control\TerminalServer\WinStations\ICA-tcp der Wert UseDefaultGina auf 0 gesetzt ist (1 schaltet die CtxGina ab).

4. Active Directory Policy

    • Import des ADM Templates in eine beliebige Policy
    • Im User Teil der Policy müssen folgende Einstellungen gesetzt sein:

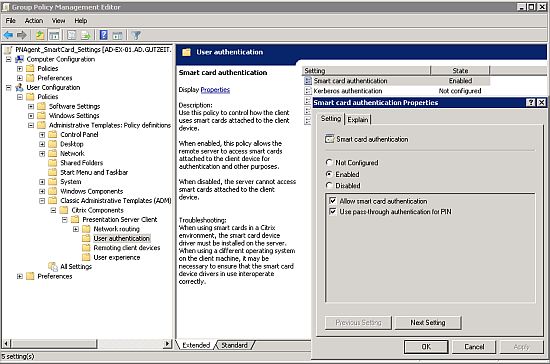
Citrix Policy

  • <PolicyName>\User Configuration\Administrative Templates\Citrix Components\Presentation Server Client\User Authentication\Smart Card Authentication muss “Enabled” werden und “Allow Smart Card Authentication” und “Use pass-through authentication for PIN” müssen aktiviert werden.
  • Alle weiteren Optionen bleiben unkonfiguriert, vorausgesetzt es sollen nur SmartCard Logins konfiguriert werden.

Jetzt sollte einem “Single Sign On” mit SmartCard und PNAgent nichts mehr im Wege stehen 😀

Diese Anleitung gilt leider nur für Windows XP und Server 2003. Vista und 2008 Server sind hier momentan explizit ausgenommen, da aktuell kein Citrix Client, einschliesslich 11.0, in der Lage ist, die SmartCard PIN unter diesen OS weiterzureichen 🙁

Hier noch ein paar interessante weiterführende Links:

Gruss
Ecki

All available documentation regarding “Single Sign On” or “Credential pass-through” with Smart Card and Citrix clients is limited to the Program Neighborhood client only, as can be seen exemplarily at Brianmadden . I don’t use this client in customer projects for a couple of years now but use the PNAgent or the Web client instead.

With these clients, a pass-through of the Smart Card PIN didn’t work, because they do not read their settings from the APPSRV.INI, which would allow for the neccessary settings.

Since client version 10.0, an Active Directory Group Policy Template can be found in every client installation directory, named “icaclient.adm”. All clients, starting with 10.0 now read the policy settings first and make use of the APPSRV.INI only in case, no policy is defined. This new feature allows now for a “Single Sign On” with SmartCard and PNAgent.

Here is, what you need to do, to get it up and running:

1. On the Presentation Server /XenApp Server

  • Confirm proper operation by logging in to a full desktop on the Citrix server. Insert a Smart Card and it should begin reading it. Enable “Trust requests sent to the XML Service”. This is necessary if using smart card pass through logon.

2. On the Web Interface Server

    • SSL must be configured and active (a web server certificate has to be installed) and the “Directory Service Mapping” has to be activated. This option can be found in the IIS Manager below the properties of the “Web Sites” folder:

Web Sites propertiesDirectory Service Mapper

  • The Web Interface site itself must now be configured. Open the Citrix Access Suite Management Console on the Web Interface server and run discovery if necessary to find the Web Interface site you wish to work with.
    Under “Configure Authentication” select “Smart Card with Passthrough”.

3. Registry

  • Check HKLM\System\CurrentControlSet\Control\TerminalServer\WinStations\ICA-tcp the value for “UseDefaultGina” should be 0 (1 disables the CtxGina).

4. Active Directory Policy

    • Import the ADM template into a Policy
    • Go to the “User Configuration” of the policy, leave the Computer part set to “not configured”. The following settings have to be enabled:

Citrix Policy

  • <PolicyName>\User Configuration\Administrative Templates\Citrix Components\Presentation Server Client\User Authentication\Smart Card Authentication has to be “Enabled” and “Allow Smart Card Authentication” and “Use pass-through authentication for PIN” have to be activated.
  • Leave everything else to “Not Configured”, provided that you are testing just Smart Card and PIN pass-through.

Now “Single Sign On” with Smart Card and PNAgent should work 😀

Unfortunately these instructions only work for Windows XP and Server 2003. At the moment, no Citrix client, including 11.0, allows for PIN pass-through with Vista and 2008 Server 🙁

Here are some more interesting links:

Regards
Ecki

June 18th, 2008

IE Kiosk Mode IE kiosk mode

Ich musste gerade bei einem Kunden dafür sorgen, dass der Internet Explorer ohne Navigationsleisten und sonstige Benutzerschnittstellen startet, um eine browserbasierte Applikation zum SmartCard Rollout zu veröffentlichen. Die Suche nach einer Lösung gestaltete sich hierbei schwieriger als erwartet.

Der häufigste Ansatz, den Google bei einer entsprechenden Anfrage ausspuckte, war der eingebaute “Kiosk Mode” des Internet Explorers. Der Modus wird durch den Aufruf des IE mit dem Parameter -k aktiviert, s. http://support.microsoft.com/kb/154780. Dieser Modus versetzt den IE in den Vollbild Modus, blendet aber, im Gegensatz zum Tastendruck F11, die Symbolleisten komplett aus. Ein Beenden des IE ist dann nur noch über Alt. + F4 möglich und auch die sonstige Bedienung beschränkt sich ausschliesslich auf Tastenkürzel. Eine eher endkundenuntaugliche Variante 🙁

Der nächste Ansatz waren Microsoft Group Policies, aber auch hier gab es zu viele Einschränkungen und Probleme. So lassen sich die Symbolleisten des IE nicht komplett per Policy ausblenden, sondern nur einzelne Icons, was wiederum Anpassungen in der Registry unter HKCU notwendig gemacht hätte, um die Symbolleisten komplett zu entfernen. Hier gehen die ansonsten ausufernden IE Policies eindeutig nicht weit genug 🙁

Die Lösung kam in Form einen VBS Objekts. Der Internet Explorer lässt sich über VBS ansprechen und steuern. Dies gab mir die Möglichkeit, auch das Erscheinungsbild des Browsers soweit anzupassen, dass sämtliche Steuerelemente ausgeblendet werden können, ohne wichtige Funktionen zu beeinträchtigen. Mit dem folgenden Code lässt sich nun ein IE mit einer vordefinierten URL starten und ein Ausbruch aus dieser Umgebung ist deutlich erschwert 🙂

DIM IE
Set IE = CreateObject("InternetExplorer.Application")
IE.Navigate "http://das.ist.die.anzuzeigende.url"
IE.Visible=True
IE.Toolbar=no
IE.Menubar=no
IE.Statusbar=no
IE.Width=750
IE.Height=600
IE.Resizable=yes
'IE.Top=5
'IE.Left=5

Auf den Eintrag IE.Navigate folgt hierbei die aufzurufende URL, wobei die gesamte URL in Anführungszeichen gesetzt sein muss. Optionale Parameter sind die Fenstergrösse (IE.Width/IE.Height) und die Position des Fensters auf dem Desktop (IE.Top/IE.Left).

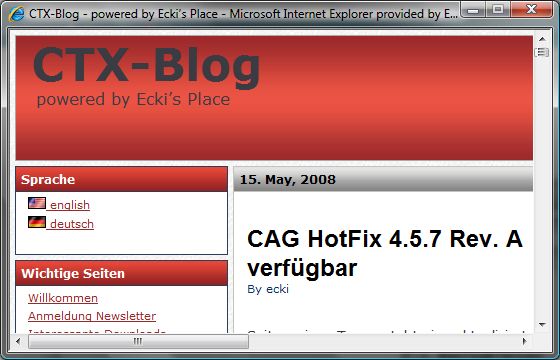
IE Kiosk Mode

Das Script funktioniert sowohl unter Windows XP als auch 2003 Server problemlos. Unter Vista und 2008 Server sind Administrator Rechte notwendig, um den gewünschten Effekt zu erzielen!

Gruss
Ecki

I recently had a customer that wanted Internet Explorer to be published as a locked down version without toolbars and userinterface. The goal was to publish a browser based application to allow for a smart card rollout and not allowing users to browse away from this site. The search for a solution was harder than expected.

The solution most frequently found with Google was the built in “kiosk mode” of Internet Explorer. This mode can be activated by appending the parameter -k to the IE shortcut. For more details see http://support.microsoft.com/kb/154780. In this mode the IE starts in full screen mode, but without the ability to access the navigation panes, toolbars and menus as it would be possible when switching to full screen view by pressing F11. To end such a session, the user is forced to use the Alt. + F4 hotkey and all navigation in IE has to be done through hotkeys too. Not the solution we wanted for standard users 🙁

The next approach were Microsoft Group policies, but they too had too many constraints and issues. One issue here was, that there is no way, to hide the standard toolbars through group policies. It would have been therefore inevitable to manipulate the HKCU branch of the users registry at logon. This is a subject, where the otherwise “overloaded” IE policies are not detailed enough 🙁

The solution came through a VBS object. Internet Explorer can be addresses and controlled through VBS. This gave me the possibility to adjust the user interface of the IE and to hide all toolbars, navigation panes and menues, without disabling basic functionality. The following code starts IE with a predefined URL and makes it much more difficult for users to break out of the predefined environment 🙂

DIM IE
Set IE = CreateObject("InternetExplorer.Application")
IE.Navigate "http://this.is.the.url.to.be.shown"
IE.Visible=True
IE.Toolbar=no
IE.Menubar=no
IE.Statusbar=no
IE.Width=750
IE.Height=600
IE.Resizable=yes
'IE.Top=5
'IE.Left=5

The entry IE.Navigate stands for the target URL. Take care that the whole URL is surrounded by double quotes. Optional parameters are for the windows size (IE.Width/IE.Height) and the windows position on the users desktop (IE.Top/IE.Left).

IE kiosk mode

This script works perfect under Windows XP and 2003 Server. With Vista and 2008 Server administrative privileges are required!

Regards
Ecki
July 17th, 2007

LANMANServer und LANMANWorkstation Tuning LANMANServer and LANMANWorkstation Tuning

Bei Brian Madden bin ich auf ein sehr interessantes Dokument zum Thema Terminal Server Tuning gestossen. In diesem Artikel werden sämtliche relevanten LANMANServer und LANMANWorkstation Parameter und Registry Keys vorgestellt und erkärt, die in diesem Zusammenhang von Bedeutung sind.

Anschliessend werden mögliche Optimierungsmassnamen und deren Risiken besprochen und sogar ein ADM Template zur Verfügung gestellt, mit dem sich die besprochenen Optimierungen via GPO umsetzen lassen.

Der vollständige Artikel kann hier nachgelesen werden.

Gruss
Ecki

I recently stumbled across this realy good article about terminal server tuning. This article introduces and explains all the relevant LANMANServer and LANMANWorkstation parameters and registry keys.

Following that, the article discusses the potential optimizing actions and their risks and provides even an ADM template that allows to tune your environment through GPOs.

The complete article can be found here.

Regards
Ecki

|