Access

CTX-Blog

powered by Ecki's Place

October 21st, 2008

SmartCard Single Sign On mit PNAgent Smart Card Single Sign On with PNAgent

Alle verfügbaren Dokumentationen zum Thema “Single Sign On” oder “Credential passthrough” mit SmartCard und Citrix Clients beschränkt sich leider auf den Gebrauch der Program Neighborhood, wie folgende Anleitung von Brianmadden beispielhaft zeigt. Diesen Client setze ich bei Kundenprojekten aber seit Jahren nur noch in Ausnamefällen ein. Statt dessen verwende ich meistens den PNAgent, oder den Web Client.

Diese Clients entzogen sich aber bisher dem Passthrough der SmartCard PIN, da sie die APPSRV.INI ignorierten und daher die notwendigen Einstellungen nicht übernahmen.

Seit dem 10.0er Client findet sich im Installationsverzeichnis jedes Citrix Clients eine Datei “icaclient.adm”, ein Active Directory Group Policies Template, das die benötigten Optionen enthält. Seit dem Release 10.0 überprüft jeder ICA Client zuerst, ob eine entsprechende Policy konfiguriert wurde und übernimmt dann diese Einstellungen aus der Registry. Die Datei APPSRV.INI fungiert nur noch als Fallback, wenn keine Policy existiert. Dieses neue Client Feature ermöglicht nun endlich ein “Single Sign On” mit SmartCard und PNAgent.

Hier in Kürze die Schritte, die es dafür benötigt:

1. Auf dem Presentation Server /XenApp Server

  • Überprüfen, ob ein Login auf einen Desktop mittels SmartCard generell funktioniert. Für SmartCard-Passthrough muss in den Server-Eigenschaften die Option “Trust requests sent to the XML Service” aktiviert sein.

2. Auf dem Web Interface Server

    • Hier muss SSL aktiviert (ein Web Server Zertifikat installiert) und das “Directory Service Mapping” aktiviert sein. Diese Option findet sich im IIS Manager unter den Eigenschaften des “Web Sites” Ordners:
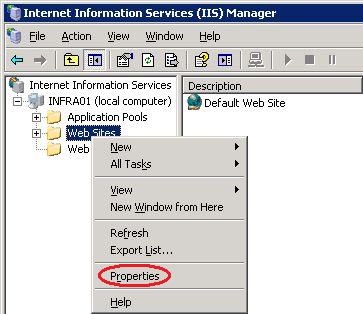
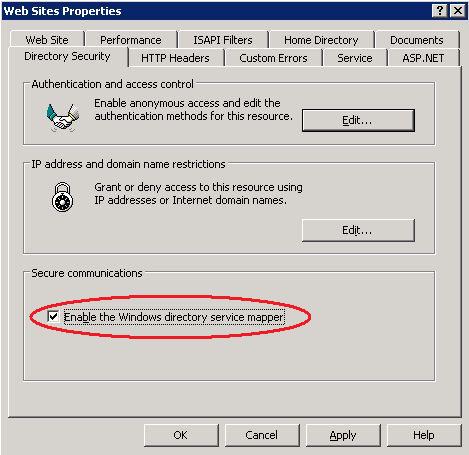
Web Sites EigenschaftenDirectory Service Mapper

  • In der Access Suite Management Console muss die PNAgent Web Site unter “Configure Authentication” auf “Smart Card with Passthrough” konfiguriert werden.

3. Registry

  • Überprüfen, ob unter HKLM\System\CurrentControlSet\Control\TerminalServer\WinStations\ICA-tcp der Wert UseDefaultGina auf 0 gesetzt ist (1 schaltet die CtxGina ab).

4. Active Directory Policy

    • Import des ADM Templates in eine beliebige Policy
    • Im User Teil der Policy müssen folgende Einstellungen gesetzt sein:
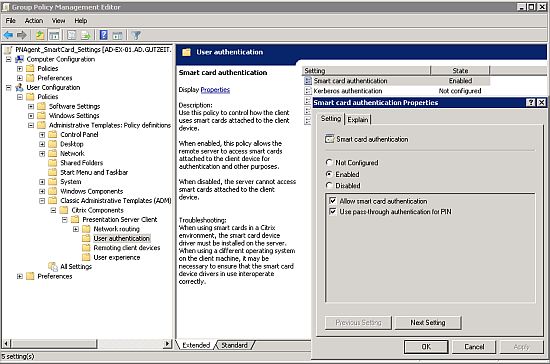
Citrix Policy

  • <PolicyName>\User Configuration\Administrative Templates\Citrix Components\Presentation Server Client\User Authentication\Smart Card Authentication muss “Enabled” werden und “Allow Smart Card Authentication” und “Use pass-through authentication for PIN” müssen aktiviert werden.
  • Alle weiteren Optionen bleiben unkonfiguriert, vorausgesetzt es sollen nur SmartCard Logins konfiguriert werden.

Jetzt sollte einem “Single Sign On” mit SmartCard und PNAgent nichts mehr im Wege stehen 😀

Diese Anleitung gilt leider nur für Windows XP und Server 2003. Vista und 2008 Server sind hier momentan explizit ausgenommen, da aktuell kein Citrix Client, einschliesslich 11.0, in der Lage ist, die SmartCard PIN unter diesen OS weiterzureichen 🙁

Hier noch ein paar interessante weiterführende Links:

Gruss
Ecki

All available documentation regarding “Single Sign On” or “Credential pass-through” with Smart Card and Citrix clients is limited to the Program Neighborhood client only, as can be seen exemplarily at Brianmadden . I don’t use this client in customer projects for a couple of years now but use the PNAgent or the Web client instead.

With these clients, a pass-through of the Smart Card PIN didn’t work, because they do not read their settings from the APPSRV.INI, which would allow for the neccessary settings.

Since client version 10.0, an Active Directory Group Policy Template can be found in every client installation directory, named “icaclient.adm”. All clients, starting with 10.0 now read the policy settings first and make use of the APPSRV.INI only in case, no policy is defined. This new feature allows now for a “Single Sign On” with SmartCard and PNAgent.

Here is, what you need to do, to get it up and running:

1. On the Presentation Server /XenApp Server

  • Confirm proper operation by logging in to a full desktop on the Citrix server. Insert a Smart Card and it should begin reading it. Enable “Trust requests sent to the XML Service”. This is necessary if using smart card pass through logon.

2. On the Web Interface Server

    • SSL must be configured and active (a web server certificate has to be installed) and the “Directory Service Mapping” has to be activated. This option can be found in the IIS Manager below the properties of the “Web Sites” folder:

Web Sites propertiesDirectory Service Mapper

  • The Web Interface site itself must now be configured. Open the Citrix Access Suite Management Console on the Web Interface server and run discovery if necessary to find the Web Interface site you wish to work with.
    Under “Configure Authentication” select “Smart Card with Passthrough”.

3. Registry

  • Check HKLM\System\CurrentControlSet\Control\TerminalServer\WinStations\ICA-tcp the value for “UseDefaultGina” should be 0 (1 disables the CtxGina).

4. Active Directory Policy

    • Import the ADM template into a Policy
    • Go to the “User Configuration” of the policy, leave the Computer part set to “not configured”. The following settings have to be enabled:

Citrix Policy

  • <PolicyName>\User Configuration\Administrative Templates\Citrix Components\Presentation Server Client\User Authentication\Smart Card Authentication has to be “Enabled” and “Allow Smart Card Authentication” and “Use pass-through authentication for PIN” have to be activated.
  • Leave everything else to “Not Configured”, provided that you are testing just Smart Card and PIN pass-through.

Now “Single Sign On” with Smart Card and PNAgent should work 😀

Unfortunately these instructions only work for Windows XP and Server 2003. At the moment, no Citrix client, including 11.0, allows for PIN pass-through with Vista and 2008 Server 🙁

Here are some more interesting links:

Regards
Ecki

December 15th, 2007

AAC Tuning, Teil 3 AAC tuning, part 3

Two Factor Authentication mit RSA, SafeWord oder einer beliebigen RADIUS Lösung ist eine gängige Methode zur sicheren Authentifizierung an einem AAC Deployment. AAC beschriftet das Eingabefeld für das RSA/SafeWord/RADIUS One Time Passwort bei einem deutschen Client jedoch starr mit dem Text “SecurID-PASSCODE”, “SafeWord CODE:” oder generisch mit “RADIUS-Passwort”.

Endbenutzer kennen ihre One Time Passwort Lösung jedoch meist unter einem anderem Namen, meist dem Namen des Herstellers. Dies kann dann zu Verwirrung und Problemen bei der Eingabe führen.

Dieses Problem lässt sich für RSA und SafeWord recht einfach lösen. Eine Lösung für RADIUS ist weiter unten beschrieben. Wie schon im ersten und zweiten Beitrag zu dieser Reihe, befindet sich der Schlüssel in der Datei “web.config” im Root des jeweiligen LogonPoint Verzeichnisses.

Auf einem Standard AAC Server vermutlich unter:

C:\Inetpub\wwwroot\CitrixLogonPoint\#LogonPointName#

Es existiert noch eine weitere Version dieser Datei unter “C:\Inetpub\wwwroot\CitrixLogonPoint\”, welche unberührt bleiben sollte !

Diese Datei lässt sich mit einem Editor wie z. B. NotePad öffnen und bearbeiten. Im letzten Drittel findet sich der Abschnitt <appSettings>, in dem diverse Einstellungen vorgenommen werden können. Unter Anderem lässt sich hier auch die Anzeige für das Eingabefeld des One Time Passwords manipulieren, so dass ein beliebiger Text angezeigt werden kann. Dazu genügt es, folgende Zeilen im <appSettings> Block einzufügen:

<add key=”SecondaryAuthenticationPromptOverride” value=”Password:” />
und
<add key=”SecondaryAuthenticationToolTipOverride” value=”Enter Password” />

Wobei “Password:” für den anzuzeigenden Text steht und “Enter Password” den Text für den Tool Tip festlegt.

Der Abschnitt sollte dann z. B. so aussehen:

<appSettings>
<add key="DebugConsoleTrace" value="False" />
<add key="AdvancedGatewayClientDownloadUrl" value="http://www.citrix.com" />
<add key="AdvancedGatewayClientActivationDelay" value="10" />
<add key="MaxConnectionsToAuthenticationService" value="20" />
<add key="LogonPointId" value="00000000-0000-0000-0000-000000000000" />
<add key="DeployedBy" value="LACONFIG" />
<add key="ExtendedSecurIdFunctionalityEnabled" value="true" />
<add key="SecondaryAuthenticationPromptOverride" value="SafeWord PIN + Zahlencode:" />
<add key="SecondaryAuthenticationToolTipOverride" value="PIN und Zahlencode eingeben" />
<!- -

Nach dem Speichern der Datei und einem Refresh des LogonPoints sollte der neue Text erscheinen 🙂

Dieses Vorgehen funktioniert leider nur bei RSA SecureID und SafeWord. Der Text, welcher bei einer RADIUS Lösung angezeigt wird, ist leider hart codiert und kann nicht so einfach geändert werden. Es gibt zwar bereits einen Feature Request bei Citrix, aber wann eine Lösung effektiv verfügbar sein wird, ist momentan noch nicht abzusehen.

Joel Donaldson hat im Citrix AAC Forum jedoch auch für diesen Fall eine tolle Umgehungs- / Übergangslösung veröffentlicht. Eine einfache Manipulation der Datei BasePage.aspx aus dem jeweiligen LogonPoint Verzeichnis läst das Problem auf elegante Art und Weise.

Es genügt, bei einem deutschen LogonPoint, folgenden Abschnitt vor dem </body> Tag einzufügen:

<script type="text/javascript" language="JavaScript">
document.body.innerHTML=document.body.innerHTML.replace("RADIUS-Kennwort:","Kobil Einmalpasswort:");
</script>

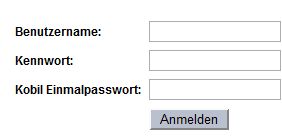
Das Ergbnis sieht dann so aus:
Loginprompt nach der Manipulation

Sollen auch englische LogonPoints unterstützt werden, hilft ein weiterer Code Block, der die englische Schreibweise berücksichtigt:

<script type="text/javascript" language="JavaScript">
document.body.innerHTML=document.body.innerHTML.replace("RADIUS Password:","Kobil OTP:");
</script>

Weitere Sprachen können so leicht hinzugefügt werden.

Wer sich nun fragt, warum das funktioniert, dem kann evtl. diese Erklärung weiterhelfen. Der Script Code sucht im Text der ausgelieferten Webseite nach dem String “RADIUS-Kennwort:” und ersetzt ihn dann durch den zweiten Parameter der Funktion “document.body.innerHTML.replace”, also in unserem Beispiel durch “Kobil Einmalpasswort:”.

Achtung, dies funktioniert nur, solange JavaScript im Browser aktiviert und erlaubt ist. Ist JavaScript abgeschaltet, erscheint wieder der ursprüngliche Text “RADIUS-Kennwort:”! Weitere Nebenwirkungen sind bei dieser Anpassung nicht zu befürchten.

< < AAC Tuning, Teil 2

!!! Bitte beachtet den ersten Kommentar zu diesem Beitrag !!!

Gruss
Ecki

Two Factor Authentication with RSA, SafeWord or any other third party RADIUS solution is a common way to authenticate in a secure manner to an AAC deployment. AAC however labels the input box for the OTP (One Time Password) fix with the text “SecurID-PASSCODE”, “SafeWord CODE:” oder generic with “RADIUS Password”.

Endusers however know their OTP solution most of the time with other names, the name of the RADIUS solution provider for example. This can lead to confusion during the login process.

This problem is easily solved for RSA SecureID and SafeWord. A solution for RADIUS is described further down. As in part 1 and 2, the solution can be found in the “web.config” file in the root of the respective LogonPoint directory.

On a standard AAC server this is presumably:

C:\Inetpub\wwwroot\CitrixLogonPoint\#LogonPointName#

There is an other version of this file in the “C:\Inetpub\wwwroot\CitrixLogonPoint\” directory which should stay untouched !

This file can be opened and edited with any editor like the Windows NotePad. In the last third of the file you can find a section <appSettings>, which gives you some interesting possibilities. Among other things you can configure the lables for the OTP field, so that it displays a text your users expect. All it needs, is to change the following line below the <appSettings> section:

<add key=”SecondaryAuthenticationPromptOverride” value=”Password:” />
and
<add key=”SecondaryAuthenticationToolTipOverride” value=”Enter Password” />

Where “Password:” stands for the text to be displayed as lable and “Enter Password” stands for the text, displayed as tool tip.

The section should look like this afterwards:

<appSettings>
<add key="DebugConsoleTrace" value="False" />
<add key="AdvancedGatewayClientDownloadUrl" value="http://www.citrix.com" />
<add key="AdvancedGatewayClientActivationDelay" value="10" />
<add key="MaxConnectionsToAuthenticationService" value="20" />
<add key="LogonPointId" value="00000000-0000-0000-0000-000000000000" />
<add key="DeployedBy" value="LACONFIG" />
<add key="ExtendedSecurIdFunctionalityEnabled" value="true" />
<add key="SecondaryAuthenticationPromptOverride" value="SafeWord PIN + Zahlencode:" />
<add key="SecondaryAuthenticationToolTipOverride" value="PIN und Zahlencode eingeben" />
<!- -

After saving the changes, a user calling this manipulated LogonPoint should now see the new lable.

This method unfortunately works only for RSA SecureID and SafeWord. The text displayed, when using a third party RADIUS solution is hard coded and not that easy to manipulate. There is a pending feature request at Citrix, but it isn’t clear, when a solution will be publicly available.

At last I found a very good work-around in the Citrix AAC Forum, published by Joel Donaldson. A simple manipulation of the BasePage.aspx file of the respective LogonPoint solves the problem in an elegant way.

With an english LogonPoint it is sufficient, to add the following paragraph before the </body> tag:

<script type="text/javascript" language="JavaScript">
document.body.innerHTML=document.body.innerHTML.replace("RADIUS Password:","Kobil Einmalpasswort:");
</script>

The result will look like this:
Loginprompt nach der Manipulation

If you want to support german LogonPoints also, you need another code block that respects the german notation:

<script type="text/javascript" language="JavaScript">
document.body.innerHTML=document.body.innerHTML.replace("RADIUS-Kennwort:","Kobil Einmalpasswort:");
</script>

Other languages can be added easily this way.

If someone is asking itself why this works, this short explanation may help. The script code is looking for the string “RADIUS Password:” in the delivered web page and replaces it with the second parameter of the function “document.body.innerHTML.replace”, in our example “Kobil OTP:”.

Attention, this works only, if JavaScript is enabled in the browser. If JavaScript is disabled, the original text “RADIUS Password:” is displayed. This modification shouldn’t have any other side effects.

< < AAC tuning, part 2

!!! Please read the first comment to this post !!!

Regards
Ecki

May 28th, 2007

AAC Tuning, Teil 2 AAC tuning, part 2

AAC Admins, die RSA SecureID, SafeWord oder eine andere Two Factor Authentifizierungsmethode einsetzen, kennen das Dilemma. Durch den Token wird zwar die Sicherheit deutlich erhöht, wenn der Token aber mal nicht zur Hand ist, gibt es keinen Zugriff auf interne Ressourcen. Das muss nicht sein. Ein LogonPoint der für Two Factor Authentication konfiguriert wurde, erfordert nicht immer zwingend ein One Time Passwort.

Wie schon im ersten Beitrag zu dieser Reihe, befindet sich der Schlüssel in der Datei “web.config” im Root des jeweiligen LogonPoint Verzeichnisses.

Auf einem Standard AAC Server vermutlich unter:

C:\Inetpub\wwwroot\CitrixLogonPoint\#LogonPointName#

Es existiert noch eine weitere Version dieser Datei unter “C:\Inetpub\wwwroot\CitrixLogonPoint\”, welche unberührt bleiben sollte !

Diese Datei lässt sich mit einem Editor wie z. B. NotePad öffnen und bearbeiten. Im letzten Drittel findet sich der Abschnitt <appSettings>, in dem diverse Einstellungen vorgenommen werden können. Unter Anderem lässt sich hier auch die Two Factor Authentication so konfigurieren, dass ein One Time Passwort nicht mehr zwingend erforderlich ist. Dazu genügt es, folgende Zeile im <appSettings> Block zu ändern:

Von
<add key=”SecondaryAuthenticationIsOptional” value=“false” />
auf
<add key=”SecondaryAuthenticationIsOptional” value=“true” />

Der Abschnitt sollte dann so aussehen:

<appSettings>
<add key="DebugConsoleTrace" value="False" />
<add key="AdvancedGatewayClientDownloadUrl" value="http://www.citrix.com" />
<add key="AdvancedGatewayClientActivationDelay" value="10" />
<add key="MaxConnectionsToAuthenticationService" value="20" />
<add key="LogonPointId" value="00000000-0000-0000-0000-000000000000" />
<add key="DeployedBy" value="LACONFIG" />
<add key="ExtendedSecurIdFunctionalityEnabled" value="true" />
<add key="SecondaryAuthenticationIsOptional" value="true" />
<!- -

Nach dem Speichern der Datei sieht der User bei diesem einen LogonPoint nun zwar immer noch die Eingabemaske für RSA, SafeWord, etc., kann dieses Eingabefeld nun aber auch leer lassen und nur mit Username und Passwort einloggen.

Diese Manipulation reisst natürlich erst ein Mal ein grosses Loch in die Sicherheitseinstellungen der Installation. Um nun die Two Factor Authentication nicht völlig zu entwerten, muss an anderer Stelle nachgebessert werden. Mit Hilfe eines angepassten Filters und einer angepassten Policy kann die Sicherheit jedoch weiterhin hoch gehalten werden.

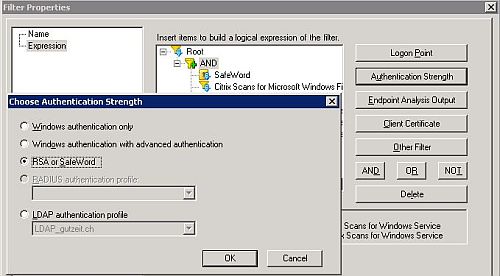
Der Filter für den vollwertigen Zugriff muss zwingend RSA, SafeWord, oder RADIUS als Authentifizierung voraussetzen. Dazu bietet der Filtergenerator den Punkt “Authentication Strength”. Nur wer eine starke Authentifizierung durchführt, bekommt Vollzugriff auf alle Ressourcen.

Authentication Strength

Hat der User sein Token ein Mal nicht im Zugriff, kann er sich trotzdem ohne One Time Passwort authentifiziert. Dann greift allerdings ein anderer Filter (identisch mit dem Filer für vollwertigen Zugriff, allerdings ohne Strong Authentication) und eine andere Policy, die den Zugriff restriktiver handhabt. So kann der User zumindest auf eine eingeschränkte Umgebung zugreifen und ist nicht zum Däumchen drehen verdammt 🙂

< < AAC Tuning, Teil 1 AAC Tuning, Teil 3 >>

!!! Bitte beachtet den ersten Kommentar zu diesem Beitrag !!!

Gruss
Ecki

AAC admins that deploy LogonPoints with RSA SecureID, SafeWord or any other Two Factor Authentication solution know the dilemma. The token realy boosts security, but if the token isn’t at hand, there is no way to access internal resources. Fortunately this is not imperativ. A LogonPoint configured with Two Factor Authentication must not always require a One Time Password.

As in part 1, the solution can be found in the “web.config” file in the root of the respective LogonPoint directory.

On a standard AAC server this is presumably:

C:\Inetpub\wwwroot\CitrixLogonPoint\#LogonPointName#

There is an other version of this file in the “C:\Inetpub\wwwroot\CitrixLogonPoint\” directory which should stay untouched !

This file can be opened and edited with any editor like the Windows NotePad. In the last third of the file you can find a section <appSettings>, which gives you some interesting possibilities. Among other things you can configure Two Factor Authentication such, that a One Time Password is not mandatory. All it needs is to change the following line below the <appSettings> section:

From
<add key=”SecondaryAuthenticationIsOptional” value=“false” />
to
<add key=”SecondaryAuthenticationIsOptional” value=“true” />

The section should look like this afterwards:

<appSettings>
<add key="DebugConsoleTrace" value="False" />
<add key="AdvancedGatewayClientDownloadUrl" value="http://www.citrix.com" />
<add key="AdvancedGatewayClientActivationDelay" value="10" />
<add key="MaxConnectionsToAuthenticationService" value="20" />
<add key="LogonPointId" value="00000000-0000-0000-0000-000000000000" />
<add key="DeployedBy" value="LACONFIG" />
<add key="ExtendedSecurIdFunctionalityEnabled" value="true" />
<add key="SecondaryAuthenticationIsOptional" value="true" />
<!- -

After saving the changes, a user calling this manipulated LogonPoint will still see the prompt for RSA, SafeWord, or RADIUS passcode, but he is now able to leave this field empty and log in with just his username and password.

This manipulation creates a big hole in your security configuration, but this hole can be easily closed again. All that is needed is to reconfigure your filters and policies.

The filter for full access must require RSA, SafeWord, or RADIUS authentication. Therefore the filter generator allows to use the authentication strength as a criteria. Only users using strong authentication get access to all resources.

Authentication Strength

A user that has no access to his token is nevertheless able to authenticate without a One Time Password. But now an other filter is matched (you can create the same filter as for full acces, but without strong authentication) and an other, more restrictive policy becomes active. This way, the user is at least able to work in a restricted environment, then to stop working 🙂

< < AAC tuning, part 1 AAC tuning, part 3 >>

!!! Please read the first comment to this post !!!

Regards
Ecki

|