Access

CTX-Blog

powered by Ecki's Place

March 8th, 2013

IE 10 + Access Gateway Enterprise Logon Screen Problem IE 10 + Access Gateway Enterprise Logon Screen Issue

Wer bereits den neuen IE 10 einsetzt, ist vermutlich auch schon über dieses Phänomen mit einem Access Gateway Enterprise gestolpert. Der Bildschirm bleibt leer, wenn man die URL des AGEE eingibt. Erst wenn man manuell in den Kompatabilitätsmodus des Browsers wechselt, werden die Login Felder angezeigt. Ein ähnliches Problem hatte ich bereits vor einigen Jahren beschrieben, s. AAC und IE 8.0

Die Lösung ist ähnlich, allerdings unterscheiden sich die Dateien.

Beim Access Gateway Enterprise muss in der Datei “/netscaler/ns_gui/vpn/index.html” folgende Zeile (rot/fett) im Header hinzugefügt werden:

<HTML><HEAD><TITLE>Citrix Access Gateway</TITLE>
<link rel="SHORTCUT ICON" href="/vpn/images/AccessGateway.ico" type="image/vnd.microsoft.icon">
<META http-equiv="X-UA-Compatible" content="IE=EmulateIE9" />
<META http-equiv="Content-Type" content="text/html; charset=UTF-8">
<META content=noindex,nofollow,noarchive name=robots>
<LINK href="/vpn/images/caxtonstyle.css" type=text/css rel=STYLESHEET>
<script type="text/javascript" src="/vpn/resources.js"></script>
<script type="text/javascript" language="javascript">
var Resources = new ResourceManager("resources/{lang}", "logon");
</script>

Wenn das Ergebnis stimmt (! Browser schliessen und neu öffnen !), darf nicht vergessen werden, dass das Access Gateway Enterprise diese Modifikation bei einem Reboot “vergisst”! Wie man solche Anpassungen persistent macht, beschreibt z. B. How to Retain the Custom Settings made to the NetScaler Appliance after it is Restarted

Gruss
Ecki

People who already use IE 10 will have probably seen this phenomenon while connecting to an Access Gateway Enterprise site. The browser window remains empty after connecting to the AGEE URL. The logon prompt is only visible after switching to compatibility mode. A similar problem has been described on this site a few years ago, s. AAC und IE 8.0

The solution is similar but the files are different.

With Access Gateway Enterprise the file “/netscaler/ns_gui/vpn/index.html” has to be changed according to the following listing (red/bold line added):

<HTML><HEAD><TITLE>Citrix Access Gateway</TITLE>
<link rel="SHORTCUT ICON" href="/vpn/images/AccessGateway.ico" type="image/vnd.microsoft.icon">
<META http-equiv="X-UA-Compatible" content="IE=EmulateIE9" />
<META http-equiv="Content-Type" content="text/html; charset=UTF-8">
<META content=noindex,nofollow,noarchive name=robots>
<LINK href="/vpn/images/caxtonstyle.css" type=text/css rel=STYLESHEET>
<script type="text/javascript" src="/vpn/resources.js"></script>
<script type="text/javascript" language="javascript">
var Resources = new ResourceManager("resources/{lang}", "logon");
</script>

If the fix is working (! close the browser and reopen it !), don’t forget to make this change persistent since the Access Gateway Enterprise “forgets” all the modifications during a reboot! The following Citrix KB article describes, how to make changes survive a reboot: How to Retain the Custom Settings made to the NetScaler Appliance after it is Restarted

Regards
Ecki

October 17th, 2010

Fehlendes XML File für Offline-Plugin 6.0.1 für den Merchandising Server Missing XML file for Offline-Plugin 6.0.1 for Merchandising Server

Wer bereits den Merchandising Server einsetzt, wird vermutlich ebenfalls über folgendes Problem gestolpert sein.

Citrix bietet ein Update für das Offline-Plugin an, welches 45 Fehler behebt. Als normaler Download steht das Update 6.0.1 seit einiger Zeit zur Verfügung. Wer aber im Merchandising Server das aktuelle Plugin sucht, wird es nicht finden. Auch eine manuelle Aktualisierung findet das Update nicht 🙁

Der Grund liegt in einem fehlenden XML-File, welches der Merchandising Server verwendet, um die Installation und Konfiguration zu steuern. Es sieht leider nicht so aus, als ob Citrix das fehlende File irgendwann selbst bereitstellen würde, s. Citrix Blog: App Streaming-6.0.1 LCM Update

Ich habe mir daher die folgenden Ressourcen genauer angesehen:

Citrix-TV
Citrix eDocs
Metadata Reference

und anschliessend mein eigenes XML File erstellt.

Um euch die Arbeit zu ersparen, stelle ich es hier zum download bereit: XenAppStreamingMetaData.xml

Im Merchandising Server lässt sich das aktuelle Offline-Plugin und das aktualisierte XML-File manuell hochladen und dann via Deliveries wie gewohnt verteilen 🙂

Warum Citrix dieses File nicht selbst zur Verfügung stellt, wird wohl ihr Geheimnis bleiben. Grundsätzlich stellt dieses Verhalten jedoch die Nützlichkeit des an sich guten Gedankens des Merchandising Server stark in Frage. Ich hoffe, Citrix wird seine Update Politik für Merchandising Server nochmal überdenken und ALLE Updates auch auf dieser Plattform verfügbar machen…

Gruss
Ecki

If you are already working with Merchandising Server, you will probably know this problem.

Citrix provides an update for his Offline –Plugin that eliminates 45 bugs. The update 6.0.1 is available as regular download since many weeks now but if you try to find the update on your Merchandising Server you won’t find it. Even a manual rescan of the available plugins doesn’t help 🙁

The reason is a missing XML file, which Merchandising Server needs to control the installation and configuration of the plugins. Apparently Citrix won’t make this XML file available to the public, see Citrix Blog: App Streaming-6.0.1 LCM Update

I have therefore taken the time to have a look at the following resources:

Citrix-TV
Citrix eDocs
Metadata Reference

and finally created my own XML file.

To save your time, I will provide you with the XML file needed here: XenAppStreamingMetaData.xml

On the Merchandising Server it is now possible to upload the actual Offline-Plugin together with the new XML file. After that step you can deploy the update through standard deliveries as usual.

Why Citrix doesn’t provide this file itself is a miracle to me. In fact this behavior doesn’t help to convince people to use Merchandising Server. I hope Citrix is rethinking the way they provide updates to Merchandising Server in the future…

Regards
Ecki

July 11th, 2010

32bit Icon Option fehlt in den XenApp Farm Eigenschaften 32bit icon option missing from the XenApp farm properties

Ich bin vor kurzem über ein sehr seltsames Verhalten der Citrix AMC gestolpert, bei der die Option für 32bit Icon Support nicht angezeigt wurde, obwohl alle Prerequisites installiert waren. Nur durch einen Zufall sind wir auf die Lösung gekommen.

Das Problem betrifft alle XenApp Versionen die ich testen konnte, einschliesslich Presentation Server 4.5 und XenApp 5.0, sowohl für W2k3 als auch für W2k8.

Das Problem zeigt sich folgendermassen. In den Eigenschaften der Farm ist der Platz, an dem die 32bit Icon Option stehen sollte leer. Die Option für 32bit Icons ist daher nicht verfügbar 🙁

Kein 32bit Icon Support in der AMC

Der Verursacher dieses Phänomens ist tatsächlich eine Konfiguration beim Farm-Discovery. Ich verwende gelegentlich LOCALHOST in der Liste der für das Discovery zu verwendenden Server. So funktioniert das Discovery immer, auch bei Roaming Profiles und XenApp Servern ohne IIS Installation.

Ist das Discovery folgendermassen konfiguriert, verschwindet die 32bit Icon Option aus der AMC:

Konfiguriert mit LOCALHOST

Wird dagegen wieder der lokale Server beim Discovery verwendet,

Konfiguriert mit "Local Server"

erscheint wie durch ein Wunder die vermisste Option wieder in den Farm Eigenschaften.

32bit Icon Support verfügbar

Man kann das Verhalten jederzeit problemlos reproduzieren. Zugegebenermassen ist das nicht unbedingt ein alltägliches Problem, aber seltsam ist das Verhalten schon und wenn ihr in Zukunft mal darüber stolpert, seid ihr gewarnt…

Gruss
Ecki

I recently stumbled uppon a really weired problem with 32bit icon support in XenApp. Under certain circumstances the AMC won’t show the option for 32bit icon support in the farm properties even if all prerequisites are perfectly met. We found out the reason for that behaviour only by accident.

The problem can be seen with all versions of Presentation Server 4.5 and XenApp 5.0 for w2k3 as well as for w2k8.

If the problem hits you, the farm properties won’t show the option for 32bit icon support, but there will only be a blank space 🙁

No 32bit icon support in the AMC

The reason for this odd behaviour can be found in the configuration of the farm-discovery. I sometimes use LOCALHOST as the hostname for discovery. This is helpful in situations where you have roaming profiles and IIS is not installed on the XenApp servers.

But if you configure discovery that way there will be no 32bit icon option in the AMC.

Configured with LOCALHOST

If you change the discovery option back to the local server

Konfiguriert mit "Local Server"

the missing option reappeares again.

32bit icon support available

You can toggle that behaviour as you like. Admittedly this is not a common problem but it is odd and if you happen to see it, you will be warned…

Regards
Ecki

July 2nd, 2009

Laptop und XenServer mit GNOME auf USB Disk Laptop and XenServer with GNOME on USB disk

Wäre es nicht toll, wenn man seine XenServer Umgebung auf einer USB Disk immer mit dabei haben könnte ?

Wenn die USB Disk direkt am eigenen Notebook laufen würde ?

Und wenn man nicht eine zusätzliche Maschine bräuchte, um den XenServer zu managen ?

Dass und wie das geht, habe ich in einem einfachen Tutorial dokumentiert. Dabei wird XenServer auf einer USB Disk an einem Laptop installiert, danach wird ein X Server und GNOME auf der USB Disk eingerichtet und anschliessend eine VM mit installiertem XenCenter über RDP aufgerufen.

Sozusagen eine “Demo in a box” 🙂

Das Dokument kann hier heruntergeladen werden: “XenServer_and_Gnome_on_your_USB_disk_DE.pdf”

Gruss
Ecki

Wouldn’t it be nice to have your XenServer environment allways with you on a USB disk ?

Wouldn’t it be nice, if this USB disk would function with your own notebook ?

And that you don’t need a second machine to run XenCenter on it ?

That this is possible and how to achieve this, is documented in my last tutorial. In this tutorial we will install XenServer on a USB harddisk attached to a laptop, then install X server and GNOME on this disk and then run an RDP session to a VM running on the XenServer and providing us with XenCenter.

A “demo in a box” 🙂

The tutorial can be downloaded here: “XenServer_and_Gnome_on_your_USB_disk_EN.pdf”
For the moment, this tutorial is availabel only in German, but i will upload an english version soon, so stay tuned…
The english version is now available too…

Regards
Ecki

March 24th, 2009

AAC und IE 8.0 AAC and IE 8.0

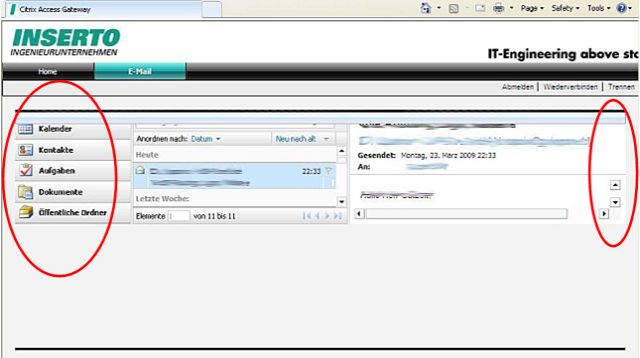
Vor wenigen Tagen wurde der IE 8.0 offiziell zum Download freigegeben. Da er demnächst auch als Windows Update verfügbar sein wird, werden schnell viele User mit diesem Browser auf bestehende AAC Deployments zugreifen wollen. Dies gestaltet sich in der Defaulteinstellung jedoch leider als problematisch. So sieht eine AAC Portalseite mit dem IE 8.0 aus:

Portal
OWA

Das Layout ist in der Höhe gestaucht, es fehlen daher viele Links und OWA ist praktisch nicht bedienbar 🙁

Eine kleine Anpassung der Datei C:\Inetpub\wwwroot\CitrixSessionInit\NUI.aspx läst die Darstellungsprobleme, indem es den IE 8.0 in den IE 7.0 Kompatibilitätsmodus zwingt.

Es genügt, im Header der Datei NUI.aspx folgende Zeile hinzuzufügen:

<meta http-equiv=”X-UA-Compatible” content=”IE=EmulateIE7″ />

Das könnte dann z. B. so aussehen:

<html xmlns="http://www.w3.org/1999/xhtml">
<head>
<title>Citrix Access Gateway</title>
<meta http-equiv="X-UA-Compatible" content="IE=EmulateIE7" />
<meta name="GENERATOR" content="Microsoft Visual Studio .NET 7.1" />
<meta name="CODE_LANGUAGE" content="C#" />
<meta name="vs_defaultClientScript" content="JavaScript" />
<meta name="vs_targetSchema" content="http://schemas.microsoft.com/intellisense/ie5" />
<link rel="SHORTCUT ICON" href="themes/default/images/favicon.ico" type="image/vnd.microsoft.icon" />
<base id="baseElement" href="" runat="server" />
<link id="cssElement" rel="stylesheet" href="" runat="server" />
<!--[if IE]>
<style type="text/css">

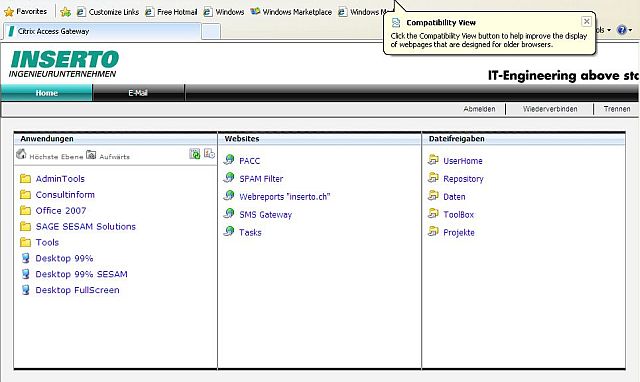
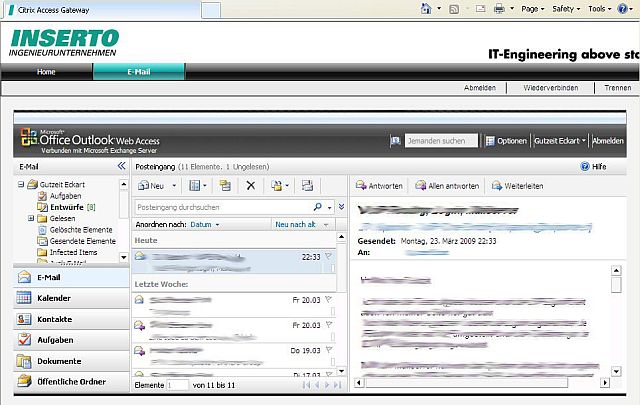
Und schon erscheint das Portal wieder in voller Pracht 🙂

Portal
OWA

Diese Anpassung stellt keine finale Lösung dar, sollte aber genügen, bis Citrix irgendwann einen Fix bereitstellt…

Gruss
Ecki

Some days ago, Microsoft officialy released IE 8.0. Since IE 8.0 will be available trough Windows Update soon, more and more users will hit existing AAC deployments with this browser. Unfortunately this is not working as expected. This is, how an AAC portal page looks like in IE 8.0 with default settings:

Portal
OWA

The layout is crushed, links are missing and OWA is nearly unusable 🙁

A small change in the file C:\Inetpub\wwwroot\CitrixSessionInit\NUI.aspx solves the display issue by forcing IE 8.0 into IE 7.0 compatibility mode.

It is sufficient to add the following line in the header of the NUI.aspx file:

<meta http-equiv=”X-UA-Compatible” content=”IE=EmulateIE7″ />

Your header might look like this after the change:

<html xmlns="http://www.w3.org/1999/xhtml">
<head>
<title>Citrix Access Gateway</title>
<meta http-equiv="X-UA-Compatible" content="IE=EmulateIE7" />
<meta name="GENERATOR" content="Microsoft Visual Studio .NET 7.1" />
<meta name="CODE_LANGUAGE" content="C#" />
<meta name="vs_defaultClientScript" content="JavaScript" />
<meta name="vs_targetSchema" content="http://schemas.microsoft.com/intellisense/ie5" />
<link rel="SHORTCUT ICON" href="themes/default/images/favicon.ico" type="image/vnd.microsoft.icon" />
<base id="baseElement" href="" runat="server" />
<link id="cssElement" rel="stylesheet" href="" runat="server" />
<!--[if IE]>
<style type="text/css">

Immediately your portal is rendered again as it should be 🙂

Portal
OWA

This is not a final solution for the problem, but until Citrix releases a fix for this issue it will do…

Regards
Ecki

December 15th, 2007

AAC Tuning, Teil 3 AAC tuning, part 3

Two Factor Authentication mit RSA, SafeWord oder einer beliebigen RADIUS Lösung ist eine gängige Methode zur sicheren Authentifizierung an einem AAC Deployment. AAC beschriftet das Eingabefeld für das RSA/SafeWord/RADIUS One Time Passwort bei einem deutschen Client jedoch starr mit dem Text “SecurID-PASSCODE”, “SafeWord CODE:” oder generisch mit “RADIUS-Passwort”.

Endbenutzer kennen ihre One Time Passwort Lösung jedoch meist unter einem anderem Namen, meist dem Namen des Herstellers. Dies kann dann zu Verwirrung und Problemen bei der Eingabe führen.

Dieses Problem lässt sich für RSA und SafeWord recht einfach lösen. Eine Lösung für RADIUS ist weiter unten beschrieben. Wie schon im ersten und zweiten Beitrag zu dieser Reihe, befindet sich der Schlüssel in der Datei “web.config” im Root des jeweiligen LogonPoint Verzeichnisses.

Auf einem Standard AAC Server vermutlich unter:

C:\Inetpub\wwwroot\CitrixLogonPoint\#LogonPointName#

Es existiert noch eine weitere Version dieser Datei unter “C:\Inetpub\wwwroot\CitrixLogonPoint\”, welche unberührt bleiben sollte !

Diese Datei lässt sich mit einem Editor wie z. B. NotePad öffnen und bearbeiten. Im letzten Drittel findet sich der Abschnitt <appSettings>, in dem diverse Einstellungen vorgenommen werden können. Unter Anderem lässt sich hier auch die Anzeige für das Eingabefeld des One Time Passwords manipulieren, so dass ein beliebiger Text angezeigt werden kann. Dazu genügt es, folgende Zeilen im <appSettings> Block einzufügen:

<add key=”SecondaryAuthenticationPromptOverride” value=”Password:” />
und
<add key=”SecondaryAuthenticationToolTipOverride” value=”Enter Password” />

Wobei “Password:” für den anzuzeigenden Text steht und “Enter Password” den Text für den Tool Tip festlegt.

Der Abschnitt sollte dann z. B. so aussehen:

<appSettings>
<add key="DebugConsoleTrace" value="False" />
<add key="AdvancedGatewayClientDownloadUrl" value="http://www.citrix.com" />
<add key="AdvancedGatewayClientActivationDelay" value="10" />
<add key="MaxConnectionsToAuthenticationService" value="20" />
<add key="LogonPointId" value="00000000-0000-0000-0000-000000000000" />
<add key="DeployedBy" value="LACONFIG" />
<add key="ExtendedSecurIdFunctionalityEnabled" value="true" />
<add key="SecondaryAuthenticationPromptOverride" value="SafeWord PIN + Zahlencode:" />
<add key="SecondaryAuthenticationToolTipOverride" value="PIN und Zahlencode eingeben" />
<!- -

Nach dem Speichern der Datei und einem Refresh des LogonPoints sollte der neue Text erscheinen 🙂

Dieses Vorgehen funktioniert leider nur bei RSA SecureID und SafeWord. Der Text, welcher bei einer RADIUS Lösung angezeigt wird, ist leider hart codiert und kann nicht so einfach geändert werden. Es gibt zwar bereits einen Feature Request bei Citrix, aber wann eine Lösung effektiv verfügbar sein wird, ist momentan noch nicht abzusehen.

Joel Donaldson hat im Citrix AAC Forum jedoch auch für diesen Fall eine tolle Umgehungs- / Übergangslösung veröffentlicht. Eine einfache Manipulation der Datei BasePage.aspx aus dem jeweiligen LogonPoint Verzeichnis läst das Problem auf elegante Art und Weise.

Es genügt, bei einem deutschen LogonPoint, folgenden Abschnitt vor dem </body> Tag einzufügen:

<script type="text/javascript" language="JavaScript">
document.body.innerHTML=document.body.innerHTML.replace("RADIUS-Kennwort:","Kobil Einmalpasswort:");
</script>

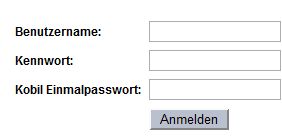
Das Ergbnis sieht dann so aus:
Loginprompt nach der Manipulation

Sollen auch englische LogonPoints unterstützt werden, hilft ein weiterer Code Block, der die englische Schreibweise berücksichtigt:

<script type="text/javascript" language="JavaScript">
document.body.innerHTML=document.body.innerHTML.replace("RADIUS Password:","Kobil OTP:");
</script>

Weitere Sprachen können so leicht hinzugefügt werden.

Wer sich nun fragt, warum das funktioniert, dem kann evtl. diese Erklärung weiterhelfen. Der Script Code sucht im Text der ausgelieferten Webseite nach dem String “RADIUS-Kennwort:” und ersetzt ihn dann durch den zweiten Parameter der Funktion “document.body.innerHTML.replace”, also in unserem Beispiel durch “Kobil Einmalpasswort:”.

Achtung, dies funktioniert nur, solange JavaScript im Browser aktiviert und erlaubt ist. Ist JavaScript abgeschaltet, erscheint wieder der ursprüngliche Text “RADIUS-Kennwort:”! Weitere Nebenwirkungen sind bei dieser Anpassung nicht zu befürchten.

< < AAC Tuning, Teil 2

!!! Bitte beachtet den ersten Kommentar zu diesem Beitrag !!!

Gruss
Ecki

Two Factor Authentication with RSA, SafeWord or any other third party RADIUS solution is a common way to authenticate in a secure manner to an AAC deployment. AAC however labels the input box for the OTP (One Time Password) fix with the text “SecurID-PASSCODE”, “SafeWord CODE:” oder generic with “RADIUS Password”.

Endusers however know their OTP solution most of the time with other names, the name of the RADIUS solution provider for example. This can lead to confusion during the login process.

This problem is easily solved for RSA SecureID and SafeWord. A solution for RADIUS is described further down. As in part 1 and 2, the solution can be found in the “web.config” file in the root of the respective LogonPoint directory.

On a standard AAC server this is presumably:

C:\Inetpub\wwwroot\CitrixLogonPoint\#LogonPointName#

There is an other version of this file in the “C:\Inetpub\wwwroot\CitrixLogonPoint\” directory which should stay untouched !

This file can be opened and edited with any editor like the Windows NotePad. In the last third of the file you can find a section <appSettings>, which gives you some interesting possibilities. Among other things you can configure the lables for the OTP field, so that it displays a text your users expect. All it needs, is to change the following line below the <appSettings> section:

<add key=”SecondaryAuthenticationPromptOverride” value=”Password:” />
and
<add key=”SecondaryAuthenticationToolTipOverride” value=”Enter Password” />

Where “Password:” stands for the text to be displayed as lable and “Enter Password” stands for the text, displayed as tool tip.

The section should look like this afterwards:

<appSettings>
<add key="DebugConsoleTrace" value="False" />
<add key="AdvancedGatewayClientDownloadUrl" value="http://www.citrix.com" />
<add key="AdvancedGatewayClientActivationDelay" value="10" />
<add key="MaxConnectionsToAuthenticationService" value="20" />
<add key="LogonPointId" value="00000000-0000-0000-0000-000000000000" />
<add key="DeployedBy" value="LACONFIG" />
<add key="ExtendedSecurIdFunctionalityEnabled" value="true" />
<add key="SecondaryAuthenticationPromptOverride" value="SafeWord PIN + Zahlencode:" />
<add key="SecondaryAuthenticationToolTipOverride" value="PIN und Zahlencode eingeben" />
<!- -

After saving the changes, a user calling this manipulated LogonPoint should now see the new lable.

This method unfortunately works only for RSA SecureID and SafeWord. The text displayed, when using a third party RADIUS solution is hard coded and not that easy to manipulate. There is a pending feature request at Citrix, but it isn’t clear, when a solution will be publicly available.

At last I found a very good work-around in the Citrix AAC Forum, published by Joel Donaldson. A simple manipulation of the BasePage.aspx file of the respective LogonPoint solves the problem in an elegant way.

With an english LogonPoint it is sufficient, to add the following paragraph before the </body> tag:

<script type="text/javascript" language="JavaScript">
document.body.innerHTML=document.body.innerHTML.replace("RADIUS Password:","Kobil Einmalpasswort:");
</script>

The result will look like this:
Loginprompt nach der Manipulation

If you want to support german LogonPoints also, you need another code block that respects the german notation:

<script type="text/javascript" language="JavaScript">
document.body.innerHTML=document.body.innerHTML.replace("RADIUS-Kennwort:","Kobil Einmalpasswort:");
</script>

Other languages can be added easily this way.

If someone is asking itself why this works, this short explanation may help. The script code is looking for the string “RADIUS Password:” in the delivered web page and replaces it with the second parameter of the function “document.body.innerHTML.replace”, in our example “Kobil OTP:”.

Attention, this works only, if JavaScript is enabled in the browser. If JavaScript is disabled, the original text “RADIUS Password:” is displayed. This modification shouldn’t have any other side effects.

< < AAC tuning, part 2

!!! Please read the first comment to this post !!!

Regards
Ecki
December 9th, 2007

Update: PNAgent Filter für Web Interface 4.6 Update: PNAgent Filter for Web Interface 4.6

Ich bin kürzlich in die Situation gekommen, den PNAgent Filter für das Web Interface 4.6 einsetzen zu müssen. Dabei stellte sich heraus, dass der eigentliche Code der Erweiterung für das WI 4.5 ohne Anpassungen auch unter dem WI 4.6 weiter funktioniert. Damit die Einrichtung aber so leicht bleibt, wie gewohnt, stelle ich das Update für das Web Interface 4.6 als weiteren Download zur Verfügung. So genügt es weiterhin, eine Datei auszutausche. Eine manuelle Änderung im Code ist nicht notwendig.

Download FilterApps4.6

Diese Modifikation des Web Interfaces ermäglicht es, Published Applications von der Anzeige im PNAgent auszuschliessen, indem der Description der Published Application ein “#” Zeichen vorangestellt wird. Nützlich, wenn der PNAgent z. B. zum Bestücken des Desktops und des Startmenüs verwendet wird, und man nicht möchte, dass der gepublishte Desktop dort, oder in den Eigenschaften des PNAgent Symbols in der Startleiste erscheint.

Siehe auch: PNAgent Filter für Web Interface 4.5

Gruss
Ecki

Not long ago, i had to implement the PNAgent Filter for Web Interface 4.6. It turned out, that the code itself of the modification didn’t need any changes from WI 4.5 to WI 4.6. To allow for an easy implementation, i nevertheless created an updated archive of the modification and updated the files for WI 4.6. Therefore all it needs is to replace one file, without the hassle to copy and paste code blocks to the right locations.

Download FilterApps4.6

This modification gives an administrator the power to hide Published Applications from the user. The only thing he has to do is adding a “#” sign in front of the application description. Very handy, if you use PNAgent to populate the Desktop and Start Menu and do not want the published Desktop to appear in the context menu of the PNAgent in the taskbar.

See also: PNAgent Filter for Web Interface 4.5

Regards
Ecki

November 22nd, 2007

Wie kann die Sprache des ICA Clients geändert werden How to change the ICA client language

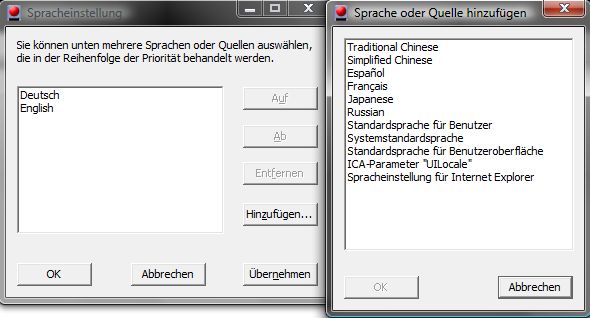
Während der Installation kann der User seine bevorzugte Sprache für den ICA Client Version 10.x und höher, über einen Dialog auswählen.

Wenn die Sprache jedoch später geändert werden muss, kann dies einfach über die Kommandozeile gemacht werden.Dazu muss eine Eingabeaufforderung geöffnet werden und zum ICA Clientverzeichnis gewechselt werden. Der Befehl

Wfica32.exe /UserUILocale

cmd.exe

führt zur Anzeige einer Dialogbox, über die die benötigte Sprache ausgewählt und hinzugefügt werden kann.

MUI Einstellungen

Die Sprache die hier an erster Stelle steht, wird nun zur Anzeige der Client GUI verwendet.

Gruss
Ecki

Users can choose the user interface language of the ICA Client for Win32 10.x and above through a dialog box the ICA Client provides during installation.

If users want to change the Language after the installation this can be done from the command line. Simply open a command prompt, browse to the ICA Client directory and run

Wfica32.exe /UserUILocale

cmd.exe

Then add the required language and move it to the top of the list.

MUI settings

After a restart the ICA Client should appear with the new language selected.

Regards
Ecki

September 17th, 2007

Access Gateway HotFix 4.5.5 Rev. BAccess Gateway hotfix 4.5.5 Rev. B

Nach den Sommerferien und einigen sehr arbeitsreichen Wochen, geht es hier nun endlich wieder weiter 🙂

Ab sofort steht bei Citrix eine Revision des Access Gateway Updates 4.5.5 zum Download zur Verfügung, welches einige unschöne Fehler ausbügelt. Nach dem Update auf 4.5.5 konnte es vorkommen, das das CAG Standard alle 10 bis 20 Minuten einfrohr, bzw. mehrmals pro Tag crashte, was einen Reboot nach sich zog. “Ursache” war die Konfiguration von mehr als einer STA auf dem CAG Standard. Nach dem Update auf Rev. B sollte dieser Bug behoben sein.

Weitere Fixes beinhalten Verbesserungen beim SAClient Rollout und EPA Scan Download. Auch soll sich der VPN Client nach dem Ausloggen am AAC Server nun verlässlicher beenden.

Weitere Infos zu den Verbesserungen und der Download sind hier zu finden.

Gruss
Ecki

After the summer holidays and several very busy weeks, i have found the time again to carry on with these pages 🙂

Citrix released Revision B of the Access Gateway HotFix 4.5.5 today, which eliminates a couple of bugs. After the update to version 4.5.5 some CAG Standard installations experienced a freeze every 10 to 20 minutes or even worse 2 to 3 crashes/reboots a day. The “reason” for this behavior was the configuration of more than one STA on the CAG Standard. After the update to Rev. B this bug should be eliminated.

Additional fixes for the SAC roll out and the EPA download are included. Furthermore the SAC should close now more reliably in AAC deployments. The full list of fixes and the download can be found here.

Regards
Ecki

July 21st, 2007

Web Interface 4.6 für Windows verfügbar Web Interface 4.6 for Windows available

Seit Gestern steht bei Citrix das neue Web Interface 4.6 zum Download bereit. Diese Version ist Voraussetzung für einige neue Features und Verbesserungen, die mit dem Rollup Pack 01 für Presentation Server 4.5 eingeführt wurden.

Vor der Installation des Web Interfaces 4.6 muss zwingend die AMC (Access Management Console für Presentation Server 4.5) aktualisiert werden, da das Update sonst fehl schlägt. Die aktuelle AMC kann hier heruntergeladen werden.

Der Download des Web Interface 4.6 und weitere Informationen sind hier zu finden.

Gruss
Ecki

Yesterday Citrix released the new Web Interface 4.6 for Windows. This version is mandatory for several new features and enhancements introduced with the Rollup Pack 01 for Presentation Server 4.5.

Before installing Web Interface 4.6 you have to update your AMC (Access Management Console for Presentation Server 4.5) first. The new console snap-ins must be present before the new features can be installed successfully. The new AMC can be downloded here.

The download of Web Interface 4.6 and aditional informations can be found here.

Regards
Ecki