SmartCard Single Sign On mit PNAgent Smart Card Single Sign On with PNAgent
Alle verfügbaren Dokumentationen zum Thema “Single Sign On” oder “Credential passthrough” mit SmartCard und Citrix Clients beschränkt sich leider auf den Gebrauch der Program Neighborhood, wie folgende Anleitung von Brianmadden beispielhaft zeigt. Diesen Client setze ich bei Kundenprojekten aber seit Jahren nur noch in Ausnamefällen ein. Statt dessen verwende ich meistens den PNAgent, oder den Web Client.
Diese Clients entzogen sich aber bisher dem Passthrough der SmartCard PIN, da sie die APPSRV.INI ignorierten und daher die notwendigen Einstellungen nicht übernahmen.
Seit dem 10.0er Client findet sich im Installationsverzeichnis jedes Citrix Clients eine Datei “icaclient.adm”, ein Active Directory Group Policies Template, das die benötigten Optionen enthält. Seit dem Release 10.0 überprüft jeder ICA Client zuerst, ob eine entsprechende Policy konfiguriert wurde und übernimmt dann diese Einstellungen aus der Registry. Die Datei APPSRV.INI fungiert nur noch als Fallback, wenn keine Policy existiert. Dieses neue Client Feature ermöglicht nun endlich ein “Single Sign On” mit SmartCard und PNAgent.
Hier in Kürze die Schritte, die es dafür benötigt:
1. Auf dem Presentation Server /XenApp Server
- Überprüfen, ob ein Login auf einen Desktop mittels SmartCard generell funktioniert. Für SmartCard-Passthrough muss in den Server-Eigenschaften die Option “Trust requests sent to the XML Service” aktiviert sein.
2. Auf dem Web Interface Server
-
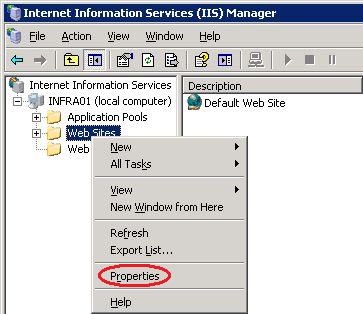
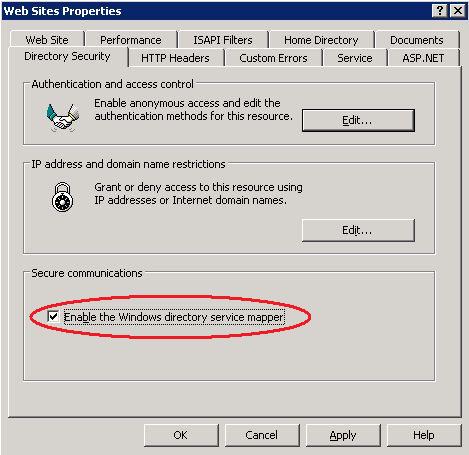
- Hier muss SSL aktiviert (ein Web Server Zertifikat installiert) und das “Directory Service Mapping” aktiviert sein. Diese Option findet sich im IIS Manager unter den Eigenschaften des “Web Sites” Ordners:
- In der Access Suite Management Console muss die PNAgent Web Site unter “Configure Authentication” auf “Smart Card with Passthrough” konfiguriert werden.
3. Registry
- Überprüfen, ob unter HKLM\System\CurrentControlSet\Control\TerminalServer\WinStations\ICA-tcp der Wert UseDefaultGina auf 0 gesetzt ist (1 schaltet die CtxGina ab).
4. Active Directory Policy
-
- Import des ADM Templates in eine beliebige Policy
- Im User Teil der Policy müssen folgende Einstellungen gesetzt sein:
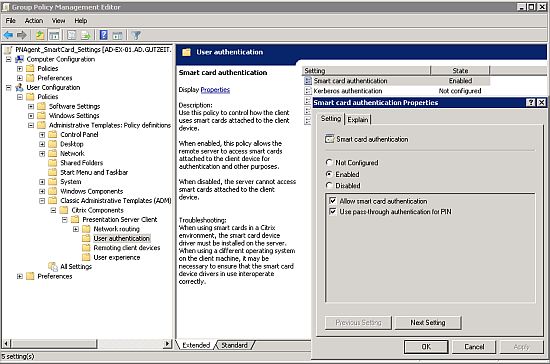
- <PolicyName>\User Configuration\Administrative Templates\Citrix Components\Presentation Server Client\User Authentication\Smart Card Authentication muss “Enabled” werden und “Allow Smart Card Authentication” und “Use pass-through authentication for PIN” müssen aktiviert werden.
- Alle weiteren Optionen bleiben unkonfiguriert, vorausgesetzt es sollen nur SmartCard Logins konfiguriert werden.
Jetzt sollte einem “Single Sign On” mit SmartCard und PNAgent nichts mehr im Wege stehen 😀
Diese Anleitung gilt leider nur für Windows XP und Server 2003. Vista und 2008 Server sind hier momentan explizit ausgenommen, da aktuell kein Citrix Client, einschliesslich 11.0, in der Lage ist, die SmartCard PIN unter diesen OS weiterzureichen 🙁
Hier noch ein paar interessante weiterführende Links:
- Error: Smartcard support is not allowed on pass through servers
- Internet Explorer 7 Known Issues
- Readme for Web Interface 4.6 for Presentation Server – German
Gruss
Ecki
All available documentation regarding “Single Sign On” or “Credential pass-through” with Smart Card and Citrix clients is limited to the Program Neighborhood client only, as can be seen exemplarily at Brianmadden . I don’t use this client in customer projects for a couple of years now but use the PNAgent or the Web client instead.
With these clients, a pass-through of the Smart Card PIN didn’t work, because they do not read their settings from the APPSRV.INI, which would allow for the neccessary settings.
Since client version 10.0, an Active Directory Group Policy Template can be found in every client installation directory, named “icaclient.adm”. All clients, starting with 10.0 now read the policy settings first and make use of the APPSRV.INI only in case, no policy is defined. This new feature allows now for a “Single Sign On” with SmartCard and PNAgent.
Here is, what you need to do, to get it up and running:
1. On the Presentation Server /XenApp Server
- Confirm proper operation by logging in to a full desktop on the Citrix server. Insert a Smart Card and it should begin reading it. Enable “Trust requests sent to the XML Serviceâ€. This is necessary if using smart card pass through logon.
2. On the Web Interface Server
-
- SSL must be configured and active (a web server certificate has to be installed) and the “Directory Service Mapping” has to be activated. This option can be found in the IIS Manager below the properties of the “Web Sites” folder:
- The Web Interface site itself must now be configured. Open the Citrix Access Suite Management Console on the Web Interface server and run discovery if necessary to find the Web Interface site you wish to work with.
Under “Configure Authentication†select “Smart Card with Passthroughâ€.
3. Registry
- Check HKLM\System\CurrentControlSet\Control\TerminalServer\WinStations\ICA-tcp the value for “UseDefaultGina” should be 0 (1 disables the CtxGina).
4. Active Directory Policy
-
- Import the ADM template into a Policy
- Go to the “User Configuration” of the policy, leave the Computer part set to “not configuredâ€. The following settings have to be enabled:
- <PolicyName>\User Configuration\Administrative Templates\Citrix Components\Presentation Server Client\User Authentication\Smart Card Authentication has to be “Enabled” and “Allow Smart Card Authentication” and “Use pass-through authentication for PIN” have to be activated.
- Leave everything else to “Not Configured”, provided that you are testing just Smart Card and PIN pass-through.
Now “Single Sign On” with Smart Card and PNAgent should work 😀
Unfortunately these instructions only work for Windows XP and Server 2003. At the moment, no Citrix client, including 11.0, allows for PIN pass-through with Vista and 2008 Server 🙁
Here are some more interesting links:
- Error: Smartcard support is not allowed on pass through servers
- Internet Explorer 7 Known Issues
- Readme for Web Interface 4.6 for Presentation Server – German
Regards
Ecki