Access

CTX-Blog

powered by Ecki's Place

March 18th, 2018

XenDesktop – Publish desktop to IP address instead of a user group – the missing link

There are some situations where you want to publish a VDI desktop to a certain machine instead of a user group. The way to accomplish that is documented in the following article CTX128232 – How to Configure XenDesktop for a Teaching Lab or Classroom Environment

According to this article you only need to fire up PowerShell, load the Citrix.Broker.Admin.* commandlets, get the DesktopGroupUid of your delivery group and set some BrokerAccessPolicyRules and BrokerAssignmentPolicyRules. In a last step you have to assign an IP address to a domain machine.

Add-PSSnapin Citrix.Broker.Admin.*

Get-BrokerDesktopGroup

Get-BrokerAccessPolicyRule -DesktopGroupUid <uid> | Set-BrokerAccessPolicyRule -AllowedUsers AnyAuthenticated

Get-BrokerAssignmentPolicyRule -DesktopGroupUid <uid> | Set-BrokerAssignmentPolicyRule -Enabled $false

Set-BrokerPrivateDesktop DOMAIN\MACHINE_A -AssignedIPAddress 10.1.1.100

A nice article but unfortunately it is incomplete 🙁

The following blog post helped me a little bit further: XenDesktop – Assigning Private Desktops by Client IP or Hostname. It showed me some more options for the published desktops like a custom name for every single published desktop and how to view the configured settings afterwards:

Set-BrokerPrivateDesktop DOMAIN\MACHINE_A -AssignedIPAddress 10.1.1.100 -PublishedName “Desktop_A”

Get-BrokerPrivateDesktop | ft MachineName,AssignedIPAddress,AssignedClientName,PublishedName

But still the published desktops where not visible to the configured machines. They connected fine to StoreFront but showed no desktop to launch 🙁

So I started scratching my head and tried to understand how this “magic” could ever work…

The main question was how the Delivery Controller gets to see the real IP address of the client because the client never ever talks directly to the Delivery Controller. All communication is between StoreFront and Client only. This is where it made “click”.

In almost every environment I know StoreFront is load balanced behind some NetScaler or similar device. Therefore the StoreFront server only sees the IP address of the load balancer and not the real client IP. In case of a NetScaler it is the SNIP StoreFront sees as client IP address.

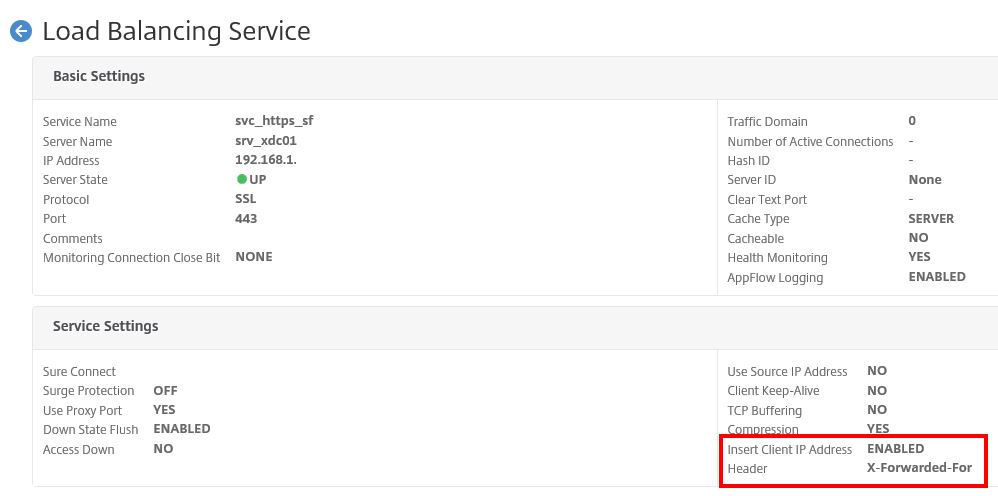
So the solution was as simple as that: Configure NetScaler to pass the real client IP address as “X-Forwarded-For” header to StoreFront which can be done easily on the Service or Service Group used for StoreFront load balancing. StoreFront then extracts the real client IP address from the HTTP header and passes it automatically to the Delivery Controller which finally knows which desktop to deliver.

Immediately after that configuration has been done the desktops appeared with their individual name in StoreFront 🙂

Regards

Ecki

March 6th, 2018

NetScaler – WinSCP only access (command policies) – the missing link

NetScaler Command Policies are not extremely well documented and if you don’t know how to work with regular expressions you are doomed. Citrix gives you some ideas on how Command Policies work in this Citrix eDoc Article but there is no hint on how to limit shell and scp/sftp access.

Well the solution is easy if you know how to do it but it took me some time to figure out…

First create a new Command Policy and give it a name like “WinSCP”. Choose “ALLOW” as action and add the following regular expression in the Command Spec* panel.

(^sftp.*)|(^scp.*)

Second create a new local user like “WinSCP”, set a password and give him login privileges. The other options are optional. Then bind the new “WinSCP” Command Policy to that user.

You’re done 🙂 This command policy allows only access through SCP, or SFTP tools like WinSCP and all other access (GUI, shell) is blocked.

Regards
Ecki

March 5th, 2018

The missing link

Nach langer Pause habe ich mich entschieden, wieder mehr Zeit in meinen Citrix Blog zu investieren und mich dabei den Themen anzunehmen, die eigentlich dokumentiert sind, bei denen aber einzelne, wichtige Details fehlen.

Um den zeitlichen Aufwand zu minimieren, habe ich mich ausserdem entschlossen, neue Beiträge nur noch auf englisch zu verfassen, da sie so einem grösseren Publikum zugänglich sind.

Ich hoffe, meinen Lesern mit dieser neuen Serie einige “Aha”-Momente zu verschaffen. Und nun viel Spass beim Lesen und Probleme lösen 🙂

Gruss
Ecki

After a long break I decided to invest again more time into my Citrix Blog and to focus on topics that seem well documented but lack crucial detail information.

From now on all postings will be in english only to reduce time and effort needed.

I hope to give my readers some light bulb moments. And now have fun reading and solving problems 🙂

Regards
Ecki

August 26th, 2013

Office 2013 auf Server 2012 (Windows Installer Loop) Office 2013 on Server 2012 (Windows Installer Loop)

Kürzlich bekam ich den Auftrag, einen neuen XenDesktop 7.0 RDS Host zu installieren. Auf der neuen Plattform sollte dann auch Office 2013 laufen. Kein Problem dachte ich mir und ging ans Werk. Nach Abschluss der Installation und dem Einspielen aller Windows Updates (mehr als 3GB, unfassbar), gab es aber eine unliebsame Überraschung. Bei jedem Start von Outlook kam zuerst eine Windows Installer Meldung, die Outlook konfigurieren wollte. Anschliessend lief Outlook zwar problemlos, aber der Windows Installer meldete sich bei jedem weiteren Start erneut 🙁

Dem Eventlog konnte man leider keinen direkten Hinweis auf die Fehlerursache entnehmen, es wurden nur eine Reihe Informationen, aber keinerlei Fehler geloggt, s. Screenshot:

Outlook2013_Windows_Installer_Eventviewer

Eine Office 2013 Reparatur blieb genauso erfolglos, wie weitere “Rettungsversuche” mit Registry Keys von Office 2010, wie in diesem Thread beschrieben: Office-2010-Professional-Plus-configures-each-time-i-launch-fixed. Auch ein komplett neu installiertes System zeigte die gleiche Symptomatik.

Nach langem Suchen im Internet stiess ich dann auf folgenden Thread, der mir die Lösung brachte: Outlook-2013-starts-configuration-every-time

Outlook 2013 benötigt auf einem Server 2012 den Windows Search Service um das Setup abzuschliessen. Ist dieser Service nicht installiert (was auf einem RDS Host der Standard ist), kommt bei jedem Start von Outlook der Windows Installer und versucht das “Problem” zu reparieren. Nachdem ich den Search Service als Feature installiert hatte und den Service auf “disabled” gesetzt hatte, war die Windows Installer Meldung verschwunden 🙂

Gruss
Ecki

Not long ago I was asked to install a new XenDesktop 7.0 RDS host. Office 2013 should run on this system also. An easy one was my first thought and I went to work. After installing Server 2012, Office 2013 and all the needed Windows Updates (more than 3GB, incredible) I discovered an unpleasant surprise. With every start of Outlook, a Windows Installer window popped up, telling me that Office would now be configured. After that, Outlook worked fine without errors but the Windows Installer popped up again and again with every start of Outlook 🙁

The Windows Event Log didn’t really help much because it only showed some informational messages of the Windows Installer but no error messages, see the following screen-shot:

Outlook2013_Windows_Installer_Eventviewer

An Office repair didn’t help as was the case with several other “rescue attempts” with registry keys mentioned in an article about Office 2010 problems: Office-2010-Professional-Plus-configures-each-time-i-launch-fixed. Even a brand new installed system showed the same symptoms.

After a long search on the Internet I stumbled upon the following thread that helped me to solve the problem: Outlook-2013-starts-configuration-every-time

Outlook 2013 on Server 2012 needs the Windows Search service to finalize its setup. If this service is not installed, which is the default for RDS, then Outlook tries at every start to “fix” the problem. After installing the Windows Search service feature and setting it to “disabled” in the Services manager, the Windows Installer pop-ups disappeared 🙂

Regards
Ecki

March 8th, 2013

IE 10 + Access Gateway Enterprise Logon Screen Problem IE 10 + Access Gateway Enterprise Logon Screen Issue

Wer bereits den neuen IE 10 einsetzt, ist vermutlich auch schon über dieses Phänomen mit einem Access Gateway Enterprise gestolpert. Der Bildschirm bleibt leer, wenn man die URL des AGEE eingibt. Erst wenn man manuell in den Kompatabilitätsmodus des Browsers wechselt, werden die Login Felder angezeigt. Ein ähnliches Problem hatte ich bereits vor einigen Jahren beschrieben, s. AAC und IE 8.0

Die Lösung ist ähnlich, allerdings unterscheiden sich die Dateien.

Beim Access Gateway Enterprise muss in der Datei “/netscaler/ns_gui/vpn/index.html” folgende Zeile (rot/fett) im Header hinzugefügt werden:

<HTML><HEAD><TITLE>Citrix Access Gateway</TITLE>
<link rel="SHORTCUT ICON" href="/vpn/images/AccessGateway.ico" type="image/vnd.microsoft.icon">
<META http-equiv="X-UA-Compatible" content="IE=EmulateIE9" />
<META http-equiv="Content-Type" content="text/html; charset=UTF-8">
<META content=noindex,nofollow,noarchive name=robots>
<LINK href="/vpn/images/caxtonstyle.css" type=text/css rel=STYLESHEET>
<script type="text/javascript" src="/vpn/resources.js"></script>
<script type="text/javascript" language="javascript">
var Resources = new ResourceManager("resources/{lang}", "logon");
</script>

Wenn das Ergebnis stimmt (! Browser schliessen und neu öffnen !), darf nicht vergessen werden, dass das Access Gateway Enterprise diese Modifikation bei einem Reboot “vergisst”! Wie man solche Anpassungen persistent macht, beschreibt z. B. How to Retain the Custom Settings made to the NetScaler Appliance after it is Restarted

Gruss
Ecki

People who already use IE 10 will have probably seen this phenomenon while connecting to an Access Gateway Enterprise site. The browser window remains empty after connecting to the AGEE URL. The logon prompt is only visible after switching to compatibility mode. A similar problem has been described on this site a few years ago, s. AAC und IE 8.0

The solution is similar but the files are different.

With Access Gateway Enterprise the file “/netscaler/ns_gui/vpn/index.html” has to be changed according to the following listing (red/bold line added):

<HTML><HEAD><TITLE>Citrix Access Gateway</TITLE>
<link rel="SHORTCUT ICON" href="/vpn/images/AccessGateway.ico" type="image/vnd.microsoft.icon">
<META http-equiv="X-UA-Compatible" content="IE=EmulateIE9" />
<META http-equiv="Content-Type" content="text/html; charset=UTF-8">
<META content=noindex,nofollow,noarchive name=robots>
<LINK href="/vpn/images/caxtonstyle.css" type=text/css rel=STYLESHEET>
<script type="text/javascript" src="/vpn/resources.js"></script>
<script type="text/javascript" language="javascript">
var Resources = new ResourceManager("resources/{lang}", "logon");
</script>

If the fix is working (! close the browser and reopen it !), don’t forget to make this change persistent since the Access Gateway Enterprise “forgets” all the modifications during a reboot! The following Citrix KB article describes, how to make changes survive a reboot: How to Retain the Custom Settings made to the NetScaler Appliance after it is Restarted

Regards
Ecki

October 17th, 2010

Fehlendes XML File für Offline-Plugin 6.0.1 für den Merchandising Server Missing XML file for Offline-Plugin 6.0.1 for Merchandising Server

Wer bereits den Merchandising Server einsetzt, wird vermutlich ebenfalls über folgendes Problem gestolpert sein.

Citrix bietet ein Update für das Offline-Plugin an, welches 45 Fehler behebt. Als normaler Download steht das Update 6.0.1 seit einiger Zeit zur Verfügung. Wer aber im Merchandising Server das aktuelle Plugin sucht, wird es nicht finden. Auch eine manuelle Aktualisierung findet das Update nicht 🙁

Der Grund liegt in einem fehlenden XML-File, welches der Merchandising Server verwendet, um die Installation und Konfiguration zu steuern. Es sieht leider nicht so aus, als ob Citrix das fehlende File irgendwann selbst bereitstellen würde, s. Citrix Blog: App Streaming-6.0.1 LCM Update

Ich habe mir daher die folgenden Ressourcen genauer angesehen:

Citrix-TV
Citrix eDocs
Metadata Reference

und anschliessend mein eigenes XML File erstellt.

Um euch die Arbeit zu ersparen, stelle ich es hier zum download bereit: XenAppStreamingMetaData.xml

Im Merchandising Server lässt sich das aktuelle Offline-Plugin und das aktualisierte XML-File manuell hochladen und dann via Deliveries wie gewohnt verteilen 🙂

Warum Citrix dieses File nicht selbst zur Verfügung stellt, wird wohl ihr Geheimnis bleiben. Grundsätzlich stellt dieses Verhalten jedoch die Nützlichkeit des an sich guten Gedankens des Merchandising Server stark in Frage. Ich hoffe, Citrix wird seine Update Politik für Merchandising Server nochmal überdenken und ALLE Updates auch auf dieser Plattform verfügbar machen…

Gruss
Ecki

If you are already working with Merchandising Server, you will probably know this problem.

Citrix provides an update for his Offline –Plugin that eliminates 45 bugs. The update 6.0.1 is available as regular download since many weeks now but if you try to find the update on your Merchandising Server you won’t find it. Even a manual rescan of the available plugins doesn’t help 🙁

The reason is a missing XML file, which Merchandising Server needs to control the installation and configuration of the plugins. Apparently Citrix won’t make this XML file available to the public, see Citrix Blog: App Streaming-6.0.1 LCM Update

I have therefore taken the time to have a look at the following resources:

Citrix-TV
Citrix eDocs
Metadata Reference

and finally created my own XML file.

To save your time, I will provide you with the XML file needed here: XenAppStreamingMetaData.xml

On the Merchandising Server it is now possible to upload the actual Offline-Plugin together with the new XML file. After that step you can deploy the update through standard deliveries as usual.

Why Citrix doesn’t provide this file itself is a miracle to me. In fact this behavior doesn’t help to convince people to use Merchandising Server. I hope Citrix is rethinking the way they provide updates to Merchandising Server in the future…

Regards
Ecki

July 11th, 2010

32bit Icon Option fehlt in den XenApp Farm Eigenschaften 32bit icon option missing from the XenApp farm properties

Ich bin vor kurzem über ein sehr seltsames Verhalten der Citrix AMC gestolpert, bei der die Option für 32bit Icon Support nicht angezeigt wurde, obwohl alle Prerequisites installiert waren. Nur durch einen Zufall sind wir auf die Lösung gekommen.

Das Problem betrifft alle XenApp Versionen die ich testen konnte, einschliesslich Presentation Server 4.5 und XenApp 5.0, sowohl für W2k3 als auch für W2k8.

Das Problem zeigt sich folgendermassen. In den Eigenschaften der Farm ist der Platz, an dem die 32bit Icon Option stehen sollte leer. Die Option für 32bit Icons ist daher nicht verfügbar 🙁

Kein 32bit Icon Support in der AMC

Der Verursacher dieses Phänomens ist tatsächlich eine Konfiguration beim Farm-Discovery. Ich verwende gelegentlich LOCALHOST in der Liste der für das Discovery zu verwendenden Server. So funktioniert das Discovery immer, auch bei Roaming Profiles und XenApp Servern ohne IIS Installation.

Ist das Discovery folgendermassen konfiguriert, verschwindet die 32bit Icon Option aus der AMC:

Konfiguriert mit LOCALHOST

Wird dagegen wieder der lokale Server beim Discovery verwendet,

Konfiguriert mit "Local Server"

erscheint wie durch ein Wunder die vermisste Option wieder in den Farm Eigenschaften.

32bit Icon Support verfügbar

Man kann das Verhalten jederzeit problemlos reproduzieren. Zugegebenermassen ist das nicht unbedingt ein alltägliches Problem, aber seltsam ist das Verhalten schon und wenn ihr in Zukunft mal darüber stolpert, seid ihr gewarnt…

Gruss
Ecki

I recently stumbled uppon a really weired problem with 32bit icon support in XenApp. Under certain circumstances the AMC won’t show the option for 32bit icon support in the farm properties even if all prerequisites are perfectly met. We found out the reason for that behaviour only by accident.

The problem can be seen with all versions of Presentation Server 4.5 and XenApp 5.0 for w2k3 as well as for w2k8.

If the problem hits you, the farm properties won’t show the option for 32bit icon support, but there will only be a blank space 🙁

No 32bit icon support in the AMC

The reason for this odd behaviour can be found in the configuration of the farm-discovery. I sometimes use LOCALHOST as the hostname for discovery. This is helpful in situations where you have roaming profiles and IIS is not installed on the XenApp servers.

But if you configure discovery that way there will be no 32bit icon option in the AMC.

Configured with LOCALHOST

If you change the discovery option back to the local server

Konfiguriert mit "Local Server"

the missing option reappeares again.

32bit icon support available

You can toggle that behaviour as you like. Admittedly this is not a common problem but it is odd and if you happen to see it, you will be warned…

Regards
Ecki

May 4th, 2010

Homedrive wird beim Login nicht verbunden (Vista/Windows 7) Homedrive fails silently to mount at logon (Vista/Windows 7)

Nach dem Update auf Vista/Windows 7 wird das UserHome Verzeichnis beim Login nicht mehr verbunden. Alle anderen Drivemappings, welche über das Logonscript eingerichtet werden, funktionieren normal. Das passiert immer dann, wenn das UserHome über das AD Userobjekt und nicht über GPO gemappt wird. Es werden keine Fehler geloggt und auch sonst finden sich keinerlei Hinweise auf die Ursache des Problems 🙁

Das Abschalten der UAC hilft zwar, sollte aber nicht die Lösung sein, da damit wieder weitere Sicherheitslücken aufgerissen werden.

Nicht direkt ein Citrix Problem, aber sehr nervig, wenn man darüber stolpert. Da ich einige Zeit für die Problemlösung benötigt habe, dachte ich mir, dass hier ein kleiner Hinweis angebracht ist.

Folgender Registry Key erlaubt das Mappen des UserHome Shares wieder:

Windows Registry Editor Version 5.00

[HKEY_LOCAL_MACHINE\SOFTWARE\Microsoft\Windows\CurrentVersion\Policies\System]
“EnableLinkedConnections”=dword:00000001

Die Lösung habe ich übrigens hier gefunden.

Gruss
Ecki

After the update to Vista/Windows 7, mapping of the UserHome drive fails silently at logon. All other drive mappings made by a logon script are successful. This happens always if the UserHome is mapped through the AD user-object. UserHome mapping configured by GPO is not affected. There are no error messages logged and it is hard to find a reason for this behavior 🙁

Disabling UAC helps, but should not be the final solution, since it opens up many security holes.

Not really a Citrix problem but annoying if you happen to stumble upon it. Since it took me some time to find a solution, i thought it might be a good idea to post it here.

The following registry key allows again for a successful UserHome mapping:

Windows Registry Editor Version 5.00

[HKEY_LOCAL_MACHINE\SOFTWARE\Microsoft\Windows\CurrentVersion\Policies\System]
“EnableLinkedConnections”=dword:00000001

The original solution has been posted here.

Regards
Ecki

July 2nd, 2009

Laptop und XenServer mit GNOME auf USB Disk Laptop and XenServer with GNOME on USB disk

Wäre es nicht toll, wenn man seine XenServer Umgebung auf einer USB Disk immer mit dabei haben könnte ?

Wenn die USB Disk direkt am eigenen Notebook laufen würde ?

Und wenn man nicht eine zusätzliche Maschine bräuchte, um den XenServer zu managen ?

Dass und wie das geht, habe ich in einem einfachen Tutorial dokumentiert. Dabei wird XenServer auf einer USB Disk an einem Laptop installiert, danach wird ein X Server und GNOME auf der USB Disk eingerichtet und anschliessend eine VM mit installiertem XenCenter über RDP aufgerufen.

Sozusagen eine “Demo in a box” 🙂

Das Dokument kann hier heruntergeladen werden: “XenServer_and_Gnome_on_your_USB_disk_DE.pdf”

Gruss
Ecki

Wouldn’t it be nice to have your XenServer environment allways with you on a USB disk ?

Wouldn’t it be nice, if this USB disk would function with your own notebook ?

And that you don’t need a second machine to run XenCenter on it ?

That this is possible and how to achieve this, is documented in my last tutorial. In this tutorial we will install XenServer on a USB harddisk attached to a laptop, then install X server and GNOME on this disk and then run an RDP session to a VM running on the XenServer and providing us with XenCenter.

A “demo in a box” 🙂

The tutorial can be downloaded here: “XenServer_and_Gnome_on_your_USB_disk_EN.pdf”
For the moment, this tutorial is availabel only in German, but i will upload an english version soon, so stay tuned…
The english version is now available too…

Regards
Ecki

March 24th, 2009

AAC und IE 8.0 AAC and IE 8.0

Vor wenigen Tagen wurde der IE 8.0 offiziell zum Download freigegeben. Da er demnächst auch als Windows Update verfügbar sein wird, werden schnell viele User mit diesem Browser auf bestehende AAC Deployments zugreifen wollen. Dies gestaltet sich in der Defaulteinstellung jedoch leider als problematisch. So sieht eine AAC Portalseite mit dem IE 8.0 aus:

Portal
OWA

Das Layout ist in der Höhe gestaucht, es fehlen daher viele Links und OWA ist praktisch nicht bedienbar 🙁

Eine kleine Anpassung der Datei C:\Inetpub\wwwroot\CitrixSessionInit\NUI.aspx läst die Darstellungsprobleme, indem es den IE 8.0 in den IE 7.0 Kompatibilitätsmodus zwingt.

Es genügt, im Header der Datei NUI.aspx folgende Zeile hinzuzufügen:

<meta http-equiv=”X-UA-Compatible” content=”IE=EmulateIE7″ />

Das könnte dann z. B. so aussehen:

<html xmlns="http://www.w3.org/1999/xhtml">
<head>
<title>Citrix Access Gateway</title>
<meta http-equiv="X-UA-Compatible" content="IE=EmulateIE7" />
<meta name="GENERATOR" content="Microsoft Visual Studio .NET 7.1" />
<meta name="CODE_LANGUAGE" content="C#" />
<meta name="vs_defaultClientScript" content="JavaScript" />
<meta name="vs_targetSchema" content="http://schemas.microsoft.com/intellisense/ie5" />
<link rel="SHORTCUT ICON" href="themes/default/images/favicon.ico" type="image/vnd.microsoft.icon" />
<base id="baseElement" href="" runat="server" />
<link id="cssElement" rel="stylesheet" href="" runat="server" />
<!--[if IE]>
<style type="text/css">

Und schon erscheint das Portal wieder in voller Pracht 🙂

Portal
OWA

Diese Anpassung stellt keine finale Lösung dar, sollte aber genügen, bis Citrix irgendwann einen Fix bereitstellt…

Gruss
Ecki

Some days ago, Microsoft officialy released IE 8.0. Since IE 8.0 will be available trough Windows Update soon, more and more users will hit existing AAC deployments with this browser. Unfortunately this is not working as expected. This is, how an AAC portal page looks like in IE 8.0 with default settings:

Portal
OWA

The layout is crushed, links are missing and OWA is nearly unusable 🙁

A small change in the file C:\Inetpub\wwwroot\CitrixSessionInit\NUI.aspx solves the display issue by forcing IE 8.0 into IE 7.0 compatibility mode.

It is sufficient to add the following line in the header of the NUI.aspx file:

<meta http-equiv=”X-UA-Compatible” content=”IE=EmulateIE7″ />

Your header might look like this after the change:

<html xmlns="http://www.w3.org/1999/xhtml">
<head>
<title>Citrix Access Gateway</title>
<meta http-equiv="X-UA-Compatible" content="IE=EmulateIE7" />
<meta name="GENERATOR" content="Microsoft Visual Studio .NET 7.1" />
<meta name="CODE_LANGUAGE" content="C#" />
<meta name="vs_defaultClientScript" content="JavaScript" />
<meta name="vs_targetSchema" content="http://schemas.microsoft.com/intellisense/ie5" />
<link rel="SHORTCUT ICON" href="themes/default/images/favicon.ico" type="image/vnd.microsoft.icon" />
<base id="baseElement" href="" runat="server" />
<link id="cssElement" rel="stylesheet" href="" runat="server" />
<!--[if IE]>
<style type="text/css">

Immediately your portal is rendered again as it should be 🙂

Portal
OWA

This is not a final solution for the problem, but until Citrix releases a fix for this issue it will do…

Regards
Ecki