Access

CTX-Blog

powered by Ecki's Place

October 21st, 2008

SmartCard Single Sign On mit PNAgent Smart Card Single Sign On with PNAgent

Alle verfügbaren Dokumentationen zum Thema “Single Sign On” oder “Credential passthrough” mit SmartCard und Citrix Clients beschränkt sich leider auf den Gebrauch der Program Neighborhood, wie folgende Anleitung von Brianmadden beispielhaft zeigt. Diesen Client setze ich bei Kundenprojekten aber seit Jahren nur noch in Ausnamefällen ein. Statt dessen verwende ich meistens den PNAgent, oder den Web Client.

Diese Clients entzogen sich aber bisher dem Passthrough der SmartCard PIN, da sie die APPSRV.INI ignorierten und daher die notwendigen Einstellungen nicht übernahmen.

Seit dem 10.0er Client findet sich im Installationsverzeichnis jedes Citrix Clients eine Datei “icaclient.adm”, ein Active Directory Group Policies Template, das die benötigten Optionen enthält. Seit dem Release 10.0 überprüft jeder ICA Client zuerst, ob eine entsprechende Policy konfiguriert wurde und übernimmt dann diese Einstellungen aus der Registry. Die Datei APPSRV.INI fungiert nur noch als Fallback, wenn keine Policy existiert. Dieses neue Client Feature ermöglicht nun endlich ein “Single Sign On” mit SmartCard und PNAgent.

Hier in Kürze die Schritte, die es dafür benötigt:

1. Auf dem Presentation Server /XenApp Server

  • Überprüfen, ob ein Login auf einen Desktop mittels SmartCard generell funktioniert. Für SmartCard-Passthrough muss in den Server-Eigenschaften die Option “Trust requests sent to the XML Service” aktiviert sein.

2. Auf dem Web Interface Server

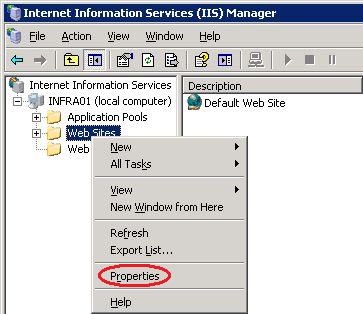
    • Hier muss SSL aktiviert (ein Web Server Zertifikat installiert) und das “Directory Service Mapping” aktiviert sein. Diese Option findet sich im IIS Manager unter den Eigenschaften des “Web Sites” Ordners:
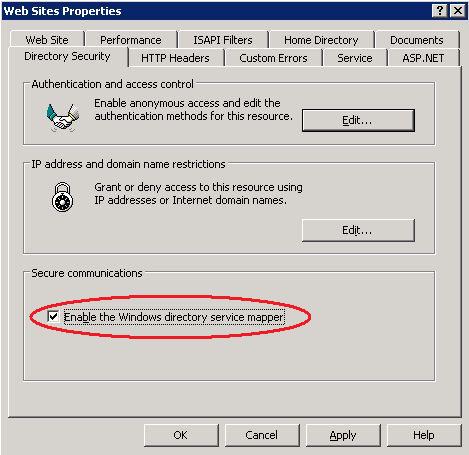
Web Sites EigenschaftenDirectory Service Mapper

  • In der Access Suite Management Console muss die PNAgent Web Site unter “Configure Authentication” auf “Smart Card with Passthrough” konfiguriert werden.

3. Registry

  • Überprüfen, ob unter HKLM\System\CurrentControlSet\Control\TerminalServer\WinStations\ICA-tcp der Wert UseDefaultGina auf 0 gesetzt ist (1 schaltet die CtxGina ab).

4. Active Directory Policy

    • Import des ADM Templates in eine beliebige Policy
    • Im User Teil der Policy müssen folgende Einstellungen gesetzt sein:
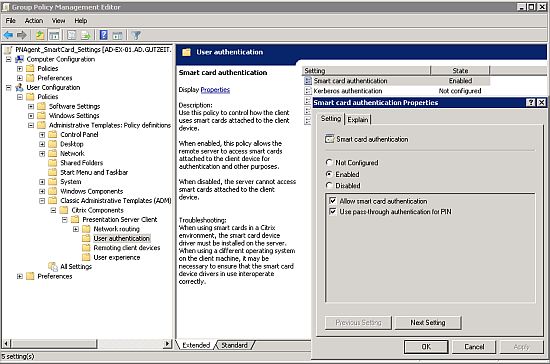
Citrix Policy

  • <PolicyName>\User Configuration\Administrative Templates\Citrix Components\Presentation Server Client\User Authentication\Smart Card Authentication muss “Enabled” werden und “Allow Smart Card Authentication” und “Use pass-through authentication for PIN” müssen aktiviert werden.
  • Alle weiteren Optionen bleiben unkonfiguriert, vorausgesetzt es sollen nur SmartCard Logins konfiguriert werden.

Jetzt sollte einem “Single Sign On” mit SmartCard und PNAgent nichts mehr im Wege stehen 😀

Diese Anleitung gilt leider nur für Windows XP und Server 2003. Vista und 2008 Server sind hier momentan explizit ausgenommen, da aktuell kein Citrix Client, einschliesslich 11.0, in der Lage ist, die SmartCard PIN unter diesen OS weiterzureichen 🙁

Hier noch ein paar interessante weiterführende Links:

Gruss
Ecki

All available documentation regarding “Single Sign On” or “Credential pass-through” with Smart Card and Citrix clients is limited to the Program Neighborhood client only, as can be seen exemplarily at Brianmadden . I don’t use this client in customer projects for a couple of years now but use the PNAgent or the Web client instead.

With these clients, a pass-through of the Smart Card PIN didn’t work, because they do not read their settings from the APPSRV.INI, which would allow for the neccessary settings.

Since client version 10.0, an Active Directory Group Policy Template can be found in every client installation directory, named “icaclient.adm”. All clients, starting with 10.0 now read the policy settings first and make use of the APPSRV.INI only in case, no policy is defined. This new feature allows now for a “Single Sign On” with SmartCard and PNAgent.

Here is, what you need to do, to get it up and running:

1. On the Presentation Server /XenApp Server

  • Confirm proper operation by logging in to a full desktop on the Citrix server. Insert a Smart Card and it should begin reading it. Enable “Trust requests sent to the XML Service”. This is necessary if using smart card pass through logon.

2. On the Web Interface Server

    • SSL must be configured and active (a web server certificate has to be installed) and the “Directory Service Mapping” has to be activated. This option can be found in the IIS Manager below the properties of the “Web Sites” folder:

Web Sites propertiesDirectory Service Mapper

  • The Web Interface site itself must now be configured. Open the Citrix Access Suite Management Console on the Web Interface server and run discovery if necessary to find the Web Interface site you wish to work with.
    Under “Configure Authentication” select “Smart Card with Passthrough”.

3. Registry

  • Check HKLM\System\CurrentControlSet\Control\TerminalServer\WinStations\ICA-tcp the value for “UseDefaultGina” should be 0 (1 disables the CtxGina).

4. Active Directory Policy

    • Import the ADM template into a Policy
    • Go to the “User Configuration” of the policy, leave the Computer part set to “not configured”. The following settings have to be enabled:

Citrix Policy

  • <PolicyName>\User Configuration\Administrative Templates\Citrix Components\Presentation Server Client\User Authentication\Smart Card Authentication has to be “Enabled” and “Allow Smart Card Authentication” and “Use pass-through authentication for PIN” have to be activated.
  • Leave everything else to “Not Configured”, provided that you are testing just Smart Card and PIN pass-through.

Now “Single Sign On” with Smart Card and PNAgent should work 😀

Unfortunately these instructions only work for Windows XP and Server 2003. At the moment, no Citrix client, including 11.0, allows for PIN pass-through with Vista and 2008 Server 🙁

Here are some more interesting links:

Regards
Ecki

July 29th, 2008

Update – AAC Tuning, Teil 4Update – AAC tuning, part 4

Das Dokument wurde ein wenig erweitert, nachdem ein Kunde einen sehr dunklen Blauton für den farbigen Querbalken verwenden wollte. Die Beschriftung des Balkens war daraufhin nicht mehr lesbar. Daher musste die Schriftfarbe innerhalb des Balkens auf Weiss gesetzt werden, um wieder für den nötigen Kontrast zu sorgen. Wie das geht wurde nun dem Dokument hinzugefügt.

Das HowTo steht wieder, der besseren Lesbarkeit wegen, als PDF zum Download zur Verfügung. Es kann hier heruntergeladen werden: AAC4_5_CustomizeLogonPoint_Rev1.1_DE.pdf

Gruss
Ecki

I had to upgrade the document, because a customer wanted to set the color of the bar to a dark blue. The caption inside the bar could not be read anymore after this change, so we had to change the color of the caption to white. This way we got the contrast needed back. How to do that is added to the document now.

The howto is written in german. A translation into english is not available at the moment. Since the pdf utilizes a lot of pictures, you might be able to understand it anyway. As soon as i find the time, i will provide a translated version. Until then, you can download the german version here: AAC4_5_CustomizeLogonPoint_Rev1.1_DE.pdf

Regards
Ecki

July 12th, 2008

AAC Tuning, Teil 4AAC tuning, part 4

Die Optik eines AAC Logon Points ist leider nicht so leicht an die CI einer Firma anpassbar, wie die des Citrix Web Interfaces. Wie es trotz fehlender Assistenten geht, möchte ich in dem folgenden PDF zeigen.

Das HowTo steht, der besseren Lesbarkeit wegen, als PDF zum Download zur Verfügung. Es kann hier heruntergeladen werden: AAC4_5_CustomizeLogonPoint_Rev1.1_DE.pdf

Das PDF beschreibt in detaillierten und bebilderten Einzelschritten den Weg zu einem individuellen AAC LogonPoint. Dieser könnte dann z. B. so aussehen:
Angepasster LogonPoint - LoginAngepasster LogonPoint - Portal

Weitere lesenswerte Dokumentationen zur Anpassung eines AAC LogonPoints finden sich hier:

Und hier noch ein aktuell interessanter Artikel zu FireFox 3.0:

Gruss
Ecki

To adjust the look of an AAC LogonPoint at the CI of a company is not as easy as it is with a Citrix Web Interface deployment. In the following PDF i will show you a way to get there anyway.

The howto is written in german. A translation into english is not available at the moment. Since the pdf utilizes a lot of pictures, you might be able to understand it anyway. As soon as i find the time, i will provide a translated version. Until then, you can download the german version here: AAC4_5_CustomizeLogonPoint_Rev1.1_DE.pdf

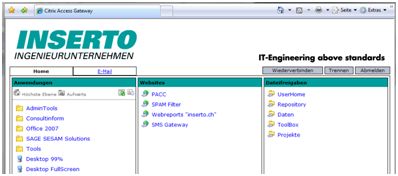
This is, what your LogonPoint could look like after reading this document:
Angepasster LogonPoint - LoginAngepasster LogonPoint - Portal

Additional documentation about customizing an AAC LogonPoint can be found here:

And here you can find a currently very interesting article about AAC and FireFox 3.0:

Regards
Ecki

June 18th, 2008

IE Kiosk Mode IE kiosk mode

Ich musste gerade bei einem Kunden dafür sorgen, dass der Internet Explorer ohne Navigationsleisten und sonstige Benutzerschnittstellen startet, um eine browserbasierte Applikation zum SmartCard Rollout zu veröffentlichen. Die Suche nach einer Lösung gestaltete sich hierbei schwieriger als erwartet.

Der häufigste Ansatz, den Google bei einer entsprechenden Anfrage ausspuckte, war der eingebaute “Kiosk Mode” des Internet Explorers. Der Modus wird durch den Aufruf des IE mit dem Parameter -k aktiviert, s. http://support.microsoft.com/kb/154780. Dieser Modus versetzt den IE in den Vollbild Modus, blendet aber, im Gegensatz zum Tastendruck F11, die Symbolleisten komplett aus. Ein Beenden des IE ist dann nur noch über Alt. + F4 möglich und auch die sonstige Bedienung beschränkt sich ausschliesslich auf Tastenkürzel. Eine eher endkundenuntaugliche Variante 🙁

Der nächste Ansatz waren Microsoft Group Policies, aber auch hier gab es zu viele Einschränkungen und Probleme. So lassen sich die Symbolleisten des IE nicht komplett per Policy ausblenden, sondern nur einzelne Icons, was wiederum Anpassungen in der Registry unter HKCU notwendig gemacht hätte, um die Symbolleisten komplett zu entfernen. Hier gehen die ansonsten ausufernden IE Policies eindeutig nicht weit genug 🙁

Die Lösung kam in Form einen VBS Objekts. Der Internet Explorer lässt sich über VBS ansprechen und steuern. Dies gab mir die Möglichkeit, auch das Erscheinungsbild des Browsers soweit anzupassen, dass sämtliche Steuerelemente ausgeblendet werden können, ohne wichtige Funktionen zu beeinträchtigen. Mit dem folgenden Code lässt sich nun ein IE mit einer vordefinierten URL starten und ein Ausbruch aus dieser Umgebung ist deutlich erschwert 🙂

DIM IE
Set IE = CreateObject("InternetExplorer.Application")
IE.Navigate "http://das.ist.die.anzuzeigende.url"
IE.Visible=True
IE.Toolbar=no
IE.Menubar=no
IE.Statusbar=no
IE.Width=750
IE.Height=600
IE.Resizable=yes
'IE.Top=5
'IE.Left=5

Auf den Eintrag IE.Navigate folgt hierbei die aufzurufende URL, wobei die gesamte URL in Anführungszeichen gesetzt sein muss. Optionale Parameter sind die Fenstergrösse (IE.Width/IE.Height) und die Position des Fensters auf dem Desktop (IE.Top/IE.Left).

IE Kiosk Mode

Das Script funktioniert sowohl unter Windows XP als auch 2003 Server problemlos. Unter Vista und 2008 Server sind Administrator Rechte notwendig, um den gewünschten Effekt zu erzielen!

Gruss
Ecki

I recently had a customer that wanted Internet Explorer to be published as a locked down version without toolbars and userinterface. The goal was to publish a browser based application to allow for a smart card rollout and not allowing users to browse away from this site. The search for a solution was harder than expected.

The solution most frequently found with Google was the built in “kiosk mode” of Internet Explorer. This mode can be activated by appending the parameter -k to the IE shortcut. For more details see http://support.microsoft.com/kb/154780. In this mode the IE starts in full screen mode, but without the ability to access the navigation panes, toolbars and menus as it would be possible when switching to full screen view by pressing F11. To end such a session, the user is forced to use the Alt. + F4 hotkey and all navigation in IE has to be done through hotkeys too. Not the solution we wanted for standard users 🙁

The next approach were Microsoft Group policies, but they too had too many constraints and issues. One issue here was, that there is no way, to hide the standard toolbars through group policies. It would have been therefore inevitable to manipulate the HKCU branch of the users registry at logon. This is a subject, where the otherwise “overloaded” IE policies are not detailed enough 🙁

The solution came through a VBS object. Internet Explorer can be addresses and controlled through VBS. This gave me the possibility to adjust the user interface of the IE and to hide all toolbars, navigation panes and menues, without disabling basic functionality. The following code starts IE with a predefined URL and makes it much more difficult for users to break out of the predefined environment 🙂

DIM IE
Set IE = CreateObject("InternetExplorer.Application")
IE.Navigate "http://this.is.the.url.to.be.shown"
IE.Visible=True
IE.Toolbar=no
IE.Menubar=no
IE.Statusbar=no
IE.Width=750
IE.Height=600
IE.Resizable=yes
'IE.Top=5
'IE.Left=5

The entry IE.Navigate stands for the target URL. Take care that the whole URL is surrounded by double quotes. Optional parameters are for the windows size (IE.Width/IE.Height) and the windows position on the users desktop (IE.Top/IE.Left).

IE kiosk mode

This script works perfect under Windows XP and 2003 Server. With Vista and 2008 Server administrative privileges are required!

Regards
Ecki

May 15th, 2008

CAG HotFix 4.5.7 Rev. A verfügbarCAG hotfix 4.5.7 Rev. A available

Seit wenigen Tagen steht eine aktualisierte Version des Hotfixes AG2000_v457 bei Citrix zum Download bereit. Diese Aktualisierung beseitigt eine Sicherheitslücke in der Access Gateway Implementierung der 4.5er Reihe. Es stehen Fixes für CAG 4.5.5, 4.5.6 und 4.5.7 zur Verfügung.

Vor allem Nutzer der SSL VPN Komponente des Access Gateways sollten den Fix schnellstmöglich einspielen.

Der Download und das ReadMe für das CAG 4.5.7 Rev. A sind hier zu finden: CTX117123, Hotfix AG2000_v457 Rev. A

Gruss
Ecki

A few days ago, Citrix released the hot fix AG2000_v457 Rev. A. This release fixes a security issue found in all 4.5 releases of the Access Gateway. Fixes for Access Gateway 4.5.5, 4.5.6 and 4.5.7 are available for download.

Especially if you use the SSL VPN feature of the Access Gateway, it is recommended to install this fix as soon as possible.

The download and readme for CAG 4.5.7 Rev. A can be found here: CTX117123, Hot fix AG2000_v457 Rev. A

Regards
Ecki

May 7th, 2008

AAC HotFix AAC450W003 und CAG HotFix 4.5.7 verfügbarAAC hotfix AAC450W003 and CAG hotfix 4.5.7 available

Seit wenigen Tagen stehen die Hotfixes AAC450W003 und Hotfix AG2000_v457 bei Citrix zum Download bereit. Neben einigen kleineren Bugfixes gibt es in diesen Releases weitere wirklich interessante Neuerungen:

Durch den AAC HotFix wird mein letzter Beitragt “AAC Tuning, Teil 3” teilweise entwertet. Genauer gesagt ist durch die Intervention, welche ich für einen Kunden durchgeführt habe, nun eine einfache Möglichkeit entstanden, den Beschreibungstext für das RADIUS-Eingabefeld nicht nur bei einem RSA, bzw. SafeWord Deployment einfach zu wechseln, sondern neu auch bei einer beliebigen RADIUS Implementation. Das Vorgehen aus dem ersten Abschnitt des Beitrags “AAC Tuning, Teil 3” behält daher seinen Gültigkeit, gilt aber nach der Installation des HotFixes AAC450W003 auch für alle RADIUS Lösungen.

Vista wird nun endlich, wenn auch nur im Beta Stadium, von AAC 4.5 unterstützt. Das heisst, es lassen sich nun auch Vista Clients via EPA-Scan überprüfen und klassifizieren. Erste Tests verliefen bereits positiv. ACHTUNG: Wenn EPA-Scans von EPAFactory/Accario eingesetzt werden, darf dieser Hotfix noch nicht eingespielt werden. Accario plant die Unterstützung von AAC 4.5 HF03 für voraussichtlich den 20. Mai.

Die Liste der unterstützten Virenscanner und Personal Firewalls wurde ergänzt. So sind nun endlich u. a. auch McAfee 8.5i, Symantec AVE 10.0, Symantec Endpoint Protection 11.0 und Trend Micro 8.0 offiziell von Citrix unterstützt.

Der Download und das ReadMe für AAC 4.5 sind hier zu finden: CTX117123, AAC45W003

Der Download und das ReadMe für das CAG 4.5.7 sind hier zu finden: CTX117123, Hotfix AG2000_v457

Gruss
Ecki

A few days ago, Citrix released the hotfixes AAC450W003 and hotfix AG2000_v457. Beside a couple of bug fixes, there are some really interesting things in these releases:

Hotfix AAC450W003 invalidates some parts of my last posting in “AAC tuning, part 3”. A couple of months ago, i asked Citrix to allow customers to change the caption of the RADIUS input box on the logon page. In my last article i showed a way to change the caption easily for RSA and SafeWord deployments and pointed out a way to change the text with a little script in case of another RADIUS solution. However this solution had some unwanted side effects and so i’m glad that Citrix came up with a solution for all deployments. The procedure described in the first section of “AAC tuning, part 3” stays valid but is now applicable for all RADIUS deployments too, given you installed hotfix AAC450W003 correctly.

Vista is now supported with AAC 4.5, but it is still beta. This means, that you are now able to check Vista clients through EPA-scans, provided by Citrix. My first tests have been successfull. CAUTION: If you use EPA-scans from EPAFactory/Accario you have to wait for an update from Accario to support AAC 4.5 HF03. This should be available around the 20th of Mai.

The list of supported AV scanner and personal firewalls has become a little longer. McAfee 8.5i, Symantec AVE 10.0, Symantec Endpoint Protection 11.0 and Trend Micro 8.0 are now officially supported at last.

The download and readme for AAC can be found here: CTX117123, AAC45W003

The download and readme for CAG 4.5.7 can be found here: CTX117123, Hotfix AG2000_v457

Regards
Ecki

December 15th, 2007

AAC Tuning, Teil 3 AAC tuning, part 3

Two Factor Authentication mit RSA, SafeWord oder einer beliebigen RADIUS Lösung ist eine gängige Methode zur sicheren Authentifizierung an einem AAC Deployment. AAC beschriftet das Eingabefeld für das RSA/SafeWord/RADIUS One Time Passwort bei einem deutschen Client jedoch starr mit dem Text “SecurID-PASSCODE”, “SafeWord CODE:” oder generisch mit “RADIUS-Passwort”.

Endbenutzer kennen ihre One Time Passwort Lösung jedoch meist unter einem anderem Namen, meist dem Namen des Herstellers. Dies kann dann zu Verwirrung und Problemen bei der Eingabe führen.

Dieses Problem lässt sich für RSA und SafeWord recht einfach lösen. Eine Lösung für RADIUS ist weiter unten beschrieben. Wie schon im ersten und zweiten Beitrag zu dieser Reihe, befindet sich der Schlüssel in der Datei “web.config” im Root des jeweiligen LogonPoint Verzeichnisses.

Auf einem Standard AAC Server vermutlich unter:

C:\Inetpub\wwwroot\CitrixLogonPoint\#LogonPointName#

Es existiert noch eine weitere Version dieser Datei unter “C:\Inetpub\wwwroot\CitrixLogonPoint\”, welche unberührt bleiben sollte !

Diese Datei lässt sich mit einem Editor wie z. B. NotePad öffnen und bearbeiten. Im letzten Drittel findet sich der Abschnitt <appSettings>, in dem diverse Einstellungen vorgenommen werden können. Unter Anderem lässt sich hier auch die Anzeige für das Eingabefeld des One Time Passwords manipulieren, so dass ein beliebiger Text angezeigt werden kann. Dazu genügt es, folgende Zeilen im <appSettings> Block einzufügen:

<add key=”SecondaryAuthenticationPromptOverride” value=”Password:” />
und
<add key=”SecondaryAuthenticationToolTipOverride” value=”Enter Password” />

Wobei “Password:” für den anzuzeigenden Text steht und “Enter Password” den Text für den Tool Tip festlegt.

Der Abschnitt sollte dann z. B. so aussehen:

<appSettings>
<add key="DebugConsoleTrace" value="False" />
<add key="AdvancedGatewayClientDownloadUrl" value="http://www.citrix.com" />
<add key="AdvancedGatewayClientActivationDelay" value="10" />
<add key="MaxConnectionsToAuthenticationService" value="20" />
<add key="LogonPointId" value="00000000-0000-0000-0000-000000000000" />
<add key="DeployedBy" value="LACONFIG" />
<add key="ExtendedSecurIdFunctionalityEnabled" value="true" />
<add key="SecondaryAuthenticationPromptOverride" value="SafeWord PIN + Zahlencode:" />
<add key="SecondaryAuthenticationToolTipOverride" value="PIN und Zahlencode eingeben" />
<!- -

Nach dem Speichern der Datei und einem Refresh des LogonPoints sollte der neue Text erscheinen 🙂

Dieses Vorgehen funktioniert leider nur bei RSA SecureID und SafeWord. Der Text, welcher bei einer RADIUS Lösung angezeigt wird, ist leider hart codiert und kann nicht so einfach geändert werden. Es gibt zwar bereits einen Feature Request bei Citrix, aber wann eine Lösung effektiv verfügbar sein wird, ist momentan noch nicht abzusehen.

Joel Donaldson hat im Citrix AAC Forum jedoch auch für diesen Fall eine tolle Umgehungs- / Übergangslösung veröffentlicht. Eine einfache Manipulation der Datei BasePage.aspx aus dem jeweiligen LogonPoint Verzeichnis läst das Problem auf elegante Art und Weise.

Es genügt, bei einem deutschen LogonPoint, folgenden Abschnitt vor dem </body> Tag einzufügen:

<script type="text/javascript" language="JavaScript">
document.body.innerHTML=document.body.innerHTML.replace("RADIUS-Kennwort:","Kobil Einmalpasswort:");
</script>

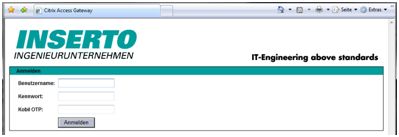
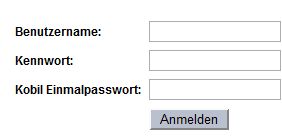
Das Ergbnis sieht dann so aus:
Loginprompt nach der Manipulation

Sollen auch englische LogonPoints unterstützt werden, hilft ein weiterer Code Block, der die englische Schreibweise berücksichtigt:

<script type="text/javascript" language="JavaScript">
document.body.innerHTML=document.body.innerHTML.replace("RADIUS Password:","Kobil OTP:");
</script>

Weitere Sprachen können so leicht hinzugefügt werden.

Wer sich nun fragt, warum das funktioniert, dem kann evtl. diese Erklärung weiterhelfen. Der Script Code sucht im Text der ausgelieferten Webseite nach dem String “RADIUS-Kennwort:” und ersetzt ihn dann durch den zweiten Parameter der Funktion “document.body.innerHTML.replace”, also in unserem Beispiel durch “Kobil Einmalpasswort:”.

Achtung, dies funktioniert nur, solange JavaScript im Browser aktiviert und erlaubt ist. Ist JavaScript abgeschaltet, erscheint wieder der ursprüngliche Text “RADIUS-Kennwort:”! Weitere Nebenwirkungen sind bei dieser Anpassung nicht zu befürchten.

< < AAC Tuning, Teil 2

!!! Bitte beachtet den ersten Kommentar zu diesem Beitrag !!!

Gruss
Ecki

Two Factor Authentication with RSA, SafeWord or any other third party RADIUS solution is a common way to authenticate in a secure manner to an AAC deployment. AAC however labels the input box for the OTP (One Time Password) fix with the text “SecurID-PASSCODE”, “SafeWord CODE:” oder generic with “RADIUS Password”.

Endusers however know their OTP solution most of the time with other names, the name of the RADIUS solution provider for example. This can lead to confusion during the login process.

This problem is easily solved for RSA SecureID and SafeWord. A solution for RADIUS is described further down. As in part 1 and 2, the solution can be found in the “web.config” file in the root of the respective LogonPoint directory.

On a standard AAC server this is presumably:

C:\Inetpub\wwwroot\CitrixLogonPoint\#LogonPointName#

There is an other version of this file in the “C:\Inetpub\wwwroot\CitrixLogonPoint\” directory which should stay untouched !

This file can be opened and edited with any editor like the Windows NotePad. In the last third of the file you can find a section <appSettings>, which gives you some interesting possibilities. Among other things you can configure the lables for the OTP field, so that it displays a text your users expect. All it needs, is to change the following line below the <appSettings> section:

<add key=”SecondaryAuthenticationPromptOverride” value=”Password:” />
and
<add key=”SecondaryAuthenticationToolTipOverride” value=”Enter Password” />

Where “Password:” stands for the text to be displayed as lable and “Enter Password” stands for the text, displayed as tool tip.

The section should look like this afterwards:

<appSettings>
<add key="DebugConsoleTrace" value="False" />
<add key="AdvancedGatewayClientDownloadUrl" value="http://www.citrix.com" />
<add key="AdvancedGatewayClientActivationDelay" value="10" />
<add key="MaxConnectionsToAuthenticationService" value="20" />
<add key="LogonPointId" value="00000000-0000-0000-0000-000000000000" />
<add key="DeployedBy" value="LACONFIG" />
<add key="ExtendedSecurIdFunctionalityEnabled" value="true" />
<add key="SecondaryAuthenticationPromptOverride" value="SafeWord PIN + Zahlencode:" />
<add key="SecondaryAuthenticationToolTipOverride" value="PIN und Zahlencode eingeben" />
<!- -

After saving the changes, a user calling this manipulated LogonPoint should now see the new lable.

This method unfortunately works only for RSA SecureID and SafeWord. The text displayed, when using a third party RADIUS solution is hard coded and not that easy to manipulate. There is a pending feature request at Citrix, but it isn’t clear, when a solution will be publicly available.

At last I found a very good work-around in the Citrix AAC Forum, published by Joel Donaldson. A simple manipulation of the BasePage.aspx file of the respective LogonPoint solves the problem in an elegant way.

With an english LogonPoint it is sufficient, to add the following paragraph before the </body> tag:

<script type="text/javascript" language="JavaScript">
document.body.innerHTML=document.body.innerHTML.replace("RADIUS Password:","Kobil Einmalpasswort:");
</script>

The result will look like this:
Loginprompt nach der Manipulation

If you want to support german LogonPoints also, you need another code block that respects the german notation:

<script type="text/javascript" language="JavaScript">
document.body.innerHTML=document.body.innerHTML.replace("RADIUS-Kennwort:","Kobil Einmalpasswort:");
</script>

Other languages can be added easily this way.

If someone is asking itself why this works, this short explanation may help. The script code is looking for the string “RADIUS Password:” in the delivered web page and replaces it with the second parameter of the function “document.body.innerHTML.replace”, in our example “Kobil OTP:”.

Attention, this works only, if JavaScript is enabled in the browser. If JavaScript is disabled, the original text “RADIUS Password:” is displayed. This modification shouldn’t have any other side effects.

< < AAC tuning, part 2

!!! Please read the first comment to this post !!!

Regards
Ecki

December 9th, 2007

Update: PNAgent Filter für Web Interface 4.6 Update: PNAgent Filter for Web Interface 4.6

Ich bin kürzlich in die Situation gekommen, den PNAgent Filter für das Web Interface 4.6 einsetzen zu müssen. Dabei stellte sich heraus, dass der eigentliche Code der Erweiterung für das WI 4.5 ohne Anpassungen auch unter dem WI 4.6 weiter funktioniert. Damit die Einrichtung aber so leicht bleibt, wie gewohnt, stelle ich das Update für das Web Interface 4.6 als weiteren Download zur Verfügung. So genügt es weiterhin, eine Datei auszutausche. Eine manuelle Änderung im Code ist nicht notwendig.

Download FilterApps4.6

Diese Modifikation des Web Interfaces ermäglicht es, Published Applications von der Anzeige im PNAgent auszuschliessen, indem der Description der Published Application ein “#” Zeichen vorangestellt wird. Nützlich, wenn der PNAgent z. B. zum Bestücken des Desktops und des Startmenüs verwendet wird, und man nicht möchte, dass der gepublishte Desktop dort, oder in den Eigenschaften des PNAgent Symbols in der Startleiste erscheint.

Siehe auch: PNAgent Filter für Web Interface 4.5

Gruss
Ecki

Not long ago, i had to implement the PNAgent Filter for Web Interface 4.6. It turned out, that the code itself of the modification didn’t need any changes from WI 4.5 to WI 4.6. To allow for an easy implementation, i nevertheless created an updated archive of the modification and updated the files for WI 4.6. Therefore all it needs is to replace one file, without the hassle to copy and paste code blocks to the right locations.

Download FilterApps4.6

This modification gives an administrator the power to hide Published Applications from the user. The only thing he has to do is adding a “#” sign in front of the application description. Very handy, if you use PNAgent to populate the Desktop and Start Menu and do not want the published Desktop to appear in the context menu of the PNAgent in the taskbar.

See also: PNAgent Filter for Web Interface 4.5

Regards
Ecki

November 22nd, 2007

Wie kann die Sprache des ICA Clients geändert werden How to change the ICA client language

Während der Installation kann der User seine bevorzugte Sprache für den ICA Client Version 10.x und höher, über einen Dialog auswählen.

Wenn die Sprache jedoch später geändert werden muss, kann dies einfach über die Kommandozeile gemacht werden.Dazu muss eine Eingabeaufforderung geöffnet werden und zum ICA Clientverzeichnis gewechselt werden. Der Befehl

Wfica32.exe /UserUILocale

cmd.exe

führt zur Anzeige einer Dialogbox, über die die benötigte Sprache ausgewählt und hinzugefügt werden kann.

MUI Einstellungen

Die Sprache die hier an erster Stelle steht, wird nun zur Anzeige der Client GUI verwendet.

Gruss
Ecki

Users can choose the user interface language of the ICA Client for Win32 10.x and above through a dialog box the ICA Client provides during installation.

If users want to change the Language after the installation this can be done from the command line. Simply open a command prompt, browse to the ICA Client directory and run

Wfica32.exe /UserUILocale

cmd.exe

Then add the required language and move it to the top of the list.

MUI settings

After a restart the ICA Client should appear with the new language selected.

Regards
Ecki

November 15th, 2007

Access Gateway HotFix 4.5.6Access Gateway hotfix 4.5.6

Ab sofort steht bei Citrix das Update 4.5.6 für das Access Gateway Standard zum Download zur Verfügung, welches wiederum einige unschöne Fehler ausbügelt. Bei älteren Versionen konnte es vorkommen, dass die Anzahl Sessions im “Real Time Monitor” und in der Statistik Anzeige nicht überein stimmten. Ausserdem sollte sich der SAC Client nun noch verlässlicher beenden, wenn sich ein User in einem AAC Deployment am Web Interface ausloggt.

Wenn das Access Gateway in einem AAC Deployment mit HotFix AAC450W001 betrieben wird, werden die User bei jedem Verbindungsaufbau gefragt, ob sie das ActiveX Control installieren wollen. Ursache ist folgender Abschnitt in der Datei “web.config”:

<add key="SACCodebase" value="net6helper.cab#version=4,5,0,122" />
</appSettings/>
</configuration/>

Die Versionsnummer muss bei der Version 4.5.6 auf den Wert 4,5,6,111 angepasst werden, damit die korrekte Versions- und Build-Nummer des SAC abgefragt wird.

Weitere Infos zu den Verbesserungen und der Download sind hier zu finden.

Gruss
Ecki

Citrix released HotFix 4.5.6 of the Access Gateway Standard, which eliminates another couple of bugs. Before the update to version 4.5.6 the number of connections from the Secure Access Client and Citrix Presentation Server Clients could be different in the Real-Time Monitor or on the Statistics tab in the Administration Tool. Another fix adresses this issue: When users are logged on to the Advanced Access Control option through the Access Gateway, when users logoff, the session is not disconnected. Users must manually disconnect by right-clicking the Secure Access Client and selecting Disconnect.

If the Access Gateway appliance is upgraded to version 4.5.6, and Access Gateway Advanced Edition with hotfix AAC450W001 is installed on a server in the internal network, users are prompted to install the ActiveX control each time a connection is created. Currently, the file web.config has the following at the end of the file:

<add key="SACCodebase" value="net6helper.cab#version=4,5,0,122" />
</appSettings/>
</configuration/>

The version number needs to be changed to the correct version and build number for 4.5.6, which is 4,5,6,111.

The full list of fixes and the download can be found here.

Regards
Ecki