Access

CTX-Blog

powered by Ecki's Place

July 12th, 2008

AAC Tuning, Teil 4AAC tuning, part 4

Die Optik eines AAC Logon Points ist leider nicht so leicht an die CI einer Firma anpassbar, wie die des Citrix Web Interfaces. Wie es trotz fehlender Assistenten geht, möchte ich in dem folgenden PDF zeigen.

Das HowTo steht, der besseren Lesbarkeit wegen, als PDF zum Download zur Verfügung. Es kann hier heruntergeladen werden: AAC4_5_CustomizeLogonPoint_Rev1.1_DE.pdf

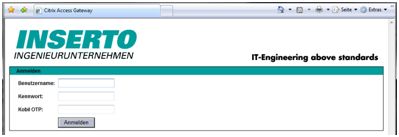
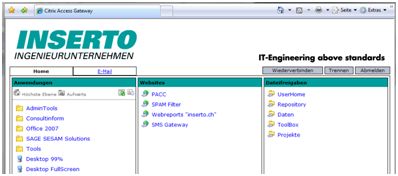
Das PDF beschreibt in detaillierten und bebilderten Einzelschritten den Weg zu einem individuellen AAC LogonPoint. Dieser könnte dann z. B. so aussehen:
Angepasster LogonPoint - LoginAngepasster LogonPoint - Portal

Weitere lesenswerte Dokumentationen zur Anpassung eines AAC LogonPoints finden sich hier:

Und hier noch ein aktuell interessanter Artikel zu FireFox 3.0:

Gruss
Ecki

To adjust the look of an AAC LogonPoint at the CI of a company is not as easy as it is with a Citrix Web Interface deployment. In the following PDF i will show you a way to get there anyway.

The howto is written in german. A translation into english is not available at the moment. Since the pdf utilizes a lot of pictures, you might be able to understand it anyway. As soon as i find the time, i will provide a translated version. Until then, you can download the german version here: AAC4_5_CustomizeLogonPoint_Rev1.1_DE.pdf

This is, what your LogonPoint could look like after reading this document:
Angepasster LogonPoint - LoginAngepasster LogonPoint - Portal

Additional documentation about customizing an AAC LogonPoint can be found here:

And here you can find a currently very interesting article about AAC and FireFox 3.0:

Regards
Ecki

December 15th, 2007

AAC Tuning, Teil 3 AAC tuning, part 3

Two Factor Authentication mit RSA, SafeWord oder einer beliebigen RADIUS Lösung ist eine gängige Methode zur sicheren Authentifizierung an einem AAC Deployment. AAC beschriftet das Eingabefeld für das RSA/SafeWord/RADIUS One Time Passwort bei einem deutschen Client jedoch starr mit dem Text “SecurID-PASSCODE”, “SafeWord CODE:” oder generisch mit “RADIUS-Passwort”.

Endbenutzer kennen ihre One Time Passwort Lösung jedoch meist unter einem anderem Namen, meist dem Namen des Herstellers. Dies kann dann zu Verwirrung und Problemen bei der Eingabe führen.

Dieses Problem lässt sich für RSA und SafeWord recht einfach lösen. Eine Lösung für RADIUS ist weiter unten beschrieben. Wie schon im ersten und zweiten Beitrag zu dieser Reihe, befindet sich der Schlüssel in der Datei “web.config” im Root des jeweiligen LogonPoint Verzeichnisses.

Auf einem Standard AAC Server vermutlich unter:

C:\Inetpub\wwwroot\CitrixLogonPoint\#LogonPointName#

Es existiert noch eine weitere Version dieser Datei unter “C:\Inetpub\wwwroot\CitrixLogonPoint\”, welche unberührt bleiben sollte !

Diese Datei lässt sich mit einem Editor wie z. B. NotePad öffnen und bearbeiten. Im letzten Drittel findet sich der Abschnitt <appSettings>, in dem diverse Einstellungen vorgenommen werden können. Unter Anderem lässt sich hier auch die Anzeige für das Eingabefeld des One Time Passwords manipulieren, so dass ein beliebiger Text angezeigt werden kann. Dazu genügt es, folgende Zeilen im <appSettings> Block einzufügen:

<add key=”SecondaryAuthenticationPromptOverride” value=”Password:” />
und
<add key=”SecondaryAuthenticationToolTipOverride” value=”Enter Password” />

Wobei “Password:” für den anzuzeigenden Text steht und “Enter Password” den Text für den Tool Tip festlegt.

Der Abschnitt sollte dann z. B. so aussehen:

<appSettings>
<add key="DebugConsoleTrace" value="False" />
<add key="AdvancedGatewayClientDownloadUrl" value="http://www.citrix.com" />
<add key="AdvancedGatewayClientActivationDelay" value="10" />
<add key="MaxConnectionsToAuthenticationService" value="20" />
<add key="LogonPointId" value="00000000-0000-0000-0000-000000000000" />
<add key="DeployedBy" value="LACONFIG" />
<add key="ExtendedSecurIdFunctionalityEnabled" value="true" />
<add key="SecondaryAuthenticationPromptOverride" value="SafeWord PIN + Zahlencode:" />
<add key="SecondaryAuthenticationToolTipOverride" value="PIN und Zahlencode eingeben" />
<!- -

Nach dem Speichern der Datei und einem Refresh des LogonPoints sollte der neue Text erscheinen 🙂

Dieses Vorgehen funktioniert leider nur bei RSA SecureID und SafeWord. Der Text, welcher bei einer RADIUS Lösung angezeigt wird, ist leider hart codiert und kann nicht so einfach geändert werden. Es gibt zwar bereits einen Feature Request bei Citrix, aber wann eine Lösung effektiv verfügbar sein wird, ist momentan noch nicht abzusehen.

Joel Donaldson hat im Citrix AAC Forum jedoch auch für diesen Fall eine tolle Umgehungs- / Übergangslösung veröffentlicht. Eine einfache Manipulation der Datei BasePage.aspx aus dem jeweiligen LogonPoint Verzeichnis läst das Problem auf elegante Art und Weise.

Es genügt, bei einem deutschen LogonPoint, folgenden Abschnitt vor dem </body> Tag einzufügen:

<script type="text/javascript" language="JavaScript">
document.body.innerHTML=document.body.innerHTML.replace("RADIUS-Kennwort:","Kobil Einmalpasswort:");
</script>

Das Ergbnis sieht dann so aus:
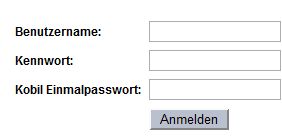
Loginprompt nach der Manipulation

Sollen auch englische LogonPoints unterstützt werden, hilft ein weiterer Code Block, der die englische Schreibweise berücksichtigt:

<script type="text/javascript" language="JavaScript">
document.body.innerHTML=document.body.innerHTML.replace("RADIUS Password:","Kobil OTP:");
</script>

Weitere Sprachen können so leicht hinzugefügt werden.

Wer sich nun fragt, warum das funktioniert, dem kann evtl. diese Erklärung weiterhelfen. Der Script Code sucht im Text der ausgelieferten Webseite nach dem String “RADIUS-Kennwort:” und ersetzt ihn dann durch den zweiten Parameter der Funktion “document.body.innerHTML.replace”, also in unserem Beispiel durch “Kobil Einmalpasswort:”.

Achtung, dies funktioniert nur, solange JavaScript im Browser aktiviert und erlaubt ist. Ist JavaScript abgeschaltet, erscheint wieder der ursprüngliche Text “RADIUS-Kennwort:”! Weitere Nebenwirkungen sind bei dieser Anpassung nicht zu befürchten.

< < AAC Tuning, Teil 2

!!! Bitte beachtet den ersten Kommentar zu diesem Beitrag !!!

Gruss
Ecki

Two Factor Authentication with RSA, SafeWord or any other third party RADIUS solution is a common way to authenticate in a secure manner to an AAC deployment. AAC however labels the input box for the OTP (One Time Password) fix with the text “SecurID-PASSCODE”, “SafeWord CODE:” oder generic with “RADIUS Password”.

Endusers however know their OTP solution most of the time with other names, the name of the RADIUS solution provider for example. This can lead to confusion during the login process.

This problem is easily solved for RSA SecureID and SafeWord. A solution for RADIUS is described further down. As in part 1 and 2, the solution can be found in the “web.config” file in the root of the respective LogonPoint directory.

On a standard AAC server this is presumably:

C:\Inetpub\wwwroot\CitrixLogonPoint\#LogonPointName#

There is an other version of this file in the “C:\Inetpub\wwwroot\CitrixLogonPoint\” directory which should stay untouched !

This file can be opened and edited with any editor like the Windows NotePad. In the last third of the file you can find a section <appSettings>, which gives you some interesting possibilities. Among other things you can configure the lables for the OTP field, so that it displays a text your users expect. All it needs, is to change the following line below the <appSettings> section:

<add key=”SecondaryAuthenticationPromptOverride” value=”Password:” />
and
<add key=”SecondaryAuthenticationToolTipOverride” value=”Enter Password” />

Where “Password:” stands for the text to be displayed as lable and “Enter Password” stands for the text, displayed as tool tip.

The section should look like this afterwards:

<appSettings>
<add key="DebugConsoleTrace" value="False" />
<add key="AdvancedGatewayClientDownloadUrl" value="http://www.citrix.com" />
<add key="AdvancedGatewayClientActivationDelay" value="10" />
<add key="MaxConnectionsToAuthenticationService" value="20" />
<add key="LogonPointId" value="00000000-0000-0000-0000-000000000000" />
<add key="DeployedBy" value="LACONFIG" />
<add key="ExtendedSecurIdFunctionalityEnabled" value="true" />
<add key="SecondaryAuthenticationPromptOverride" value="SafeWord PIN + Zahlencode:" />
<add key="SecondaryAuthenticationToolTipOverride" value="PIN und Zahlencode eingeben" />
<!- -

After saving the changes, a user calling this manipulated LogonPoint should now see the new lable.

This method unfortunately works only for RSA SecureID and SafeWord. The text displayed, when using a third party RADIUS solution is hard coded and not that easy to manipulate. There is a pending feature request at Citrix, but it isn’t clear, when a solution will be publicly available.

At last I found a very good work-around in the Citrix AAC Forum, published by Joel Donaldson. A simple manipulation of the BasePage.aspx file of the respective LogonPoint solves the problem in an elegant way.

With an english LogonPoint it is sufficient, to add the following paragraph before the </body> tag:

<script type="text/javascript" language="JavaScript">
document.body.innerHTML=document.body.innerHTML.replace("RADIUS Password:","Kobil Einmalpasswort:");
</script>

The result will look like this:
Loginprompt nach der Manipulation

If you want to support german LogonPoints also, you need another code block that respects the german notation:

<script type="text/javascript" language="JavaScript">
document.body.innerHTML=document.body.innerHTML.replace("RADIUS-Kennwort:","Kobil Einmalpasswort:");
</script>

Other languages can be added easily this way.

If someone is asking itself why this works, this short explanation may help. The script code is looking for the string “RADIUS Password:” in the delivered web page and replaces it with the second parameter of the function “document.body.innerHTML.replace”, in our example “Kobil OTP:”.

Attention, this works only, if JavaScript is enabled in the browser. If JavaScript is disabled, the original text “RADIUS Password:” is displayed. This modification shouldn’t have any other side effects.

< < AAC tuning, part 2

!!! Please read the first comment to this post !!!

Regards
Ecki
July 17th, 2007

LANMANServer und LANMANWorkstation Tuning LANMANServer and LANMANWorkstation Tuning

Bei Brian Madden bin ich auf ein sehr interessantes Dokument zum Thema Terminal Server Tuning gestossen. In diesem Artikel werden sämtliche relevanten LANMANServer und LANMANWorkstation Parameter und Registry Keys vorgestellt und erkärt, die in diesem Zusammenhang von Bedeutung sind.

Anschliessend werden mögliche Optimierungsmassnamen und deren Risiken besprochen und sogar ein ADM Template zur Verfügung gestellt, mit dem sich die besprochenen Optimierungen via GPO umsetzen lassen.

Der vollständige Artikel kann hier nachgelesen werden.

Gruss
Ecki

I recently stumbled across this realy good article about terminal server tuning. This article introduces and explains all the relevant LANMANServer and LANMANWorkstation parameters and registry keys.

Following that, the article discusses the potential optimizing actions and their risks and provides even an ADM template that allows to tune your environment through GPOs.

The complete article can be found here.

Regards
Ecki

May 28th, 2007

AAC Tuning, Teil 2 AAC tuning, part 2

AAC Admins, die RSA SecureID, SafeWord oder eine andere Two Factor Authentifizierungsmethode einsetzen, kennen das Dilemma. Durch den Token wird zwar die Sicherheit deutlich erhöht, wenn der Token aber mal nicht zur Hand ist, gibt es keinen Zugriff auf interne Ressourcen. Das muss nicht sein. Ein LogonPoint der für Two Factor Authentication konfiguriert wurde, erfordert nicht immer zwingend ein One Time Passwort.

Wie schon im ersten Beitrag zu dieser Reihe, befindet sich der Schlüssel in der Datei “web.config” im Root des jeweiligen LogonPoint Verzeichnisses.

Auf einem Standard AAC Server vermutlich unter:

C:\Inetpub\wwwroot\CitrixLogonPoint\#LogonPointName#

Es existiert noch eine weitere Version dieser Datei unter “C:\Inetpub\wwwroot\CitrixLogonPoint\”, welche unberührt bleiben sollte !

Diese Datei lässt sich mit einem Editor wie z. B. NotePad öffnen und bearbeiten. Im letzten Drittel findet sich der Abschnitt <appSettings>, in dem diverse Einstellungen vorgenommen werden können. Unter Anderem lässt sich hier auch die Two Factor Authentication so konfigurieren, dass ein One Time Passwort nicht mehr zwingend erforderlich ist. Dazu genügt es, folgende Zeile im <appSettings> Block zu ändern:

Von
<add key=”SecondaryAuthenticationIsOptional” value=“false” />
auf
<add key=”SecondaryAuthenticationIsOptional” value=“true” />

Der Abschnitt sollte dann so aussehen:

<appSettings>
<add key="DebugConsoleTrace" value="False" />
<add key="AdvancedGatewayClientDownloadUrl" value="http://www.citrix.com" />
<add key="AdvancedGatewayClientActivationDelay" value="10" />
<add key="MaxConnectionsToAuthenticationService" value="20" />
<add key="LogonPointId" value="00000000-0000-0000-0000-000000000000" />
<add key="DeployedBy" value="LACONFIG" />
<add key="ExtendedSecurIdFunctionalityEnabled" value="true" />
<add key="SecondaryAuthenticationIsOptional" value="true" />
<!- -

Nach dem Speichern der Datei sieht der User bei diesem einen LogonPoint nun zwar immer noch die Eingabemaske für RSA, SafeWord, etc., kann dieses Eingabefeld nun aber auch leer lassen und nur mit Username und Passwort einloggen.

Diese Manipulation reisst natürlich erst ein Mal ein grosses Loch in die Sicherheitseinstellungen der Installation. Um nun die Two Factor Authentication nicht völlig zu entwerten, muss an anderer Stelle nachgebessert werden. Mit Hilfe eines angepassten Filters und einer angepassten Policy kann die Sicherheit jedoch weiterhin hoch gehalten werden.

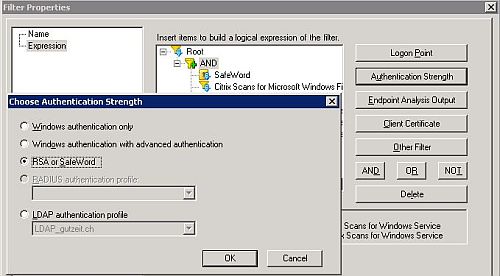
Der Filter für den vollwertigen Zugriff muss zwingend RSA, SafeWord, oder RADIUS als Authentifizierung voraussetzen. Dazu bietet der Filtergenerator den Punkt “Authentication Strength”. Nur wer eine starke Authentifizierung durchführt, bekommt Vollzugriff auf alle Ressourcen.

Authentication Strength

Hat der User sein Token ein Mal nicht im Zugriff, kann er sich trotzdem ohne One Time Passwort authentifiziert. Dann greift allerdings ein anderer Filter (identisch mit dem Filer für vollwertigen Zugriff, allerdings ohne Strong Authentication) und eine andere Policy, die den Zugriff restriktiver handhabt. So kann der User zumindest auf eine eingeschränkte Umgebung zugreifen und ist nicht zum Däumchen drehen verdammt 🙂

< < AAC Tuning, Teil 1 AAC Tuning, Teil 3 >>

!!! Bitte beachtet den ersten Kommentar zu diesem Beitrag !!!

Gruss
Ecki

AAC admins that deploy LogonPoints with RSA SecureID, SafeWord or any other Two Factor Authentication solution know the dilemma. The token realy boosts security, but if the token isn’t at hand, there is no way to access internal resources. Fortunately this is not imperativ. A LogonPoint configured with Two Factor Authentication must not always require a One Time Password.

As in part 1, the solution can be found in the “web.config” file in the root of the respective LogonPoint directory.

On a standard AAC server this is presumably:

C:\Inetpub\wwwroot\CitrixLogonPoint\#LogonPointName#

There is an other version of this file in the “C:\Inetpub\wwwroot\CitrixLogonPoint\” directory which should stay untouched !

This file can be opened and edited with any editor like the Windows NotePad. In the last third of the file you can find a section <appSettings>, which gives you some interesting possibilities. Among other things you can configure Two Factor Authentication such, that a One Time Password is not mandatory. All it needs is to change the following line below the <appSettings> section:

From
<add key=”SecondaryAuthenticationIsOptional” value=“false” />
to
<add key=”SecondaryAuthenticationIsOptional” value=“true” />

The section should look like this afterwards:

<appSettings>
<add key="DebugConsoleTrace" value="False" />
<add key="AdvancedGatewayClientDownloadUrl" value="http://www.citrix.com" />
<add key="AdvancedGatewayClientActivationDelay" value="10" />
<add key="MaxConnectionsToAuthenticationService" value="20" />
<add key="LogonPointId" value="00000000-0000-0000-0000-000000000000" />
<add key="DeployedBy" value="LACONFIG" />
<add key="ExtendedSecurIdFunctionalityEnabled" value="true" />
<add key="SecondaryAuthenticationIsOptional" value="true" />
<!- -

After saving the changes, a user calling this manipulated LogonPoint will still see the prompt for RSA, SafeWord, or RADIUS passcode, but he is now able to leave this field empty and log in with just his username and password.

This manipulation creates a big hole in your security configuration, but this hole can be easily closed again. All that is needed is to reconfigure your filters and policies.

The filter for full access must require RSA, SafeWord, or RADIUS authentication. Therefore the filter generator allows to use the authentication strength as a criteria. Only users using strong authentication get access to all resources.

Authentication Strength

A user that has no access to his token is nevertheless able to authenticate without a One Time Password. But now an other filter is matched (you can create the same filter as for full acces, but without strong authentication) and an other, more restrictive policy becomes active. This way, the user is at least able to work in a restricted environment, then to stop working 🙂

< < AAC tuning, part 1 AAC tuning, part 3 >>

!!! Please read the first comment to this post !!!

Regards
Ecki
May 23rd, 2007

AAC Tuning, Teil 1 AAC tuning, part 1

Welcher AAC Admin hat nicht schon einmal über das Verhalten des EPA-Scans geflucht. Sobald auch nur ein EPA-Scan in der AMC (Access Management Console) definiert ist, wird der EPA-Scan bei jedem LogonPoint automatisch gestartet, egal, ob er gebraucht wird, oder nicht.

Sehr lästig ist dieses Verhalten z. B. bei einem reinen OWA (Outlook Web Access) LogonPoint, der nichts anderes, als einen eingeschränkten Zugriff auf das persönliche Mailkonto bereitstellen soll. Damit er von Ãœberall her funktioniert und auch “Clientless” arbeitet, darf er natürlich keinen EPA-Scan voraussetzen. Trotzdem erscheint bei jedem Aufruf dieses LogonPoints der Download- und Installationshinweis für den EPA-Scan-Client. Ein beherzter Klick auf “Skip Scan” bringt einen zwar weiter, ohne den Client installieren zu müssen, der Download findet aber trotzdem jedes Mal im Hintergrund statt, sehr hinderlich, bei langsamen Internetverbindungen. Dazu kommt die Verunsicherung weniger computeraffiner Zeitgenossen, die u. U. endlos versuchen, auf eingeschränkten InternetCafe PC’s den EPA-Scan-Client zu installieren, was ihnen mangels Rechten nie gelingen wird…

Per Zufall bin ich kürzlich über eine Option gestolpert, die dieses Verhalten ändern kann. Gut versteckt und kaum dokumentiert, werden sie wohl bisher nur Wenige entdeckt haben. Der Schlüssel befindet sich in der Datei “web.config” im Root des jeweiligen LogonPoint Verzeichnisses.

Auf einem Standard AAC Server vermutlich unter:

C:\Inetpub\wwwroot\CitrixLogonPoint\#LogonPointName#

Es existiert noch eine weitere Version dieser Datei unter “C:\Inetpub\wwwroot\CitrixLogonPoint\”, welche unberührt bleiben sollte !

Diese Datei lässt sich mit einem Editor wie z. B. NotePad öffnen und bearbeiten. Im letzten Drittel findet sich der Abschnitt <appSettings>, in dem diverse Einstellungen vorgenommen werden können. Unter Anderem lässt sich hier auch der EPA-Scan deaktivieren. Dazu genügt es, folgende Zeile unter dem <appSettings> Block einzufügen:

<add key=”EndpointAnalysisDisabled” value=“true” />

Der Abschnitt sollte dann so aussehen:

<appSettings>
<add key="DebugConsoleTrace" value="False" />
<add key="AdvancedGatewayClientDownloadUrl" value="http://www.citrix.com" />
<add key="AdvancedGatewayClientActivationDelay" value="10" />
<add key="MaxConnectionsToAuthenticationService" value="20" />
<add key="LogonPointId" value="00000000-0000-0000-0000-000000000000" />
<add key="DeployedBy" value="LACONFIG" />
<add key="ExtendedSecurIdFunctionalityEnabled" value="true" />
<add key="SecondaryAuthenticationIsOptional" value="false" />
<add key="EndpointAnalysisDisabled" value="True" />
<!- -

Nach dem Speichern der Datei gelangt der User bei diesem einen LogonPoint nun direkt zur Eingabemaske für seinen Usernamen und sein Passwort, ohne Umweg über die EPA-Scan Zwischenseite 🙂

AAC Tuning, Teil 2 >>

!!! Bitte beachtet den ersten Kommentar zu diesem Beitrag !!!

Gruss
Ecki

Is there any AAC admin happy with the way, EPA scans behave? Once you create just one EPA scan in the AMC (Access Management Console), the EPA scan gets started automatically on every LogonPoint, regardless whether this is wanted/needed or not.

This behavior is for example very annoying at OWA (Outlook Web Access) LogonPoints, that are created only to allow restricted access to the personal mail from anywhere. To operate “client less” from anyplace, anywhere, no EPA scans may be required. On a standard LogonPoint the EPA scan appears anyway with his download and installation directions. If you click on the “Skip Scan” button, you can proceed without scanning your PC, but the download of the EPA scan client still takes place in the background, steeling you valuable bandwidth. In addition, less computer versed users in an internet cafe with restricted PCs might end up trying to install the EPA scan client over and over without a chance to succeed…

Recently I stumbled upon an option that is able to stop this “misbehavior”. Well hidden and badly documented, the chances are good, that only few people discovered this option so far. The solution can be found in the “web.config” file in the root of the respective LogonPoint directory.

On a standard AAC server this is presumably:

C:\Inetpub\wwwroot\CitrixLogonPoint\#LogonPointName#

There is an other version of this file in the “C:\Inetpub\wwwroot\CitrixLogonPoint\” directory which should stay untouched !

This file can be opened and edited with any editor like the Windows NotePad. In the last third of the file you can find a section <appSettings>, which gives you some interesting possibilities. Among other things you can disable EPA scans here. All it needs is to add the following line below the <appSettings> section:

<add key=”EndpointAnalysisDisabled” value=“true” />

The section should look like this afterwards:

<appSettings>
<add key="DebugConsoleTrace" value="False" />
<add key="AdvancedGatewayClientDownloadUrl" value="http://www.citrix.com" />
<add key="AdvancedGatewayClientActivationDelay" value="10" />
<add key="MaxConnectionsToAuthenticationService" value="20" />
<add key="LogonPointId" value="00000000-0000-0000-0000-000000000000" />
<add key="DeployedBy" value="LACONFIG" />
<add key="ExtendedSecurIdFunctionalityEnabled" value="true" />
<add key="SecondaryAuthenticationIsOptional" value="false" />
<add key="EndpointAnalysisDisabled" value="True" />
<!- -

After saving the changes, a user calling this manipulated LogonPoint will now be forwarded immediately to the login prompt without seeing any EPA “nag screen” 🙂

AAC tuning, part 2 >>

!!! Please read the first comment to this post !!!

Regards
Ecki

March 14th, 2007

Registry Scan (Watermark) mit CAG 4.5.x Advanced Registry Scan (Watermark) for CAG 4.5.x Advanced

Wer das Citrix Access Gateway (CAG) mit Advanced Access Control (AAC) schon eine Weile kennt, speziell die Version 4.2, kennt sicher auch den “Citrix Watermark” End Point Analysis Scan (EPA Scan). Eine Möglichkeit, über einen Registry Key die Zugehörigkeit zu einer bestimmten Sicherheitsgruppe zu definieren. Im Gegensatz zu MAC oder Domain Filtern war dieser Scan eine einfache Möglichkeit, schnell den Sicherheitskontext zu wechseln, um z. B. bei Produktdemonstrationen unterschiedliche Zugriffsszenarien vorführen zu können.

Das Update auf die AAC Version 4.2.5, bzw. auf die Version 4.5 brachte hier massive Änderungen im Bereich EPA Scans mit sich. Als einschneidendste Änderung kann die Verpflichtung zum Signieren aller EPA Scans gelten. Neu sind alle EPA Scans von Citrix bereits signiert. Selbst erstellt EPA Scans funktionieren nun ebenfalls nur noch, wenn sie signiert und damit als vertrauenswürdig gekennzeichnet sind. Diesen Aufwand und die damit verbundenen Kosten scheuen viele Kunden. Für Citrix Partner, die nur eine Demo Site aufbauen wollen, lohnt sich der Aufwand in der Regel ebenfalls nicht. Wer daher kein Geld in Custom Scans z. B. von EPAFactory stecken wollte, musste sich zwangsläufig mit den mitgelieferten EPA Scans arrangieren:-(

Hier möchte ich daher einen Weg aufzeigen, wie mit den vorhandenen Möglichkeiten trotzdem ein funktionierender Registry Scan zu erstellen ist. Die meisten EPA Scans machen tatsächlich nichts anderes, als in der Registry des Clients an vorkonfigurierten Stellen vorhandene Werte auszulesen. Daher kann prinzipiell fast jeder EPA Scan als Registry Scan verwendet werden. Als Beispiel verwende ich hier den mitgelieferten “Citrix Scans for Windows Update”. Dieser Scan liest auf dem Clientrechner rekursiv alle Keys unterhalb von:

HKEY_LOCAL_MACHINE\SOFTWARE\Microsoft\Updates\

aus und liefert die darin gefundenen KB-Nummern zurück. Zu beachten ist hier, dass Keys direkt unter dem o. g. Key NICHT zurückgeliefert werden. Man sollte sich daher einen vorhandenen Unterordner auswählen um den Key dort zu erstellen. Mit diesem Wissen lässt sich nun recht einfach ein Registry Scan erstellen. Wem diese Kurzanleitung nicht genügt, findet hier eine detaillierte Beschreibung mit Screenshots.

Gruss
Ecki

Most people who know Citrix Access Gateway (CAG) with Advanced Access Control (AAC) for a while, especially version 4.2, know the “Citrix Watermark” End Point Analysis Scan (EPA Scan). A possibility to configure the security group membership of a PC withe a simple registry key. In contrast to MAC or Domain filters, this scan made it very easy to change the security context of a PC, very handy for product demonstrations, where you want to visualize different access scenarios.

The update to AAC version 4.2.5, eg. version 4.5 introduced a massive change for EPA Scans. Since then, every EPA Scan has to be signed, which renders the unsigned “Watermark” scan worthless. Every EPA Scan delivered with AAC 4.5 is now already signed by Citrix and if you try to create your own EPA Scans, you have to sign them too and build your own specific EPA Scan MSI package. Lots of customers try to avoid this effort and the costs associated with signing certificates. For Citrix partners, trying to build just a demo site, the effort and the costs are too high as well. If you do not intend to spend money on Custom Scans for example from EPAFactory, you are stuck with the scans provided by Citrix:-(

I will therefore show a way, how you can accomplish a working registry scan with the means provided by a standard setup of AAC. Most EPA Scans do in fact nothing else than reading predefined keys in the registry of the client PC. Therefore almost any EPA Scan can be used as registry scan. As an example i will use the “Citrix Scans for Windows Update” shipped with AAC. This scan reads on a client PC recursively all keys beneath:

HKEY_LOCAL_MACHINE\SOFTWARE\Microsoft\Updates\

and reports back the KB-numbers found. It must be pointed out, that keys directly below the “Updates”-key are NOT delivered back to the AAC server. You should therefore use an existing key like “SP2” to create your own KB-number key. Knowing that, it is fairly simple to create your own registry scan. A detailed description with screen shots of this process can be found here (german only).

Regards
Ecki

|